Monday, January 25, 2021

Rachelle Anne Miller: Owl Be Your Friend Valentine's Day Card

Owls are symbols of wisdom, knowledge, protection, change, and transformation.  Owls are very common where I live (Northern California). Behind my house is a nursing facility where there are many palm and redwood trees. The owls like to nest in these trees so I hear and see them quite often. The baby owls are quite cute, just like these two from Rachelle Anne Miller's digital stamp called Owl Be Your Friend. Aren't they just adorable and perfect for a Valentine's Day card?

There is still time to enter the monthly challenge over at the Rachelle Anne Miller Digital Stamps fan page. All entries must be submitted by January 28. Join us and you may win a free stamp! Click here for all the details: Monthly Challenge.


The digital stamp is colored with Copic markers (colors listed below). I printed the sentiment from my computer. I used pattern papers from Crate Paper. I've had them in my stash for quite awhile.


Copic Markers Used:
Owl-Dark Brown: E37, E35, E34, E31
Owl-Light Brown: E42, E41, E40
Branch: E47, E44, E43
Leaves: YG97, YG17, YG13
Pink: RV14, RV13, RV11


I used a circle die from Stamp Anniething to cut out the owls and used the frame die to cut the white glitter paper for the circle frame. I used heart dies from Cricut and branch dies from Gina Marie Designs to embellish the card. I added a few pink enamel dots to finish the card.

Thank you for stopping by and I hope you give this card a try! It doesn't have to be just for Valentine's Day. This is a versatile stamp and can be used for many occasions. Have a wonderful day! 


Wednesday, January 20, 2021

Conie Fong Art & Design: Happy Valentine's Day Slimline Card

Most of my friends and family know that I love the color red. In the Chinese culture, red symbolizes luck, happiness, and joy. Red is the color I love for Valentine's Day cards. Today I am sharing a card made with Conie Fong's cute digital stamp, Bella Sending You Smiles.  


I colored her dress, tulips, and balloon in red using Copic markers (colors listed below). After I colored her, I fussy cut her out leaving a small white border. I stamped "Crazy 4 U" onto the balloon. This stamp is from Stamp Anniething.


Copic markers used:
Red: R59, R39, R24, R35, R22, R20, R30
Green: G28, YG67, YG63, YG03, YG11, RV42
White: T5, T3, T1, Blender
Bear's Cheeks: E93

The size of this slimline card is 3-1/4"W x 7-3/4"H. I used slimline rectangle dies and slimline scallop frame die from Stamp Anniething. I used gold cardstock for my mat and paint splattered it with black, red, and white acrylic paints. I cut out some red and white hearts for embellishments. I used MS-Word to type the sentiment and printed it on cardstock then cut it out using my paper trimmer. I added a red mat under the sentiment.

Bella and the sentiment are adhered to the card using foam squares. The rest of the elements are glued down flat.

This stamp is versatile and can be used for many occasions. All you have to do is change the sentiments. Fun and easy card to make. 


Thank you for stopping by and I hope you give this card a try. Have a wonderful day!


Monday, January 18, 2021

Stamp Anniething Design Team Day: Making Treat Boxes Using Shaker Basics Dies

Hello Everyone! One thing I love doing is getting the most use out of my products. I try to find other ways of using them other than what they're originally designed for. Today, I am sharing how you can use the Stamp Anniething Shaker Basics dies and the Shaker Tag Topper die to make treat boxes. It's so easy and something you can mass produce for parties. These treat boxes will fit 3-4 fun size candy bars.


For these treat boxes, I've used this month's stamp releases. The coloring information is in my previous blog posts so this post is on how to make the treat boxes using dies. The links for the chibi doll color details are as follows:

Supplies for the treat box:
Instructions:
  • For each box, die cut two tags and one circle.
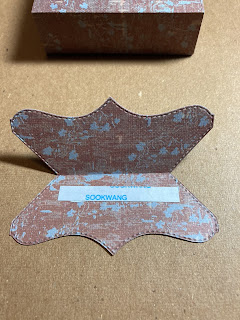
  • The tag topper die needs to be cut in one piece and should be the flip side of the two-sided patterned paper. To do this, cut a piece of patterned paper 3-3/4"W x 4"H and score at 2" on the long side. Place the bottom edge of the die over the fold so that it doesn't cut. The tag topper needs to be one piece with a fold in the middle.


  • Using a scoring board, score the bottom of both tags at 1".


  • Cut the circle die in half at 1-3/4" using a paper trimmer.

  • Score the half circles at 1" and 2-1/2"

  • Flip over the half circles and score at 1-3/4". This will form the side gussets for the box.

  • This is what you should now have and ready to assemble.


  • Add strong adhesive to the inside (bottom) of one of the tags. Place the other tag over it forming the bottom of the box.


  • Add strong adhesive to half circles making sure the gusset folds inward. Adhere to the front and back of the box to for the sides.


  • Add adhesive to one side of the tag and adhere to the top of box.

  • Using the two-way glue (either the Tombow or Zig), add to the flap and let it dry before continuing. The Tombow glue I used will dry clear. This is the reclosable flap so you only need a small dab. Make sure the glue is completely dry so that it becomes a removable bond and not permanent.


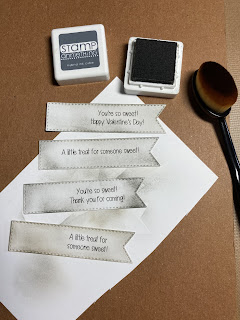
  • Using a Stamp Anniething Banner Die, cut the sentiments. Using the blending brush ink them with the with the hybrid ink to make them look distressed. 

  • Adhere the sentiment and your colored stamp (chibi) onto the box.


  • Tie some twine around the tag die and finish it with a bow.

  • Add the candy and close the flap. 


Your treat box is finished! You can decorate the box with heart die cuts, sequins, gems, and other embellishments. I like keeping it simple for safety reasons in case there are young children attending the party. 


Thank you for stopping by! I hope you give these treat boxes a try. Have a wonderful day! If you have any questions or comments, please leave them below. 


Sunday, January 17, 2021

Paper Nest Dolls: Raccoon Smooch

Valentine's Day cards are my favorite cards to make. I love using hearts and red is my favorite color. I am using one of my favorite stamps from Paper Nest Dolls called Raccoon Smooch. This stamp comes in a set of three stamps in red rubber or you can buy this particular one in digital format. 


I used Copic markers to color this stamp. So easy to color since it's only two color blends, gray and red! Colors are listed below.


Copic markers used:
Gray: W6, W5, W4, W3, W1, Blender
White: W3, W1, Blender
Red: RV17, RV14, RV13, RV11

This is a 6" x 6" card. I matted this card with patterned paper that I've had in my stash for years. I used heart dies and cut out a few different size hearts, a bow die, and a paper doily. No bow die? Just use ribbon. I typed up the sentiment, Hugs & Kisses, using MS-Word and printed it out. 


A fun, quick, and easy card to make and mass produce and the stamp makes it the cutest Valentine's Day card! Thank you for stopping by today. Have a great day! ~Betty~

Friday, January 15, 2021

Blank Page Muse - Geisha Collage Card with Rice Paper

Today I am using rice paper as the background for my card. The rice paper being used today for arts and crafts is not made out of rice. It is made from bark fibers of a mulberry tree. This rice paper is very thin, but strong since it is fibrous and makes a beautiful background for my card. Add a stamp from Blank Page Muse, and you have this gorgeous card! This red rubber stamp is called Geisha Collage and when stamped with black ink, it just makes it pop! This card will fit in an A7 size envelope.

This month's challenge theme is Vintage/Classic. This card is easy to make and can be done in less than an hour, but it looks like you spent hours making it. Try making this and entering it into the challenge to win a prize!


Supplies:
  • Blank Page Muse Stamp: Geisha Collage
  • Rice paper: Stamperia, Branch & Writings
  • Kraft cardstock (base card): 6"H x 4-5/8"W
  • White cardstock (card front): 5-3/4"H x 4-1/4"W
  • White cardstock (line inside card): 5-3/4"H x 4-1/4"W
  • Black cardstock (card mat): 4-3/8"H x 5-7/8"W
  • Black ink pad (dye or hybrid)
  • Glue stick - ensure it drys clear
  • Scissors
  • Distress ink - Vintage Photo
  • Distress ink applicator
  • Your favorite adhesive
  • Embellishments (optional)
    • D-ring picture hanger - I used Stampin' Up's Hodgepodge Hardware that has been retired. You can buy picture hangers at the hardware store that come in brass. Color it with a brown alcohol marker to make it look vintage.
    • Brad
    • Chinese coin - Purchased from my local craft store. You can find on Etsy.
    • Brown twine - 6 inches
    • 3 Black plastic rhinestones or enamel dots
Instructions:
  • First determine what part of the rice paper you want as the background. You can place your white card underneath the rice paper to assist you. Fold the rice paper over the cardstock to mark it or use a pencil. Do not cut yet!

  • Put an even layer of glue with the glue stick onto the white cardstock (card front). Cover the entire cardstock.
  • Adhere the cardstock onto the backside of the rice paper where you marked it.

  • Trim the rice paper leaving 1/2" all the way around.
  • Miter the corners by gluing them down (use glue stick) as shown below.

  • Glue (use glue stick) the edges down
  • Press down gently on the rice paper with your fingers to make sure the paper is adhered.
  • Stamp your image onto the rice paper. I used a stamp positioner to ensure the image is very dark.

  • Distress ink the edges of the rice paper.

  • Using a paper piercer, poke a hole into the card to add the picture hanger. Secure the picture hanger with the brad.

  • Using the twine, tie the coin to the picture hanger

  • Using your favorite adhesive, adhere the card front to the black cardstock then adhere onto the base card. Adhere the white cardstock to the inside of the card, add the rhinestones, and you are finished! 


I love using rice paper and will be making some more in the future. It's quick and easy and makes beautiful cards. I hope you will give it a try!  Thank you for stopping by and have a great day! ~Betty~


Tuesday, January 12, 2021

Rachelle Anne Miller Creative Studios: Let's Take an Adventure!

My friends and family know that I love elephants. I don't go hog wild collecting them, but I do have about a dozen in my house. I like the elephants with the trunk pointing up, because it represents and dispenses luck, energy, prosperity, and kindness. Trunks that point downward stores luck and energy and is a symbol of knowledge and wisdom. I guess it's a good idea to have both in the house. Today's card features Rachelle Anne Miller's digital stamp, Elephant Adventure. Such a cute stamp to put on a birthday, friendship, hello, bon voyage or note card! It's also perfect to add in your scrapbook and journal pages. 

We also have our monthly challenge over at the Rachelle Anne Miller Digital Stamps fan page. Join us and you may win a free stamp! Click here for all the details: Monthly Challenge.


This is an A6 size card (4-5/8" x 6-1/4"). Measurements are:
  • Card base: 9-1/4"W x 6-1/4"H, score at 4-5/8" and fold in half
  • Green mat: 6"W x 4-3/8"H
  • Animal print strip: 5-7/8"W x 1-1/4"H
  • White mat: 5-7/8"W x 4-1/4" H
  • Die cut mat (use patterned paper): 4-1/2"W x 3-1/2" H
  • Image mat: 4-1/8"W x 3-1/8" H
  • Image: 4"W x 3"H
I colored this stamp using Zig Clean Color Real Brush markers. I used Bristol paper since I like the smooth surface. 

Zig markers used:
  • Hair: Beige-072
  • Skin: Oatmeal-064, Flesh-071, Pale Pink-028
  • Cheeks: Light pink-025
  • Clothes: Orange-070, Green-040
  • Elephant: Gray Brown-094
  • Ground: Beige-072


I layered and adhered all the pieces together then added a few die cut leaves using the same patterned paper. The sentiment is part of the stamp. 


A cute and easy card to make. I hope you give it a try. Thank you for stopping by and have a wonderful day!