Wednesday, July 28, 2021

Blank Page Muse: Butterfly Breezes Slimline Card

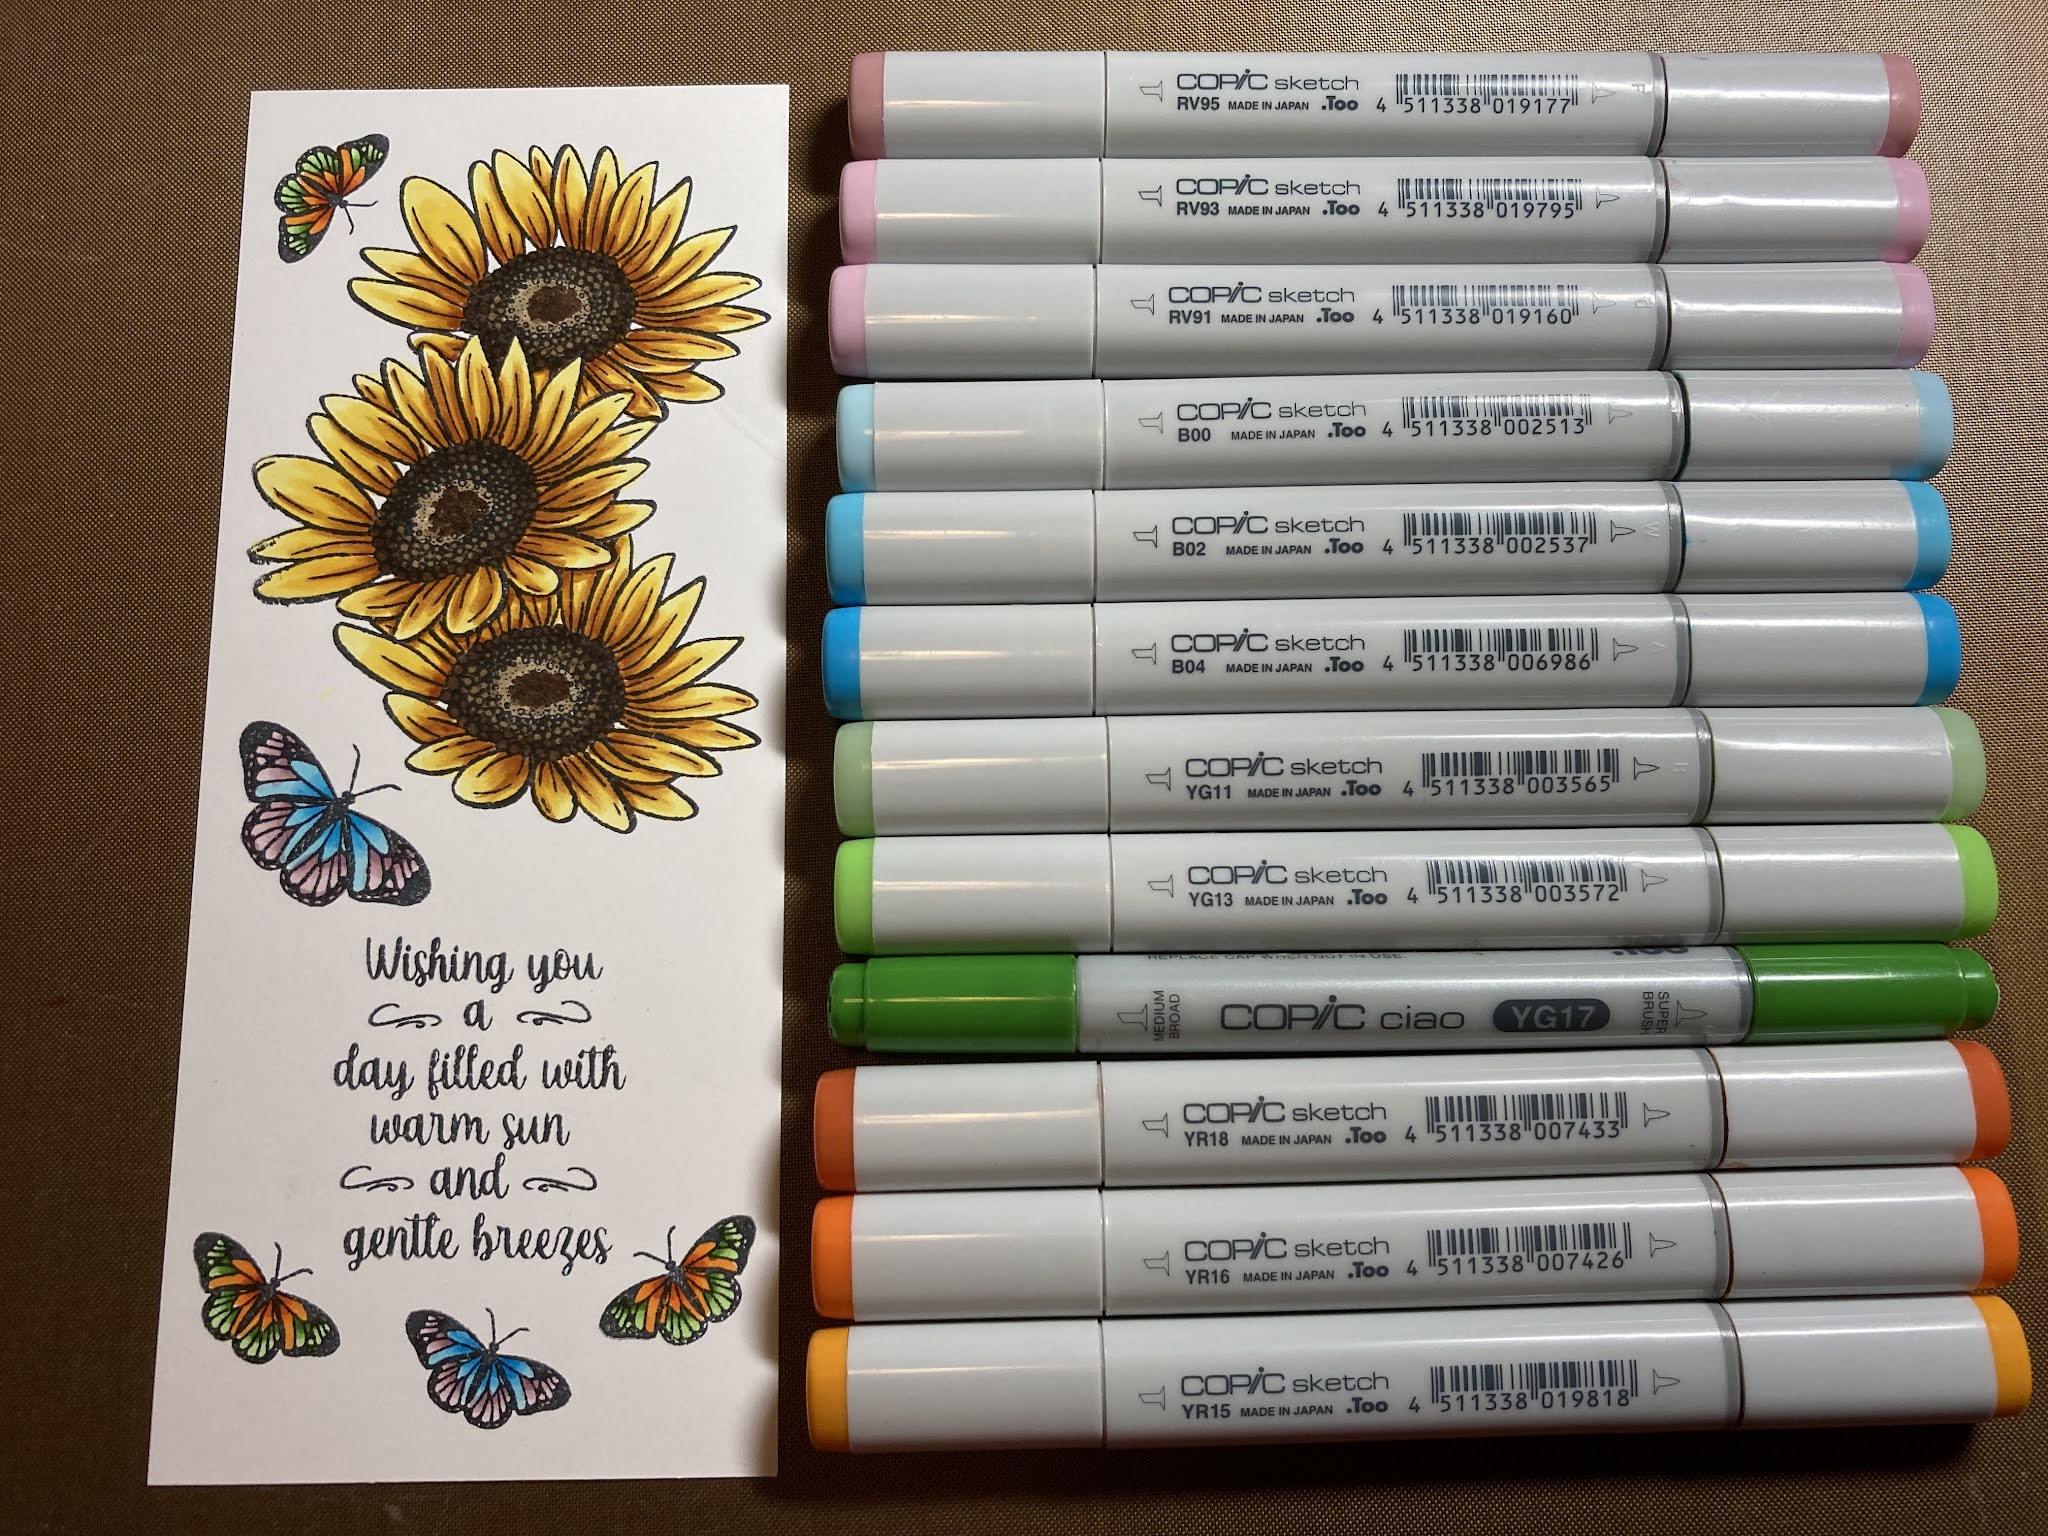
Butterflies in Chinese culture symbolizes love, beauty, and good luck. When you see Chinese paintings, you will most likely see butterflies in it. I am lucky to live in California where I see butterflies all the time. I love butterfly stamps and this set from Blank Page Muse called Butterfly Breezes Clear Stamp Set is so beautiful! It comes with three butterflies, a large sunflower, and a sentiment! I used two of the butterflies on my slimline card, the sentiment, and the sunflower three times. 


Supplies:
  • Blank Page Muse Butterfly Breezes Clear Stamp Set
  • Slimline card base 3-3/8"W x 7-7/8"H (cut paper 6-5/8"W x 7-7/8"H, fold in half)
  • Black cardstock mat 3-1/8"W x 7-3/4"H
  • White cardstock card front 3"W x 7-5/8"H
  • Black stamp pad
  • Stamping block or stamp positioner
  • Masking tape
  • Favorite coloring medium (I used Copic Markers)
  • Sparkle Pen (I used Spectrum Noir Sparkle pen)
  • Your favorite adhesive
Instructions:
  • Stamp two sunflowers on masking tape, then fussy cut them out.


  • Stamp one sunflower toward the top of the card front. Place one of the masks on top.
  • Stamp the second sunflower below the first sunflower, leaving room in the middle for another one to overlap. Place the other mask on this sunflower.
  • Stamp the third sunflower in the middle overlapping the other two sunflowers.
  • Remove the masks.
  • Stamp the sentiment.
  • Randomly stamp butterflies on your card. 
  • It's time to color! Use your favorite coloring medium. I used Copic markers. Colors are listed below.

Copic Markers Used
Sunflowers: YR27, YR24, Y15, Y11
Butterflies: RV95, RV93, RV91, B00, B02, B04, 
YG11, YG13, YG17, YR18, YR16, YR15
  • Adhere the card front to the black cardstock mat, then adhere to the card base.
  • Add some sparkle to the butterflies with a sparkle pen. The beautiful card is finished! 

Thank you for visiting my blog today! Blank Page Muse has lots of red rubber stamps and is now starting to carry clear stamps. Please take a look at all the stamps, papers, and stencils, etc. they have to offer!  Everyone have a creative week!  

Looking for more Inspiration? Click the links below!
The Blank Page Muse Shop https://blankpagemuse.com/

Monday, July 26, 2021

Paper Nest Dolls: Making Memories

I haven't done any traveling since the COVID pandemic started and my family decided to wait until 2022. We had an Alaskan cruise scheduled in May of 2020 that was canceled. Our goal is to go sometime next year. As soon as we get our cruise booked, I will start packing my bags so I don't forget anything. I will try not to over pack like Emma on my card, LOL! This stamp is from Paper Nest Dolls called Bon Voyage Emma. I used a sentiment from Whimsy Stamps to make this card versatile so it can be used for any going-away occasion.


I first stamped and colored Bon Voyage Emma with Copic markers, Prismacolor pencils, and Arteza glitter and metallic pens. It is fun to color with a variety of mediums.


Medium & Colors Used

Skin: Copic E15, E13, E11, E21, E00
Hair: Copic E59, E57, E31
Shirt and Bows: Prismacolor PC1006, PC992; Arteza Glitter Pen - Pink
Skirt: Prismacolor PC1063, PC929, PC928; Arteza Glitter Pen - Pink
Teddy Bear: Prismacolor PC946, PC943
Suitcase (Gray): PC1056, PC1054, PC1051; Arteza Metallic Pen - Silver
Suitcase (Teal): PC PC1006, PC992; Arteza Metallic Pen - Silver
Tags: Prismacolor PC929, PC928
Grass: Copic G17, G09, Prismacolor PC992 (undercoat)
Flower: Arteza Glitter Pen Pink and Green

The patterned paper is from Freepik, Designed by macrovector. The pink and teal papers are from Photoplay.  I cut all papers to fit an A6 card. I used a wacky stitch die from Gina Marie Designs to cut out a mat/frame for the colored image. To finish the card, I added some enamel dots from my stash.


Thank you for stopping by and I hope you all have a creative week! 


Wednesday, July 21, 2021

Guest Designing for Copic for ALLE: #steampunk

I am sharing my second project as the July guest designer for Copic for ALLE. The color challenge for this month is black, gray, and white. I thought this steampunk chibi doll from Stamp Anniething, called Maggie Steampunk, was the perfect stamp to make a black, gray, and white card. 


I used Copic markers to color the stamp. I used a combination of C series and W series markers. 


Copic markers used
Skin: W6, W4, W2, W1, W00
Hair: C9, C7, C5, C3
Clothes and shoes: C7, C5, C3, C1, C00
Hat: C7, C5, C3, C1
Goggles: W6, W5, W2
Ground: W3, W1, W0

I used a Gina Marie Designs oval die to cut her out. I used gear and cog dies from Tim Holz and distressed them with Distress Inks in Black Soot and Hickory Smoke. I stamped the sentiment, trimmed it, and added a black mat. 

I added a black mat to the card front, adhered it to an A2 card base and the card was finished. 


Thank you for visiting and have a creative week!

Monday, July 19, 2021

Stamp Anniething: Aloha!

Hawaii is one of my favorite vacation spots to visit. Everyone is so friendly and the local Hawaiian food is always so good. With this COVID pandemic, I've decided not to do any traveling until next year, but it doesn't mean I can't dream and make some cute cards to remind me of Hawaii! 

Today's A6 card features the cute stamp, Vanessa - Coconut Drink, the Tiki Hut Stencil Builder, the Palm Tree Die, and the Cloud Stencil Builder. Also, I used two word dies, All Star and Hello, to form the word Aloha then cut it out using the new Glitter Paradise Paper


To make this card, I first stamped Vanessa, fussy cut her out, then colored her with Copic markers.


Copic markers used
Hair: E49, E39, E35, E34, E31
Skin: E15, E13, E11, E21, E00
Tongue: R22, R20
Cheeks: R20
Purple: V17, V15, V12
Pink: RV17, RV14, RV10
Brown (Coconut): E17, E13, E11
White: T1, 0

I stenciled the tiki hut using the new Tiki Hut Stencil Builder and Distress Inks in Scattered Straw, Brushed Corduroy, Ground Espresso, and Black Soot. Then I used Copic markers in BG000 and BG10 to create and color the ocean. I then used Copic marker B41 to color the sky then used the Cloud Stencil Builder and Oxide Inks in Stormy Sky to create the clouds. 

I used one of the Palm Tree Dies to create the palm tree with coconuts. For the palm tree trunk and coconuts, I used Copic markers E37, E35, E34 and for the palm leaves, I used G28, G17, G05, G14.

I cut out the word Aloha using two other word dies,  All Star and Hello, using the new Glitter Paradise Paper. 

To finish the card, I cut out three seagulls using a die from Gina Marie Designs.

This is a fun card to make. I hope you give it a try! Have a creative week!

Friday, July 16, 2021

Blank Page Muse: Christmas in July! Gnome Holiday Card

Some countries in the Southern Hemisphere, such as Australia, celebrate Christmas in July since it's summer there in December. To have more of a winter feel, these countries will have an unofficial holiday in July. How fun is that?! So for those celebrating Christmas in July, I've made this holiday card using a stamp from Blank Page Muse called Sir Holiday Gnome Tree - No Place Like Gnome Words designed by Pam Bray. This is a five piece stamp set that you can combine or use alone to make holiday and winter cards.


Supplies:
  • Blank Page Muse Sir Holiday Gnome Tree - No Place Like Gnome Words stamp
  • A6 white card base
  • Black card mat cut to cut to 4-3/8"W x 6-1/8""H
  • Green patterned paper cut to 4-1/4"W x 6"H
  • White cardstock die cut in oval shape 3-3/4"W x 4-7/8"H
  • White cardstock to stamp stars and sentiment (sentiment of choice on front of card is optional)
  • Black cardstock to mat the sentiment on front of card (optional)
  • Coloring medium of choice. I used Copic markers.
  • Black fine tip marker
  • Black stamp pad
  • Two different shade of green stamp pads. I used Distress Oxides in Mowed Lawn and Lucky Clover.
  • Masking tape/paper
  • Red Glitter gel pen
  • Clear Glitter pen
  • Optional embellishments: Enamel dots
 Instructions: 
  • Using a stamp positioner or stamp block, stamp one tree and the gnome.
  • Color the gnome with your favorite coloring medium. I used Copic markers.

Copic markers used
Skin: E13, E11, E21, E00
Red: R39, R37, R35, R32
Gray: C5, C3, C1, C00
White: C5, C1, C00, 0
Snow: T3, T1, T0
Sky: BV00, B00, B000
Stars: YR24, Y17, Y15, White gel pen
Holly: G17, G14, R29, R22
  • After coloring the gnome, I used a Copic Multi-liner to add in more hair for the beard 
  • Using masking tape or paper, stamp another gnome and mask it
  • Stamp the second tree with a different shade of green
  • Peel off the masking tape
  • Add in the snow
  • Add the sky
  • Stamp and color two stars, then fussy cut them out
  • Adhere the stars to the top of the trees
  • Using a red glitter gel pen, add ornaments to the trees
  • Using the A6 card base, stamp the sentiment and holly inside the card
  • Color the holly
  • Optional: Add a sentiment to the front of the card
  • Optional: Add enamel dots to the front of the card

Thank you for visiting! I hope this card reminds you it's time to start your Christmas cards. This one is easy and fun to make so I hope you give it a try. Have a great and creative week!


Thursday, July 15, 2021

Scrappy Boy Stamps New Release: Coffee Girls Stamp Set

Today is release day for the Coffee Girls stamp set at Scrappy Boy Stamps! Inspired by the TV show, Gilmore Girls, the "Coffee Girls" stamp set has 4 character stamps (Lorelai, Rory, Sookie, and Luke), 7 accessories stamps, and 14 sentiment stamps that can be mixed and matched. The stamps also come with coordinating outline dies. If you haven't seen my sneak peek card of all the characters, check out this link: Sneak Peak Coffee Girls


For this mini-slimline card, I wanted to showcase Luke and the accessories stamps associated with him. Inspired by Luke's Diner from the Gilmore Girls, I stamped the coffee mugs in a stacked set to add some interest. I punched out black circles using a 1-3/4" circle punch to use as mats behind the stamps. I colored all the stamps with Copic markers.


Copic Markers Used

Luke
Skin: E04, E11, E21, E00, E000
Hair: E29, E25, E21
Red: R37, R24, R22
Green: G99. G94, G82
Brown: E18, E15, E13, E11
Coffee Pot: B00
Black Copic Multi-liner for lines on shirt

Coffee Cups
Blue: B97, B95, B93
Green: G09, G07, YG06
Red: R39, R29, R24

Luke's Sign
E25, YR24, Y38, Y17

No Cell Phones Sign
R39, R29, R24, R22


This is such a fun and fabulous stamp set. So many different cards can be made with the various sentiments. A must have stamp set for your collection! 

Thank you for stopping by and wishing you a very creative week! 

Wednesday, July 14, 2021

Guest Designing for Copic for ALLE: Heartfelt Wishes

What an honor to be guest designing again for the Facebook Group, Copic for ALLE. This month's challenge colors are Black, White, and Gray, so I've colored this beautiful digital stamp from Power Poppy by Marcella Hawley called Azaleas Forever. Instead of coloring the entire stamp, I decided to use one of the budding flowers and blow it up in size and color the entire bud like a flower (including the leaves!). What resulted was this beautiful black and white 4.5" x 4.5" square card. 


I colored the flower with Copic markers. The colors used are T7, T5, T2, and T0. The sentiment is from a new stamp set called Lily Pad and Dragonfly from Stamp Anniething. 


Thank you for stopping by and please visit the Copic for ALLE Facebook Group and enter this month's challenge using black, white, and gray colors. 


Tuesday, July 13, 2021

Conie Fong Art & Design: It's Christmas in July! Poinsettia Gnome

My friends in Australia are celebrating Christmas in July since it's Winter there now. They told me they want to have a wintery celebration. It's hard to image it being cold and rainy while we are going through a heat wave and having temperatures well over 100 this week here in California! I do like getting started early on making a few Christmas cards, so I thought July was a great month to get a few made. 

Today's mini-slimline card showcases the adorable Poinsettia Gnome digital stamp by Conie Fong Art & Design. This stamp set comes with two additional poinsettias, which I used one several times on my card.


I used Microsoft Publisher and imported the digital stamps to create this card. I colored the stamps using Copic markers.


Copic Markers Used
Skin: E13, E11, E21, E00
Cheeks: R20
Beard & White: T7, T5, T3, T1
Red: R59, R29, R24, R22
Green: G17, G07, YG13
Yellow: YR24, Y17, Y15
Blue: B18, B14, B12
Ground: E33, E31


To finish the card, I printed a sentiment and used a banner die from Stamp Anniething to cut it out, along with a red card stock mat. I also added a few enamel dots from my stash.


Thank you for visiting and wishing all those that celebrate Christmas in July, a very Merry Christmas! 


Monday, July 12, 2021

Scrappy Boy Stamps: Sneak Peek! Coffee Girls

It's Sneak Peek time over at Scrappy Boy Stamps and I have the most fabulous stamp set to show you! Inspired by the TV show, Gilmore Girls, the "Coffee Girls" stamp set has 4 character stamps (Lorelai, Rory, Sookie, and Luke), 7 accessories stamps, and 14 sentiment stamps that can be mixed and matched. The stamps also come with coordinating outline dies. I created this slimline card showcasing all the character stamps and the town's sign.

The "Coffee Girls" stamp set will be available on release day, Thursday, July 15, 2021 in the Scrappy Boy Stamps store. 


I stamped and used the outline die to cut out each stamp then colored them with Copic markers. 


Copic Markers Used

Luke
Skin: E04, E11, E21, E00, E000
Hair: E29, E25, E21
Red: R37, R24, R22
Blue: B99, B97, B95, B93, B21
Brown: E18, E15, E13, E11
Coffee Pot: B00
Black Copic Multi-liner for lines on shirt

Sookie
Skin: E04, E11, E21, E00, E000
Hair: E18, E08, YR18, YR14
Blue: B99, B97, B95, B93, B21
Pink: R85, R83, R81
White: C5, C3, C1
Wine Glass: B00, B000, R85


Rory
Skin: E04, E11, E21, E00, E000
Hair: E29, E39, YR27, YR24, Y32
Blue: B99, B95, B93, B21
Red: R37, R24, R22
White: T5, T2
Mouth: R22, R30
White gel pen for lines on skirt

Lorelai
Skin: E04, E11, E21, E00, E000
Hair: E47, E35, E55, E42
Blue Jeans: B99, B97, B93, B21
Purple: V17, V15, V12, V01
White: T3, T1, Blender
Brown: E18, E15, E13, E11


Stars Hollow Sign
Blue: B97, B95, B93
White: C5, C3, C1, C00
Stamped and embossed with white embossing powder

For the background, I used a cloud stencil and Distress Oxides in Mermaid Lagoon, Tumbled Glass, and Stormy Sky for the clouds and a grass stencil and Distress Oxide in Mowed Lawn for the grass. Both stencils are from Stamp Anniething.

To finish the card, I stamped the sentiment and added a few enamel dots. 


Thank you for stopping by! Have a creative week! 

Friday, July 9, 2021

Stamp Anniething: Sneak Peek Day 3 - Roman

Welcome to Day 3 and the final day of Stamp Anniething's Sneak Peeks! In keeping with this month's theme, "Romans," today's slimline card features the handsome soldier Roman and the Hello Bold word die. In addition, I am featuring an awesome new stencil, the Colosseum Stencil Builder! So fun to use!


I first stamped Roman and the spear then cut them out using the coordinating outline die. I then colored them with Copic markers. 


Copic Markers Used
Skin: E04, E11, E21, E00, E000
Cheeks: R20
Tongue: R22, R20
Gold: YR23, Y17, Y15, Y11
White: T5, T3, T1, Blender
Brown: E37, E35, E33
Red: R39, R37, RV29, RV23
Sky: B00, B0000, BV00


To make the background/scene, I used new Colosseum Builder Die and Distress Inks in Tea Dye, Walnut Stain, and Black Soot. Then I used the Geranium colored glitter cardstock from the Awakening Glitter Pack to cut the word Hello using the new word die. I stamped the sentiment on brown cardstock with white pigment ink and cut it out using a banner die from Stamp Anniething. 


What a fun set of stamps, dies, and stencils this month! It such a fun set that can be used for many occasions. I will be using them for birthday cards, get-well cards, and friendship cards. 

Thank you for visiting and have a creative week! 

Thursday, July 8, 2021

Stamp Anniething: Sneak Peek Day 2 - Brendan

Welcome to Day 2 of Stamp Anniething's July Sneak Peeks! Today's card features the adorable Roman God Brendan stamp, the Basket Weave Stencil, and the Hello Bold Die. Such a great set that you can use for many different occasions and the stencil and die can be used with all other Stamp Anniething stamps. 

Stamps and dies for the July new release will be available for purchase on Friday, July 9 at Stamp Anniething

I first stamped Brendan then used the coordinating outline die to cut him out. I colored him with Spectrum Noir Illustrator markers. 


Spectrum Noir Illustrators Used
Skin: AP3, FS8, FS7, FS9
Cheeks: FS4
Tongue: AP3, FS4
Hair: TN9, GB9, EB1, GY2
Green: CG3, LG2, CG1
Blue: TB5, TB3, TB2, TB1
White: BGR4, BGR3, BGR1,Blender
Brown (sandals): TN8, TN5, TN3
Necklace and bracelet: GY3, GY2, GY1

I used the Basket Weave Stencil and stencil paste to make the background. After stenciling the white cardstock, I trimmed it to 5" x 5" then matted it on white cardstock. I then adhered it to a 6" x 6" card base.

I cut out two of the Stamp Anniething Squiggle Mat Dies, one in white cardstock and one in black (for the shadow) to put behind Brenden. I used Distress Ink in Black Soot to ink the edges. I used the new Hello Bold die and added the "isn't it ovid-ous?" sentiment underneath it. The sentiment is heat embossed on black cardstock.

Thank you for stopping by Day 2 of the Sneak Peeks. Please come back tomorrow for Day 3. I will have another amazing card to share! Have a creative day!