Saturday, August 28, 2021

Blank Page Muse: Ink Smooshing Steampunk Card

Ink smooshing is one of my favorite techniques to create backgrounds with very little effort. Each time I do it, the results are different. This technique is great for steampunk cards since it's easy to achieve that vintage, rusty look. After creating the ink smooshed background, all you need is some stamps, gears, and a sentiment to create a fabulous card or scrapbook page. 

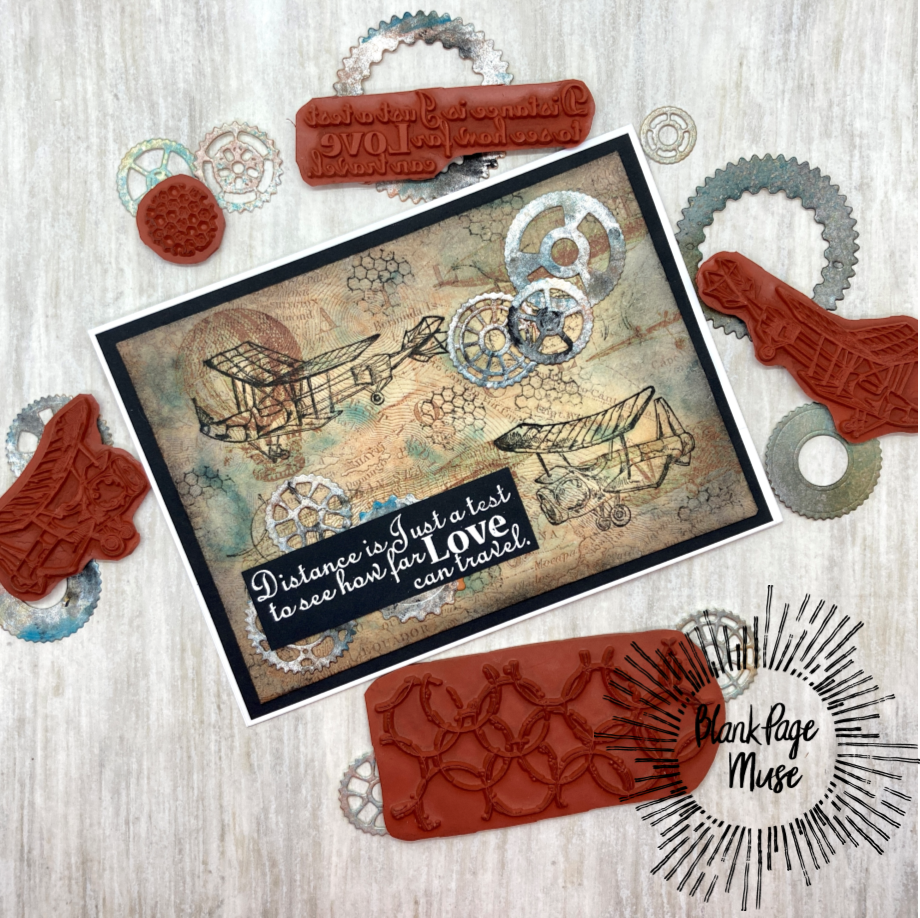
Today's card is ink smooshed using Distress Inks and one large stamp from Blank Page Muse called Bingo Collage Art Rubber Stamp. This stamp is 3.5"W x 5"H so it fits perfectly on an A2 size card. I added a few gears and cogs and decided just to use bold letters to add the word, steampunk to keep the card generic so it can be used for any occasion. You can save 15% on this stamp and all purchases at Blank Page Muse by using my special code BPMBetty. 


Supplies:
  • Blank Page Muse Bingo Collage Art Rubber Stamp
  • White A2 card base
  • Black cardstock mat 4-1/8"W x 5-3/8"H
  • Watercolor paper for card front 4"W x 5-1/8"H
  • White and black cardstock for sentiment 5"W x 3"H 
  • Distress inks or stains in Chipped Sapphire, Salvaged Patina, Rusty Hinge, Ground Espresso, Pumice Stone
  • Water spray bottle
  • Heat gun
  • Craft mat
  • Black ink pad (Dye or pigment)
  • Stamp positioner or block
  • Gears and cogs die cuts (see previous post on how to make your own)
  • Large letter dies to form the word "steampunk" (I used Sizzix Alphanumeric Classic Lower case dies, that are 1" to 1-1/4" tall)
  • Your favorite liquid adhesive
  • Low tack tape or washi tape
Instructions
  • Ink Smooshing:
    • Apply Distress Inks in Chipped Sapphire, Salvaged Patina, Rusty Hinge on a craft mat. Spritz with water.
    • Dab the watercolor paper over the ink, then turn the paper and dab again. Try not to mix the colors or it will get muddy. Dry with heat gun and repeat until you have the desired colors/design. 
  • Stamp the Bingo Collage Stamp onto the ink smooshed paper using a stamp positioner or stamp block
  • Ink the edges of the card front with Distress Ink in Ground Espresso
  • The Sentiment:
    • Swipe the pad of Distress Ink in Pumice stone over a piece of white cardstock approximately 5"W x 3"H. I used a bigger piece of paper so I can use the negative piece for a future card.
    • Using large alphabet dies, die cut out the word steampunk. Tip: line up the dies on a lined mat, then place light tack tape over the dies. Place over the cardstock and die cut. Use the negative piece to line up a glue the letters onto your card. Repeat steps to die cut the word steampunk using black cardstock. 


    • Adhere the black letters by offsetting to show the white letters as a shadow.
  • Adhere the card front onto the black cardstock mat, then adhere onto the card base.
  • Adhere the gears and cogs onto the front of the card and the card is finished. 

Thank you for visiting today. This is a very fun card to make. Try ink smooshing, you will be addicted! Have a very creative week!


Looking for more Inspiration? Click the links below!
The Blank Page Muse Shop https://blankpagemuse.com/

Friday, August 27, 2021

Scrappy Boy Stamps: Happy Fall Y'all

Fall, also called Autumn, is the time of harvest. There is a small town near me called Sloughhouse that is famous for their local farm named Davis Ranch. It started off as a tiny roadside stand that sold corn. It is now a huge stand that not only sells their famous corn, but lots of other vegetables and fruits. You can also pick your own fruit and vegetables. In the fall, they have a huge pumpkin patch with hay rides and in the winter, they have a Christmas tree farm where you can cut down your own tree. It's my favorite time of year. Today I am sharing a Fall card that reminds me of my visits to Davis Ranch, a place I took my kids quite a bit. This newly released stamp set, called Happy Fall Y'all, is now available at the Scrappy Boy Stamps store. Such a fun and fabulous fall stamp set!!


I stamped all the images on white cardstock, then used the coordinating outline die to cut them out. I stamped one of the sentiments on the wooden sign board using my stamp positioner. I colored all the images using Copic markers.


Copic markers used
Scarecrow
Hat: YR27, YR24, YR23, YR21 (Prismacolor pencil PC1034 to draw cross hatch marks); Band: E47, E44, E42
Face: E11, E21, E00
Cheeks: R20
Straw: Y17, Y15, Y11
Eyes: B93, B00
Jeans and scarf: B97, B95, B93
Green: YG09, YG06
Red: R29, R22

Wheel Barrow: E39, E37, E35, E33
Corn: YG17, YG13, YG11, Y17, Y15, Y11
Pumpkins: E18, E19, YR27, YR24, Y17; Stems: E89, YG97, YG95
Sign: E39, E37, E35, E33

Sunflower
Stems & Leaves: YG17, YG13, YG11
Center: E39, E37, E35, E33
Petals: YR27, YR24, Y17


I used the Sun Ray Stencil from Stamp Anniething and Distress Oxides in Squeezed Lemonade and Wild Honey to create the background. I adhered the card front to two mats, one in brown and the other in kraft then adhered it to the A2 card base. I finished the card by adding a few enamel dots. 

This Fall set is just so fun to color and make cards with. A great set to have for your stash! 


Thank you for stopping by. Have a creative week! 

Tuesday, August 24, 2021

Scrappy Boy Stamps: Tomb Town - Wishing You a Scary Halloween

It's time make some more Halloween cards! I just love making Halloween cards.  Scrappy Boy Stamps has the most amazing Halloween stamp set called Tomb Town, which was released last week. This set has 16 image stamps and 9 sentiment stamps. There are coordinating outline dies for the 16 image stamps. Such a fun set to play with! 


I first stamped all the images on white cardstock then used the coordinating outline dies to cut them out. I then colored the images with Copic markers.


Copic Markers Used

Witch
Skin: YG45, YG25, YG11
Hair: E49, E39, E19, E13, E01
Orange: YR18, YR15, YR02, YR00
Purple: V17, V15, V12, V000
Black: T7, T5, T3

Cauldron
Green: YG67, G24, G21, G40
Purple: V17, V15, V12, V01
Black: T7, T5, T3
Silver gel pen

Cat & Spider
Black: T7, C5, T3, T1
Pink: R20
Green (eyes): G24, G21


Tombstones
Brown: E18, E13, E11
White: C5, C3, C00

House
Yellow: Y17, Y15, Y13
Brown: E49, E39, E19, E13, E11, E21, E00
Black: C7, C5, C3

Bat
Black: C7, C5, C3

I used watercolor paper for the card front. First I used a 1-3/4" punch to punch a circle mask for the moon. I then inked the sky with Distress Inks in Seedless Preserves, Dusty Concord, and Black Soot. I removed the mask then colored the moon with Distress Oxides in Squeezed Lemonade and Wild Honey. I inked the dirt with Distress Ink in Vintage Photo and Black Soot. For the hilly grass, I uses a hill die to cut out two hills and inked them with Distress Inks in Mowed Lawn and Black Soot. I sprinkled water on the inks and blotted it with a paper towel. 

For the sentiment, I stamped it on white cardstock then cut fish tails for each end then ink blended the edges with Distress Ink in Black Soot. I added it to a black mat and adhered it to the card front. All images are adhered using liquid glue except the witch and one of the tombstones, where I used double sided foam tape and the card was finished.


Thank you for visiting today. I hope you give this card a try. This is such a fun set and you get a lot of stamps and sentiments! Hope you all have a creative week! 

Sunday, August 22, 2021

Scrappy Boy Stamps: Autumn Wishes Slimline Card

Can you believe there is only a month of summer left? We are heading into my favorite Fall season! I love the cooler weather and the beautiful colors of Fall. Now is the time to start those Fall cards and Scrappy Boy Stamps has come out with the cutest Fall set called "Happy Fall Y'all." This huge set comes with 25 image stamps and 17 word stamps that you can make many sentiments. All image stamps comes with coordinating outline dies! This is a must have stamp set!


I made a slimline card that showcases three of my favorite things. I love watching squirrels as there are many in my backyard. I love apples, especially apple donuts, pies, and cake! I also love pumpkins; mainly pies, muffins, and scones. I first stamped everything on white cardstock, then used the coordinating outline die to cut them out. For the Autumn Wishes sign, I first stamped the sign then the words using a stamp positioner. I used Copic markers to color all the images.


Copic Markers Used:
Squirrel
Fur: E39, E35, E33, E31
Acorn tops: E29, E25, E21
Acorn bottoms: E17, E13, E11
Wood Sign: E39, E37, E35, E33


Girl
Skin: E04, E11, E21, E00, E000
Hair: E18, E08, YR18, YR14
Green: YG67, YG09, YG06, YG03
Brown (Basket and Shoes): E39, E35, E33
Red: R29, R24, R32
Apple Barrel: E39, E37, E35, E33; C5, C3, C1
Apples: R29, R24, R32


Pumpkins
Orange: E18, E19, YR27, YR24, Y17
Green: E89, YG97, YG95
Wheel Barrow: E39, E37, E35, E33


To create the circle cut outs, I used an in and out circle die. I used Distress Oxides in Squeezed Lemonade and Wild Honey to create the look of the sun in the circles.  I adhered most of the images with liquid glue, except for the girl where I used double sided foam tape. I used a slimline frame die to put a frame around my card. To finish the card, I added a few yellow and red jelly dots. 


Thank you for stopping by and hope you give this card a try! You will love this amazing stamp set! Have a creative week!

Friday, August 20, 2021

Conie Fong Art & Design: Lulu and Lonny Birthday Card

My closest friends know that I love cute pigs. Although I don't go hog wild (smile) collecting them, I do have a small collection. I love adorable and whimsical pigs and when I saw this digital stamp from Conie Fong Art & Design, called Lulu and Lonny with Cupcake Bundle, I just had to color it and put it on a birthday card. This stamp set also comes with five images and four sentiments. 

Also, tomorrow is the last day for the 25% off sale all Conie Fong digital stamps. No coupon code needed. Here is the link to the store


I first printed Lulu, Lonny, and two party hats on white cardstock then colored them with Copic markers. I then fussy cut them out. 


Copic Marker Used
Pink (pigs): RV42, R01, E01, E000
Purple: V15, V12, V01
Brown: E35, E31
Pink: R85, R81
Red: R35, R32
Blue: B04, B01

For the background, I first used an in and out circle die to cut a hole in the center of my A2 size card front. I then used another piece of cardstock and used a pencil to mark the circle where I wanted to ink blend a background. I used a cloud stencil and Oxide Ink in Mermaid Lagoon to make the clouds. I used a grass stencil and Oxide In in Mowed Lawn to make the grass. 


I glued the card front onto the cardstock I just inked, then matted it with turquoise cardstock and then adhered it onto the card base. I had forgotten to print the sentiment the set came with so I used one that I had in my stash. To finish the card, I added three enamel dots and used a sparkle pen to add some glittery shine to their hats and cupcakes.


Thank you for visiting today and I hope you give this card a try! Digital stamps are so easy to use. Have a very creative week!


Tuesday, August 17, 2021

Scrappy Boy Stamps New Release: Future Family

Does this little boy and his dog look familiar?! Scrappy Boy Stamps has released the Jetsons-inspired stamp set called Future Family. What an amazing set that includes 9 image stamps and 13 sentiment/word stamps that you can combine to create your own sentiments! This set will be available on Thursday, August 19 at the Scrappy Boy Stamps store.

Jetsons was and still is one of my favorite cartoons, so I fell in love with this set as soon as I saw it. Today's card showcases the little boy Elroy and his dog Astro. In the cartoon, you often see them inside a flying car, so I thought it would be cute to put them in the car and into outer space. 


To make this A2 card, I first stamped the images and used the coordinating outline dies to cut them out. I then colored them with Copic markers. On the flying car, I used a craft knife to cut out the window and adhered acetate to the back and then adhered the boy and dog, all with double sided tape.


Copic Markers Used
Boy (Elroy)
Skin: E13, E11, E21, E00, E000
Hair: E39, YR24, YR23, YR20
Orange: YR09, YR07, YR02
Green: YG67, YG25, YG13

Dog (Astro)
Fur: W6, W4, W2, W1
Nose: W8, W4, W2
White: W4, W2, W1
Green: YG67, YG25, YG13
Red: R22, R21

Flying car 
Green: G28, G09, G05, G02, G00
Gray: T5, T3, T1
White: T3, T1, T0

I created the galaxy background by combining seven colors of Distress Inks onto watercolor paper. I used Squeezed Lemonade, Worn Lipstick, Seedless Prserves, Peacock Feathers, Blueprint Sketch, Chipped Sapphire, and Black Soot. After adding all the layers of ink, I spritzed it with water and blotted it with a paper towel. Then I used acrylic paints in white and real gold to splatter on the "stars."

I used a 1-3/8" circle punch to punch out the moon using watercolor paper. I used Oxide Inks in Squeezed Lemonade, Wild Honey, and Distress Ink in Hickory Smoke to color the moon.


I used a Versamark Watermark stamp pad to stamp the sentiment on black cardstock and used white embossing powder and heat embossed to create the sentiment. I then matted it on white cardstock. 

I adhered all the images onto the card front with double sided foam tape, mounted the card front onto black cardstock, and then onto the A2 card base and the card was done. 

I hope you give this card a try. The stamps are so cute and fun to play with! 


Thank you for stopping by and I hope you have a creative week!


Monday, August 16, 2021

Stamp Anniething: I Love You a Bushel and a Peck

Apple season has started here in Northern California. Just about 50 miles from where I live is a place called Apple Hill. There are 50 family farms that sell apples and other fruits, vegetables, baked goods, wine, jams, and much more. Local crafters have booths and during the fall months, there are activities for children. I just love visiting Apple Hill! The card I made features a Stamp Anniething stamp called Joanie - A Bushel and a Peck. She reminds me of my daughter when she was younger visiting Apple Hill. I also made a coordinating treat bag using a SVG file from Stamp Anniething's sister site, SVG Cutting Files, called Kawaii Apple Bag. A perfect little gift for my daughter! 

To make this fun shaker card, I first stamped Joanie on white cardstock, used the coordinating outline die to cut her out, then colored her with Copic markers. I used a white gel pen to add some lines to the scarf.


Copic Markers Used
Skin: RV34, E13, E02, E01, E00
Hair: E49, E47, E44, E43, E41
Blue: B97, B95, B93
Red: R39, R29, R22, R24
Brown: E59, E57, E55, E53, E51
Green (apples): YG09, YG06, YG03
Green (leaves): G17, G14, G00
Stems: E44, E42


To make the shaker portion of the card, I first used the Foilage Leave Stencil and texture paste for the frame and back of the shaker. I used Ranger Texture Paste and added a light green fine glitter and mixed it in. After it dried, I cut it using the square die from Shaker Basics Set #2. I then cut 5 more frames out of white cardstock to build up the shaker. I cut out a piece of acetate and used 1/4" Double Sided Tear Away Tape to adhere the acetate to the frame. Then I used the same tape to adhere all the frames together. You can use liquid glue, but I find I make a mess sometimes. I filled the shaker with Itty Bitty Beads (Green) and Apple Sprinkles (currently out of stock).

I used the Card Mat Die to cut the red polka dot paper from the Summer Tropics Paper Pad. I adhered it to the A2 card base using liquid glue. I stamped the sentiment, then trimmed it. I added a red cardstock mat behind it then adhered it to the card front with foam tape.  I adhered the shaker with double sided adhesive. I also adhered Joanie onto the shake using double sided adhesive.  To finish the card, I add one of the Apple Sprinkles onto the sentiment. 


For the Kawaii Apple Bag, I exported the SVG into Silhouette Studio and then cut it using colored cardstock using my Silhouette Cameo. I glued all the pieces together using liquid glue then added a small bag of Hershey's Kisses to the box.


Thank you for visiting today! I hope you give this card a try. Shaker cards and treat boxes are so fun and quite easy to make. Have a creative week! 


Saturday, August 14, 2021

Scrappy Boy Stamps: Sneak Peek! Tomb Town

Can you believe Fall is just five weeks away? It's time to get started on Halloween cards! I love Halloween cards that are cute and whimsical and not too scary. That is why I just love the new stamp set called Tomb Town by Scrappy Boy Stamps. This set has 16 image stamps and 9 sentiment stamps. There are coordinating outline dies for the 16 image stamps. So many stamps to make lots of cards! This amazing set will be released on Thursday, August 19 at the Scrappy Boy Stamps store.


When I saw the cute ghosts, I knew I had to make a slimline card. I stamped all the images and colored them with Copic markers. I ended up stamping every image and colored each one and saved some stamps for future cards. I stamped the sentiment "Boo to You" trimmed it and matted it with black cardstock.


Copic Markers Used

Vampire Boy
Skin: E13, E11, E21, E00, E000
Hair: E37, E35, E34, E31
Red: R39, R35, R22
Black: C9, C7, C5, C3

House
Yellow: Y17, Y15, Y13
Brown: E49, E39, E19, E11, E21, E00
Gray: C7, C5, C3

Ghosts
White: C5, C3, C00, C0

Moon/Cloud
Yellow: Y24, Y35, Y13
White: C5, C3, C00, C0

Iron Gate
Gray: C7, C5, C3


For the background, I first created the clouds using Distress Ink in Black Soot and a cloud stencil from Stamp Anniething. I placed the house on the card front and hand drew the walk way. I colored it with Copic markers then masked it so that I could color in the grass. I used Distress Oxide in Mowed Lawn and Distress Ink in Black Soot and a grass stencil from Stamp Anniething to create the lawn. 

To finish the card, I adhered the little vampire boy, ghosts and house to the card with foam adhesives and the rest with liquid glue. I matted the card front with black cardstock then adhered it onto a slimline card base. 


This is such a fun and cute stamp set. I will be making several more cards. Thank you for stopping by today and have a creative week! 


Thursday, August 12, 2021

Paper Nest Dolls: Amara with Lily Hello Card

We have reached a little over half way through summer and August is the hottest month here in California. It's hovering around 100 degrees, but I still rather have it hot than cold. I like the longer days since I seem to be more productive. This week, I am working on some generic, all occasion cards for my stash. I just love this cute stamp from Paper Nest Dolls called Amara with Lily. She makes a very cute and cheerful Hello card that is great to send to friends that you haven't seen in a while. With this COVID pandemic still lingering around, I am still staying home as much as possible.  


For this A2 card, I used the digital version of Amara with Lily; however she also comes in red rubber. I printed her on white cardstock then colored her with Copic markers.


Copic Markers Used
Skin: E15, E13, E11, E21
Hair: E49, E44, E43
Cheeks: R30
Orange: YR16, YR14, YR00
Green: G17, G09, G14
Teal: BG49, BG13, BG11, BG10

I trimmed the image and used a corner punch to round the edges and matted it with teal cardstock. I used patterned paper from my stash to make other mats. For the orange mat, I used a rectangular scalloped die from Gina Marie Designs. I cut out the Hello sentiment from a Stamp Anniething die using white cardstock and green cardstock. I used the green one as a shadow. To finish the card, I added a white bow and some flowers from I Am Roses. 


Thank you for visiting today and I hope you have a creative week! 


Tuesday, August 10, 2021

Blank Page Muse: Steampunk Card - Distance is just a test...

I donate many of my cards to the Card for Soldiers Program. The majority of them are birthday, missing you, holiday, and get well cards. I thought the soldiers that are in long distance relationships may need some long distance love cards. In keeping with this month's theme, "Steampunk," I created this steampunk card using stamps from Blank Page Muse's Vintage Transportation Steampunk Art Rubber Stamp Sheet set. This set comes with many stamps and sentiments.  I also used a couple of background stamps from the  Background Grunge Art Rubber Stamp Sheet designed by Pam Bray

Updated 8/14/2021: You can use discount code BPMBetty to get 15% off your entire order at Blank Page Muse!!! Check out their website: Blank Page Muse.


Supplies:
  • Blank Page Muse Vintage Transportation Steampunk Art Rubber Stamp Sheet 
  • Blank Page Muse Background Grunge Art Rubber Stamp Sheet designed by Pam Bray
  • Rice paper with vintage planes (or substitute with patterned paper)
  • White cardstock A6 size card base 
  • Black cardstock mat 6-1/8"W x 4-1/2"H
  • White cardstock card front 5-7/8"W x 4-1/4"H
  • Black cardstock to stamp sentiment 3-1/2"W x 1-1/2"H
  • Gears and Cogs die
  • Watercolor paper to cut out gears and cogs 6"W x 4"H
  • Black dye ink pad
  • Stamp positioner or stamping block
  • Glue stick or tape runner plus your favorite liquid adhesive
  • Distress Stains (spray or bottle): Brushed Pewter, Tarnished Brass, Rusty Hinge
  • Acrylic paints: Turquoise, Black
  • Distress Inks: Salvaged Pantina, Tea Dye, Black Soot
  • Watermark Stamp Pad (i.e. VersaMark)
  • White Embossing Powder
  • Heat Gun
Instructions:
  • The first thing to prepare are the gears and cogs. If you don't have gears and cogs dies, you can purchase them already made. However, it's more fun to make your own. Using gears and cogs dies, cut out several out of white cardstock to make and save the extras for future cards. 
  • Place these die cuts into a box so when spraying with Distress Spray Stains, the over spray is contained in the box. Spray the following colors and let each color dry before spraying the next color: 1) Brushed Pewter, 2) Tarnished Brass, and Rusty Hinge. I used the bottle with the dauber since I didn't have Rusty Hinge in a spray. Let dry.


  • Place the die cuts on wax paper and add some turquoise and black paint to make it look old and dirty. Set aside and let dry.

  • Using steampunk or vintage rice paper OR patterned paper, measure, trim and glue onto the White cardstock card front (5-7/8"W x 4-1/4"H). Make sure the corners are mitered to decrease bulkiness at the corners. If using rice paper, use a glue stick. Do not use liquid glue or your paper will wrinkle.


  • Now age the paper by applying Distress Inks in Salvaged Patina, Tea Dye, and Black Soot with a blending brush.

  • Stamp two airplanes from the Blank Page Muse Vintage Transportation Steampunk stamp set.
  • Use two background stamps from the Blank Page Muse Background Grunge stamp set to add some designs to the card front.

  • Adhere some gears and cogs to the card front.
  • Select a sentiment from the Vintage Transportation Steampunk stamp. Before stamping on black cardstock, use an embossing buddy to add some powder to decrease the static. Stamp with a watermark stamp pad onto the black cardstock, add white embossing powder and heat. Trim to fit the card front and adhere with glue.
  • Adhere the card front onto the card base and the card is finished. 

This is a really fun card to make. Change the sentiment and it can be for any occasion! Thank you for stopping by and have a creative week!


Looking for more Inspiration? Click the links below!
The Blank Page Muse Shop https://blankpagemuse.com/
FB Fan Page https://www.facebook.com/groups/bla...
Instagram - Shop https://www.instagram.com/blankpage...
Instagram - Blog https://www.instagram.com/blankpage...
Twitter https://twitter.com/BlankPageMuse
Pintrest https://www.pinterest.com/blankpage...