Friday, October 29, 2021

My First Cat Lover's Hop

Welcome to my blog! I am participating in my first Cat Lover's Hop! This hop is to celebrate cats of all sizes and shapes during the last full week in October. This coincides with National Cat Day, which is October 29. This hop started on Monday, October 25 and runs until 11:50 PM PT, Saturday, October 30. There are many participants and we were all given a day to share our cat projects. 


Today is my day to share a project and I made this card using the adorable Mama Kat with her Kittens Rubber Stamp by Rick St. Dennis MFA from Blank Page Muse/I Brake for Stamps, who is one of the sponsors of this hop. This is an A6-sized birthday card made for a fellow cat lover. 

You can save 15% on this stamp and all purchases at Blank Page Muse and I Brake for Stamps by using my special code BPMBetty. 


Click here to see all the wonderful cat projects made by other participants of the Hop. 

Supplies:
  • Blank Page Muse/I Brake for Stamps: Mama Kat with her Kittens Rubber Stamp by Rick St. Dennis MFA
  • A6 white card base
  • 4"W x 4"H white cardstock to stamp image 
  • 5-7/8"W x 4-3/8"H Red cardstock mat
  • 3-3/4"W x 3-3/4"H Paw Print
  • 3-7/8"W x 3-7/8"H brown cardstock to mat paw print patterned paper
  • 5-7/8"W x 1-5/8"H Hearts patterned paper
  • Sentiment of choice (I created mine on my computer, printed, trimmed, and matted it)
  • Coloring medium of choice. I used Copic markers.
  • 3" circle stitched die
  • Distress Oxide in Tumbled Glass and blending brush
  • Adornments: Red hearts, jelly dots, red bow, and charm. You can substitute with rhinestones, sequins, enamel dots, twine, or jute.
  • Your favorite adhesive
Instructions:
  • Cut all the cardstock and papers in the supplies list
  • Stamp your image and color. I used Copic markers.
    • Fur: YR27, YR24, YR21, Y32
    • Nose and ears: RV95
    • Bow: R29, R24, R22
  • Assemble and adhere the cardstock and patterned papers with your favorite adhesive.
  • Stamp or print a sentiment of choice. Trim it to size and add a mat.
  • Adhere the adornments. You can decorate your card as you like! 


This is a fun and simple card to make. This stamp is versatile so you can change the sentiment to make it a different occasion. It's perfect for mother's day, a baby card, and holiday cards. 


Thank you for visiting and keep hopping to see other cat creations! 

Looking for more Inspiration? Click the links below!
The Blank Page Muse Shop https://blankpagemuse.com/
I Brake for Stamps Shop https://ibrakeforstamps.com/
Stamp Anniething: Breast Cancer Awareness Month

October is Breast Cancer Awareness Month so I decided to make my video this month for Stamp Anniething that used the stamp Maggie - Awareness is the Key. The video is available over in the Stamp Anniething Stampers Facebook Group showing how I made this card, including how I colored Maggie with Copic markers. Click HERE for the video.


All the paper sizes, where you can get the free digital papers, and Copic marker colors are in the video. Please check it out!


Scrappy Boy Stamps New Release: The Flying Monkies!

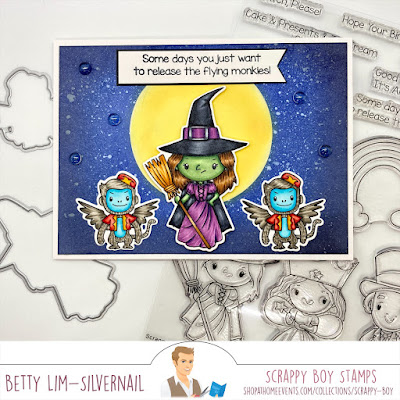
Scrappy Boy Stamps released two new stamp sets, inspired by The Wizard of Oz, called The Land of Oz and Witches & Wizards yesterday. Such fun and amazing sets that you can make cards, scrapbook pages, decorations, treat boxes, etc. for any occasion. Along with stamps and dies, he has come out with a 6x6 coordinating paper pack! The paper pack was not available to me when I made my cards, but I will sure use them for future cards!

Today's card features the wicked witch and her flying monkies. Yes, we know monkies is normally spelled monkeys, but in the Land of Oz, we spell it monkies, LOL!
 

I first stamped the images, cut them out with the coordinating outline die, the colored them with Copic Markers. 


Copic markers used:
Wicked Witch
Skin: G28, G46, G24, G21, G40
Hair: E49, E47, E35, E55, E42
Purple: V17, V15, V12
Black: C9, C7, C5, C3
Broom: YR24, YR21, YR20, E47, E35, E31

Monkey
Gray: W6, W4, W3, W2
Blue: B02, B01, B00, B000
Yellow: YR24, Y19, Y15
Red: R37, R22, R21


For the background, I wanted to create a big moon. I drew a circle on masking paper using the inside of my roll of foam tape and cut it out. I placed the masking paper in the middle of the card front and then ink blended in the sky using Distress Inks in Blueprint Sketch, Chipped Sapphire, and Black Soot. To create the stars, I diluted vanilla colored acrylic paint and splattered it on with a paint brush. After it dried, I peeled off the circle mask and ink blended the moon with Distress Oxide inks in Squeezed Lemonade and Wild Honey. 

I adhered the monkies with liquid glue and the witch with double-sided foam tape. To finish the card, I stamped the sentiment, trimmed it and added a black mat. I added five Stamp Anniething jelly dots and the card was finished.


Thank you for stopping by! Hope you have a creative week! 


Thursday, October 28, 2021

Paper Nest Dolls: Cutest Pumpkin in the Patch

Fall is my favorite time of year. Here in Northern California, the leaves are finally starting to change color. It's really fun to walk to my nearest park and see all the sycamore, maple, and oak trees all turn orange, red, yellow, and purple. It is really magical. I knew when Paper Nest Dolls came out with this stamp called Fall Emma, it was going to be one of my favorite fall stamps! I used this digital stamp to make a A6 size card.


I first printed the sentiment and digital stamp and colored it with Copic markers, Polychromos pencils, and Prismacolor pencils.


Copic Markers Used
Skin: E13, E11, E21, E00, E000
Hair: E18, E08, YR18, YR14
Cheeks: R20, R30
Pumpkin: E09, YR09, YR04, Y38
Stem: YG97, YG93, YG91

Polychromos Pencils Used
Leaves: 109, 116, 177, 133, 163
Coffee Cup: 274, 271, 180, 177, 109, 115

Prismacolor Pencil Used
Stripes on jacket: PC1008


I used dark orange cardstock to use for the card mats, along with a leaves patterned paper from Hobby Lobby.  I die cut a few leaves, ink blended the edges with Oxide Ink in Hickory Smoke. This is an easy one layer card that I hope you will try! 


Thank you for visiting and have a great and crafty week! 

Tuesday, October 26, 2021

Scrappy Boy Stamps New Release: Fun Tags with the Land of Oz and Witches & Wizards

I am so happy to finally get started on my Christmas tags! The newest stamp sets from Scrappy Boy Stamps that were inspired by The Wizard of Oz, called Land of Oz and Witches and Wizards are perfect for making tags for any holiday or occasion! All you need to do is add the stamps onto some patterned paper, punch a hole, and add some string.


First I stamped the images and cut them out using the coordinated outline die. I then colored all the images using Copic markers.

Copic Markers Used:


Good Witch
Skin: E04, E11, E21, E00, E000
Cheeks: R20
Hair: E13, E11, E53, E50
Pink: R85, R83, R81; plus Arteza pink glitter gel pen; White gel pen
Silver: C3, C1; plus Arteza silver glitter gel pen; Arteza silver metallic gel pen

Shoes
R39, R29, R24, R22; E55, E51; plus Arteza red and yellow glitter gel pens


Dorothy
Skin: E04, E11, E21, E00, E000
Cheeks: R20
Hair: E29, E37, E35, E31
Blue: B28, B24, B23, B21; plus Prismacolor white pencil on dress
Red: R29, R22
Basket: E55, E57, E53
White: T5, T3, T1

Toto
Fur: E59, E37, E55
Blue: B28, B24, B23, B21
Red: R39, R24
Tongue: R22, R20

Flowers
Red: R08, R05, YR02, R02
Green: YG09, YG05, YG03

Wizard
Skin: E04, E11, E21, E00, E000
Hair: T5, T3, T1
Green: G28, G46, G24, G21
Black: C9, C7, C5, C3
Gray: C7, C5, C3, C1

Balloon
Green: G28, G46, G24, G21
Brown: E37, E34, E31
Red: R39, R29, R24, R22
Blue: B28, B23, B21


The Christmas tags I made are 3"x 3" in size. I used 6"x 6" sheets from paper pads I got from Hobby Lobby. All I had to do is cut the papers in half and fold them in half. I used a sheet that had "Merry Christmas" for the bottoms of each tag. For the Wizard tag, I added a diagonal striped piece on the bottom. I punched a small hole on the back panel and added twine. All the images are adhered with double-sided adhesive foam tape. To finish the tags, I added a few rhinestones. 


Thank you for stopping by and I hope you give these quick and easy tags a try! Have a wonderful and creative week! 

Monday, October 25, 2021

Conie Fong Art & Design: Christmas Present Gnome

It's that time of year to get into full gear to get my Christmas/holiday cards finished. In order for me to finish, I find cute digital stamps that I can color and make one layer cards, just like this one from Conie Fong Art & Design is called Christmas Present Gnome Bundle. This set comes with the gnome and tree together and it also comes separately, plus two holiday sentiments. The images come in JPG and PNG formats. 25% off all purchases through 10/30/21.


Everyone knows I love digital stamps because I like to make the images the size I want. For holiday cards, I like to make them A6 size and add the image and sentiment on the card front. I like adding pretty patterned paper for a beautiful card. 

I first printed the image on white cardstock then colored it with Copic markers. 

Copic markers used:
Skin: E13, E21, E00
Cheeks: R20
Beard: T5, T3, T1
Turquoise: BG18, BG72, BG57, B0000
White: W4, W2, W0
Purple: RV69, V06, V04, V01
Red: R39, R35, R32
Yellow: YR24, Y19, Y18, Y13
Blue: BG72, B01, B000, B0000

For the mats, I used patterned paper from CC Designs. To finish the card, I added a few snowflakes from Stamp Anniething. 


Thank you for stopping by and I hope you give these one-layer cards a try! Have a wonderful and creative week! 

Saturday, October 23, 2021

Blank Page Muse/I Brake for Stamps: Witch Sisters are Brewing It Up!

I needed a few Halloween cards that are less kid cutesy and more for for adults that are into scary Halloween, so I made this card using the Witch Sisters and Cauldron Silhouette Halloween stamp from Blank Page Muse/I Brake for Stamps. I love making fun backgrounds using my gel printing plate and using silhouette stamps. A fun and fast way to mass produce cards and you get an unique background each time. 

You can save 15% on this stamp and all purchases at Blank Page Muse and at I Brake for Stamps by using my special code BPMBetty.  

Supplies:
  • Blank Page Muse: Witch Sisters and Cauldron Silhouette Halloween Stamp
  • A6 White cardstock card base
  • Black cardstock mat - 4-3/8"W x 6-1/8"H
  • White cardstock 6"W x 4"H for inking background
  • White cardstock to stamp sentiment (size depends on size of your stamp)
  • Distress Oxide Inks in Wild Honey, Mowed Lawn, Mermaid Lagoon
  • Gel Printing Plate and Brayer
  • Circle Stencil of choice (I used one from Stamp Anniething)
  • White cardstock
  • Tree without leaves die of choice (I used one from Gina Marie Designs)
  • Halloween sentiment stamp of choice (I used a very old one from Hero Arts)
  • Distress Ink in Black Soot and blender brush
  • Black dye ink
  • Stamp positioner
  • Your favorite adhesive
Instructions:

For this project, we will be using a gel printing plate. I have an 8x10 one made by Gelli Arts. You can use any brand, but make sure that the plate is big enough for an A6 card, which is 6-1/4"W x 4-5/8"H.
  • The background:
    • Using the Distress Oxide ink pads, apply directly onto the gel printing plate. Keep the colors separate so you don't cross contaminate the ink pads.
    • Using a brayer, spread the ink and blend so the ink covers the plate at least the size of the A6 cardstock. Clean off the brayer on a piece of scrap paper.
    • Place the stencil over the ink and use the cleaned brayer and lightly roll over the stamp to ensure it is secured on the gel printing plate. 

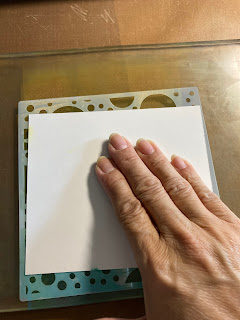
    • Place the white cardstock over the stencil and use your hand to gently rub so the ink transfers to the paper.
    • Lift off the stencil and place your paper back on the gel printing plate at a different angle to pick up more of the ink.
    • Repeat the above steps until you get the desired look.
  • The stamp:
    • For silhouette-type stamps, it is best to use a stamp positioner. Insert the inked paper into the stamp positioner and place the stamp towards the bottom half of the card. Make sure you use a black ink pad for this stamp.
  • The trees:
    • Using a tree die without leaves, cut two trees. In order to make my trees fit, I cut them apart and some of the branches off and re-positioned them. Adhere the trees using liquid glue. Trim off the excess branches with scissors.
  • Finishing the card:
    • Adhere the card front onto the black cardstock mat, then adhere onto the card base. 
    • Using a sentiment of choice, stamp on white cardstock. Trim and use Distress Ink in Black Soot to ink the edges. Adhere the sentiment onto the card front and the card is finished. 

This is a quick and easy card to mass produce. It is so fun to create backgrounds using the gel printing plate. Each one you make will be unique! Then to use fabulous silhouette stamps on the card front is easy and your card will come out amazing! 


Thank you for stopping by and I hope you give this card a try! Have a creative week.

Looking for more Inspiration? Click the links below!
The Blank Page Muse Shop https://blankpagemuse.com/
I Brake for Stamps Shop https://ibrakeforstamps.com/


Wednesday, October 20, 2021

Scrappy Boy Stamps Sneak Peek 2: The Land of Oz and Witches and Wizards

If you missed yesterday's blog post on Scrappy Boy Stamps' The Land of Oz and Witches and Wizards stamp set, here is the link. You may want to start there first. Today's card features two stamps from the Witches and Wizards stamp set and one from The Land of Oz. These Wizard of Oz-inspired stamp sets make such cute and whimsical birthday cards and cards for other occasions since there are many sentiment stamps! 

Today's A6 size card is fun and easy to create. 

Supplies used:
  • A6 card base
  • Squiggle Mat Die from Stamp Anniething
  • Brick Stencil from Stamp Anniething's Level Up Grab and Go Box
  • House Die (gift from a friend)
  • Sizzix Embossing Folder - Birthday Set #2
  • WOW! White embossing powder
The stamps were colored with Copic markers and the die cuts were inked with Distress Oxide inks.

Copic markers used:
Witch
Skin: G28, G46, G24, G21, G40
Hair: E49, E47, E35, E55, E42
Purple: V17, V15, V12
Black: C9, C7, C5, C3
Broom: YR24, YR21, YR20, E47, E35, E31

Witch Legs
Shoes: R37, R35, R22
Socks: T7, T5, T2 (Black); T3, T1, 0 (White)

Tornado/Twister
Gray: C7, C5, C3, C1


Thank you for stopping by! These amazing
Scrappy Boy Stamps sets will be released tomorrow, Thursday, October 21, 2021. Have a creative week! 

Tuesday, October 19, 2021

Scrappy Boy Stamps Sneak Peek 1: The Land of Oz and Witches and Wizards

I was so excited when I found out that Scrappy Boy Stamps was coming out with two stamp sets inspired by The Wizard of Oz! The first amazing stamp set is called The Land of Oz, comes with 8 image stamps and 9 sentiment stamps. The second stamp set is called Witches and Wizards and it comes with 7 image stamps and 6 sentiment stamps. You can use each set on it's own or you can mix and match and come up with some awesome designs for cards, scrapbook layouts, treat bags, and more. Both sets will be released on Thursday, October 21, 2021. 


Today's card features 5 stamps from The Land of Oz and 1 from Witches and Wizards. Tomorrow's card will feature more stamps from the Witches and Wizards set, so please come back tomorrow. 

Supplies used:
  • Wonky stitched slimline die from Gina Marie Designs
  • Brick stencil from Stamp Anniething's Level Up Grab and Go Box
  • Distress Oxide inks in Stormy Sky, Shabby Shutters, Squeezed Lemonade, and Wild Honey

All images are colored with Copic markers.

Copic markers used:
Girl
Skin: E04, E11, E21, E00, E000
Cheeks: R20
Hair: E29, E37, E35, E31
Blue: B28, B24, B23, B21
Red: R29, R22
Basket: E55, E57, E53
White: T5, T3, T1

Lion
Dark fur: E99, YR27, YR24, YR23, YR21
Light fur: YR24, YR21, YR20
Nose: E59, E53
Cheeks: Prismacolor Pencil PC929

Scarecrow
Skin: E55, E53, E51
Pants, Hat, Belt, Nose: E47, E44, E43, E41
Green: YG97, YG95, YG93, BG90
Straw: YR23, Y19, Y06

Tin Man
Silver: C7, C5, C3, C1
Heart: R39, R24

Dog
Fur: E59, E37, E55
Blue: B28, B24, B23, B21
Red: R39, R24
Tongue: R22, R20

Rainbow
Red: R46, R14
Orange: YR07, YR02
Yellow: Y19, Y13
Green: YG09, YG07

Thank you for stopping by and please come back tomorrow to see the card I made using Witches and Wizards stamps.


Monday, October 18, 2021

Stamp Anniething Design Team Day: Have a Magical Day

Back in August, a crafty friend had given me an Amazon gift certificate for my birthday. I wanted to get something that I've always wanted, which is a gel printing plate. This craft tool is so fun to use to make some interesting backgrounds for  cards. I experimented using different mediums, which included acrylic paints, gesso, distress inks, and distress oxide inks. This background is the result of using distress oxide inks. I made a bunch of backgrounds and found this one to be perfect for my card using the Stamp Anniething mermaid stamp, Calliope - You are Strange and Wonderful. This stamp also has a coordinating outline die so you don't have to fussy cut!

Additional Stamp Anniething supplies used to make this 6x6 square card:
Skin: E04, E11, E21, E00, E000
Cheeks: R20, R30
Tongue: R21,R20
Hair: BG13, BG11, BG10, V15, V12, V000
Body: BG18, BG13, BG11, BG10, V15, V12, V000
Thank you for stopping by! Have a wonderful and creative week! 

Thursday, October 14, 2021

Paper Nest Dolls: True Friends are Always Together in Spirit

Inspired by the movie Mulan, Paper Nest Dolls has created this cute, fun, and versatile stamp called Warrior Princess. I found this sentiment just right for this card that I will be sending to a friend. This stamp comes in red rubber and in digital formats. I used the digital format for my card so that I could make it the size I want. I knew I wanted to make an A6 size card. 


To start, I printed the Warrior Princess stamp and colored it with Copic Markers.
 

Copic Markers Used
Warrior Princess:
Skin: E04, E11, E21, E00, E000
Cheeks: R20, R30
Hair: T9, T7, T5, T3
Red: R24, R22, R21, R20
Green: G45, G24, G21, G40
Blue: BG07, BG05, BG02, G00

Dragon:
Red: R24, R22, R21, R20
Yellow: YR15, Y19, Y13
Brown (nose): E37, E35, E31
Blue: BG05

Dog:
Fur: E57, E55, E53, E51
Nose: T7, T3, T1
Inside ears: R24, R22
Collar: R21, R20

Cricket:
V15, V12, BV13, BV11


I used black cardstock and patterned washi paper to mat the card front. I adhered all the layers together with double-sided tape. Do not use liquid glue on washi paper or the paper will wrinkle. 


This is a easy one layer card to make so I hope you give it a try! Thank you for stopping by and I hope you have a creative week.