Friday, December 31, 2021

Conie Fong Art & Design: Susie Sunshine All-Occasion Card

Happy New Year's Eve! I am kicking off the year making some all-occasion cards for my stash. Today's card features the adorable digital stamp called Susie Sunshine from Conie Fong Art & Design. When I made this card, I wanted to make sure that I could use it for any celebratory occasion so there is no sentiment on the card front.  

For this 6x6 card, I first printed the stamp 4" tall and colored it with Copic markers. I then fussy cut her out. 

Copic Markers Used:
Skin: E11, E21, E00, E000
Cheeks: R20
Lips: R22, R20, R00
Eyes: B01, B00
Hair: E43, E42, E41
Pink: E43, RV13, RV11, RV10
Green: YG09, YG05, YG03, YG01
Purple: V25, V22, V20

Supplies used:
Patterned paper from Carta Bella - Flora No. 4 & Photoplay Pastel.
Double stitched oval die from Gina Marie Designs.
Leaf dies from C.C.Designs.
Paper flowers from I am Roses.
Pearl embellishments from my stash.
Thank you for visiting today and I hope you give this card a try. Have a wonderful Christmas and a Happy New Year!


Wednesday, December 29, 2021

Paper Nest Dolls: ZOINKS! Happy Birthday

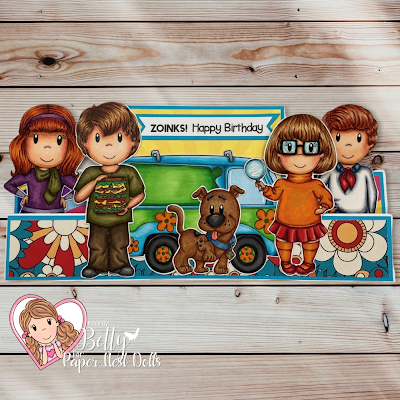
My all time favorite cartoon growing up was a group of kids and their Great Dane dog, so when Paper Nest Dolls came out with this set of stamps, called Doll Detectives, I couldn't just color just one of the stamps, I had to color them all! This awesome stamp bundle comes in red rubber and in digital formats! I used the digital formats so that I can make them the size I needed for my slimline easel card.


To make this slimline easel card, I first printed the two girls and the two boys at 3-3/4" tall. The dog is 2" tall and the bus is 2-3/4" tall. I colored all the images with Copic markers and the sandwich with Prismacolor pencils then fussy cut them.


Copic Markers Used
Girl 1
Skin: E13, E11, E21, E00, E000
Cheeks: R20
Hair: E18, E08,YR18, YR14
Green: YG97, YG95, YG93, YG91
Light Purple: V25, V22, V20
Dark Purple: V17, V15, V12

Girl 2
Skin: E04, E11, E21, E00, E000
Cheeks: R20
Glasses: B00
Hair: E29, E37, E35, E34, E31
Orange: YR18, YR16, YR14, YR12
Red: R39, R37, R35, R32
Magnifying Glass: C5, C3, C1, B01, B000

Boy 1
Skin: E04, E11, E21, E00, E000
Cheeks: R20
Hair: E13, E11, E53, E50
White: C7, C5, C3, C1, 0
Blue: B99, B97, B93, B91
Red: R39, R37, R35, R32
Shoes: E47, E44, E43

Boy 2
Skin: E04, E11, E21, E00, E000
Cheeks: R20
Hair: E29, E37, E35, E34, E31
Green: YG97, YG95, YG93, YG91
Brown: E47, E44, E43, E42
Shoes: T5, T2, T1

Sandwich - Prismacolor Pencils
Brown: PC943, PC946
Green: PC909, PC911
Orange/Yellow: PC916, PC918
Red: PC924

Dog
Brown: E39, E35, E34, E31
Red: R22, R20
Black: T7, T5, T3
Blue: B97, B93, B91
Gold: Y28, YR24

Bus
Blue: BG07, BG05, BG02, BG01, BG000
Green: YG17, YG09, YG07, YG05
Orange: Y18, Y16, Y15
Silver: T3, T2, T0
Black: T9, T7, T5

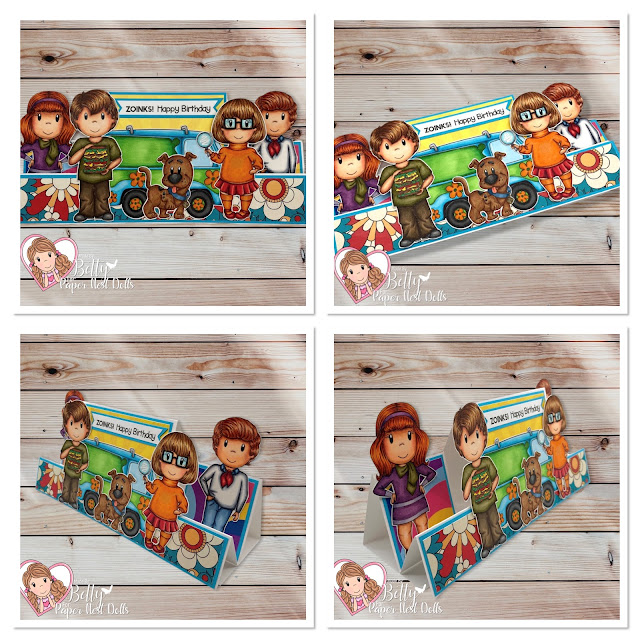
To make the slimline easel card, use the following measurements as shown below. There are two cut lines and the rest are score lines. I did my measurements and marked it with pencil, then I used a steel ruler and craft knife to make my cut lines. You can also use a rotary or blade paper trimmer that has grid lines and measurements to make your cuts. For this card, start with a sheet of 8-1/2" x 11" cardstock. Cut off 1/2" of the 11" side so that the cardstock measures 8-1/2" x 10-1/2". Make the following cut and score lines:


After making the cut and score lines, fold the easel to look like this: 


I downloaded and printed some free digital patterned paper from Freepik to decorate the card. I thought this flower pattern was perfect for the card. I matted the patterned paper with turquoise cardstock. I used liquid glue to adhere all the images onto the card. I created and printed the sentiment on my printer, then trimmed it. I added a turquoise cardstock mat behind it.

This was such a fun card to make! These stamps are just so cute! Great for scrapbooking too! 

Thank you for stopping by and I hope you have a creative week! 

Monday, December 27, 2021

Scrappy Boy Stamps: Hope You Have a FIN-tastic Birthday!

I hope everyone had a nice Christmas! I had a great time with my family and it was nice that we were all able to get together to celebrate. Today I am sharing this beautiful card using stamps from Scrappy Boy Stamps' latest release called Mermazing.
 

This Little Mermaid-inspired set has 11 image stamps with coordinating outline dies and 6 sentiment stamps that you can mix and match. There is also a beautiful 6x6 paper pack, called Under the Sea, that is perfect for cardmaking, scrapbooking, and more! Scrappy Boy Stamps debuted his first stencil, called Under the Sea Scene Builder Stencil, in this release.


For this A6 size card, I first stamped all the images then colored them using Copic markers. I then cut them out using the coordinated outline dies.

Copic Markers Used
Princess
Skin: E13, E11, E21, E00, E000
Cheeks: R20
Hair: E35, E34, E31
Dress: B18, B16, B14, B12

Prince
Skin: E04, E11, E21, E00, E000
Hair: E37, E35, E34, E31
Jacket: B28, B24, B23, B21
Pants: C9, C7, C5, C3
Gold accents: YR23, Y17, Y15

For the background, I used patterned paper from the newly released Under the Sea paper pack. I used glitter paper from Joann's to use as the mats. For embellishments, I cut out seashells from one of the patterned papers. I stamped the sentiment directly onto the patterned paper. To finish the card, I added a few sequins.


Thank you for stopping and looking forward to seeing you in 2022! Happy New Year! 

Wednesday, December 22, 2021

Scrappy Boy Stamps: Oh Crab... I forgot Your Birthday!

Having a few belated birthday cards in my stash is a must. Although I use a monthly planner, I sometimes am slow in getting my birthday cards out! Today's card features the adorable sea witch stamp from the newly released Mermazing stamp set inspired by my favorite mermaid film. I also used the lobster, seaweed, shell, and starfish stamps from this set. 


This mermaid set has 11 image stamps with coordinating outline dies and 6 sentiment stamps that you can mix and match. There is also a beautiful 6x6 paper pack, called Under the Sea, that is perfect for cardmaking, scrapbooking, and more! Scrappy Boy Stamps debuted his first stencil, called Under the Sea Scene Builder Stencil, in this release.

I first stamped all the images then colored them using Copic markers. I then cut them out using the coordinated outline dies.


Copic Markers Used
Sea Witch
Skin: V28, V25, V22, V20
Hair: W3, W1, C1, E41
Black: C9, C7, C5, C3
Purple: V28, V25, V22, V20

Lobster
Orange: YR18, YR09, YR04, YR02
Dots: C5, White gel pen

Seashell
E35, E34, E31, E50

Starfish 
YR18, Y17, Y15

Seaweed
G28, G17, G14

To create the background, I used a piece of bristol water color paper and used Distress Inks in Seedless Preserves, Dusty Concord, and Black Soot to ink it. Then I splattered some water on it and used a paper towel to dab up the excess. I used a sheet of patterned paper from the newly release Under the Sea paper pack and cut a window using the Squiggle Mat Die from Stamp Anniething. I then adhered the inked background to the back of the patterned paper with liquid glue. 


I adhered all the colored images flat except for the sea witch. I adhered her using double sided adhesive foam squares to pop her up. I stamped the sentiment using Distress Ink in Seedless Preserves, trimmed it, then inked the edges with Distress Ink in Black Soot then adhered it to the card front. I added a seashell and starfish on the sentiment. To finish the card, I added a few sequins.


Thank you for stopping by and I hope you love this stamp set as much as I do! Have a wonderful and creative week! 
 

Monday, December 20, 2021

Stamp Anniething: Hey Valentine You Drive Me Wild!

Now that I am finished with my Christmas cards, it's time to start making some Valentines cards. For my design team day at Stamp Anniething, where I get to use stamps and products of choice, I made this Valentine's card using the adorable stamp called, William-You Drive Me Wild! I wanted to show that there are many stamps that aren't particularly Valentine's stamps, but you can still use them for Valentine's theme projects. 


Additional products used are: 

I first stamped the image on white cardstock, colored it with Copic markers, then cut it out using the coordinating outline die.


Copic Markers Used:
Skin: E04, E11, E21, E00, E000
Cheeks: R20
Tongue: R22, R20
Hair: E29, E25, E23, E21
Red: R39, R37, R35, R32
White: T5, T3, T1, 0
Silver/Gray: T5, 53, T1

To create the scene for this slimline card, I first cut out all the die pieces. I cut out two sets of the racing flags, and flipped one so that I can cross them on my card. I used a stitched hill die from my stash to cut out the race track out of black cardstock. Since the die is only 6" long, I cut out two pieces and attached them. I used a white gel pen to create the line on the track.

I created the "Hey Valentine" sentiment on my computer and printed it on white cardstock. I then stamped the "you drive me wild!" sentiment and cut out both sentiments using one of the banner dies. 


I then used one sheet of the 6x6 patterned paper and 1-1/2" strips to place behind the race track. Since the paper is only 6x6, I cut out two pieces per side and attached them. I trimmed off the excess to to leave about 1/8" border showing on the card base. 

To finish the card, I die cut a red and white heart from an old Cricuit Cuttlebug die. I hope you give this card a try! It's so fun to make Valentine's cards!


Thank you for stopping by today! Have a great holiday and have fun crafting!


Saturday, December 18, 2021

Scrappy Boy Stamps: Have a Mermazing Day!

Scrappy Boy Stamps released a beautiful Little Mermaid-inspired stamp set for December! This set, called Mermazing, has 11 image stamps with coordinating outline dies and 6 sentiment stamps. There is also a beautiful 6x6 paper pack, called Under the Sea, that is perfect for cardmaking, scrapbooking, and more! Scrappy Boy released his first stencil, called the Under the Sea Scene Builder Stencil. I used this fabulous stencil on my card.


To make the A6 size card, I first stamped the images, colored them with Copic markers, then cut them out using the coordinated outline dies. 


Copic Markers Used:
 Mermaid
Skin: E04, E11, E21, E00, E000
Cheeks: R20
Hair: E18, E08, YR18, YR14
Tail: BG49, BG45, BG01

Fish
Yellow: Y19, Y15, Y13
Blue: BG18, BG49, BG45, BG01

Lobster
Orange: YR18, YR09, YR04, YR02
Dots: C5, White gel pen

Seashell
E35, E34, E31, E50

Starfish 
YR18, Y17, Y15

To make the background, I first cut a piece of white cardstock 5-7/8"W x 4-1/4"H. I used the new Under the Sea Scene Builder Stencil and Distress Oxide inks to create the background. 

Distress Oxides used:
Water: Tumbled Glass
Bubbles: Faded Jeans
Seaweed: Lucky Clover
Coral: Carved Pumpkin and Picked Raspberry


For the sentiment, I used a stamping block and stamped it on white cardstock using Momento Tuxedo Black Ink. I then cut it out using a double-stitched die from Gina Marie Designs. I adhered the sentiment, seashells, and star fishes onto the card front using liquid glue. I adhered the mermaid, lobster, and fish using double-sided adhesive foam squares. I used blue cardstock to mat the card front then adhered it to an A6 white card base and the card was finished.


Thank you for stopping by and I hope you enjoyed this card. This is such a cute set of stamps with coordinating stencils and papers. Have a wonderful and creative week! 

Friday, December 17, 2021

Blank Page Muse/I Brake For Stamps: Elephant and Gel Printing Plate Background Card

I was so excited this summer when I got a gel printing plate (Gelli Arts Printing Plate) for my birthday. I’ve wanted one for a while and when a friend sent me a gift card for Amazon, I decided that is what I wanted to get! It took me a few tries with different mediums before I decided that using Distress Oxide Inks gave me the best results. Using the oxide inks on the gel printing plate produced the perfect background for this amazing stamp called Elephants from Blank Page Muse/I Brake for Stamps. I love all things elephants so I will be keeping this card and displaying it on my shelf. 

You can save 15% on these stamps and all purchases at Blank Page Muse and at I Brake for Stamps by using my special code BPMBetty. 


Supplies:
  • Blank Page Muse/I Brake for Stamps: Elephants
  • White 6" x 6" card base
  • Black cardstock mat: 5-3/4" x 5-3/4"
  • White cardstock mat: 5-1/2" x 5-1/2"
  • White glossy cardstock: 5-1/4" x 5-1/4"
  • White and black cardstock for the word Peace: 3" x 3" each
  • Craft Mat
  • Distress Oxide Inks in Rusty Hinge, Spice Marmalade, Squeezed Lemonade, Candied Apple
  • Gel printing plate
  • Water spray bottle
  • Heat gun
  • Paper towels
  • Stamp positioner
  • Black solvent ink/archival ink (I used StazOn)
  • Uppercase alphabet dies (I used Sizzix Tim Holtz Alphanumeric Classic Upper dies)
  • Die cutting machine
  • Your favorite adhesive

Instructions:
  • Place the gel plate on top of the craft mat to protect the work surface.
  • Using the Distress Oxide in Squeezed Lemonade, apply ink directly onto the gel plate using the pad then spritz water on top. The ink will bead up. Place the glossy paper onto the ink and swirl it around. Use a heat gun to dry the ink. Keep the heat gun moving so the paper does not burn. Repeat this step with all the colors of oxide inks listed in the supplies.


  • After the ink is completely dry, use a paper towel and wipe the surface of the glossy paper. This will remove the oxide and bring back the shine to the glossy paper.
  • Using a stamp positioner, stamp the Elephant stamp using solvent/archival ink onto the glossy paper. It may take several times to stamp the entire image so it's best to use a stamp positioner. 
  • Cut out the word Peace out of black and white cardstock using the alphabet dies. To make it easier to line up, adhere the dies to blue painter's tape after aligning them on a ruler. Place it onto the cardstock and run it through a die cut machine. Starting with the white set, add glue to the letters and place it onto the card front then remove the blue tape. Repeat this step with the black set, but offset it a little to make the white set look like a shadow


  • Adhere the black mat to the card base, then the white mat, then the card front and the card is finished.

Thank you for stopping by today. I hope you give this card a try! Have a wonderful and creative week. 

Looking for more Inspiration? Click the links below!
The Blank Page Muse Shop https://blankpagemuse.com/
I Brake for Stamps Shop https://ibrakeforstamps.com/

Tuesday, December 14, 2021

Scrappy Boy Stamps Sneak Peek: Hope You Have a FIN-tastic Birthday!

It's sneak peek time over at Scrappy Boy Stamps and what an awesome stamp set Scrappy Boy is releasing for December! This set, called Mermazing, is amazing! This Little Mermaid-inspired set has 11 image stamps with coordinating outline dies and 6 sentiment stamps that you can mix. There is also a beautiful 6x6 paper pack, called Under the Sea, that is perfect for cardmaking, scrapbooking, and more! Scrappy Boy is debuting his first stencil, called Under the Sea Scene Builder Stencil, in this new release. I'll be using this stencil for my next project.  All products will be available in the Scrappy Boy Stamps store on release day, Thursday, December 16, 2021. 

Today's A6-size card features one of the cute mermaids, the fish, bubbles, a seashell, and starfishes. I made a shaker card using the gorgeous papers in the new Under the Sea paper pack. So many beautiful patterns so it was hard to choose which ones to use. 


To make this card, I first stamped the images then colored them with Copic markers. I then cut them out with the coordinating outline dies.


Copic Markers Used:
Mermaid
Skin: E04, E11, E21, E00, E000
Cheeks: R20
Tail: V09, V06, V04, V01, V000

Fish
Yellow: Y19, Y15, Y13
Blue: BG18, BG49, BG45, BG01

Bubbles
B12, B01, B00, B0000

Seashell
E35, E34, E31, E50

Starfish
#1 Y23, Y17, Y15
#2 Y18, Y23, Y17


I first prepared the card front by adhering patterned paper from the Under the Sea paper pack onto a turquoise cardstock mat. 
For the shaker part of the card, I used a shaker die from Stamp Anniething. I cut 5 layers of chipboard frames to build up the height of the shaker so that the sequins had plenty of room to be shaken. I cut out one turquoise frame for the top of the shaker and used patterned paper from the Under the Sea paper pack for the back of the shaker. I used liquid glue to glue the chipboard together; however, I used double sided tape to adhere the acetate onto the frame of the shaker and to the chipboard. Liquid glue is just to messy for me and when you get it onto the acetate, it’s almost impossible to clean.


Instead of placing the shaker just on top of the card front, I die cut the hole in the card front (the patterned paper with the turquoise mat) and inserted the shaker so that it’s flush with the card front. I added double sided tape to the shaker and used double-sided adhesive foam tape in between the card base and card front to adhere the front and back together. 

I stamped the sentiment with Versamark watermark ink onto turquoise paper and embossed it with white embossing powder. I used a small rectangular double stitched die to cut it out. I adhered the sentiment and all the colored images using double sided tape. I did not want to chance having any liquid glue smear on the acetate. 

To finish the card, I added an additional piece of white cardstock to the back panel of the card to make it more sturdy.

I hope you give this card a try. I have to admit when I first started making shaker cards, I was a little intimidated, but after making a couple, they are really fun to make! 


Thank you for visiting today and I hope you have a very creative week!


Sunday, December 12, 2021

Paper Nest Dolls: Happy Holidays from Eskimo Ellie

Paper Nest Dolls came out with quite a few new releases for December and I just love this little Eskimo girl named Eskimo Ellie. She reminded me of my daughter when she was little. I used the digital stamp, but it also comes in red rubber (available soon). I made a holiday card, but this stamp can be used for many other occasions. 


For this A6 card, I first printed the stamp 3-1/2" tall then I colored her with Copic markers. To make the fur trim around her clothing, I used a white gel pen and drew in some wacky lines. I trimmed the paper to 2-3/4"W x 4-1/8"H then matted it with lavender colored cardstock, keeping a 1/8" border. 


Copic markers used:
Skin: E13, E11, E21, E00
Cheeks: R20
Hair: T7, T5, T3
Purple: BV01, BV00, BV000, BV0000
Black boots: T7, T5, T3
Seal: C3, C1, C00
Ice: B01, B000


I used snowflake patterned paper from Hobby Lobby and matted it with lavender colored cardstock, keeping a 1/8" border. 

I created the sentiment using MS-Word, then trimmed it and cut a dovetail. I also added a lavender cardstock mat to the sentiment. 

To finish the card, I added three snowflakes from Hobby Lobby. 


Thank you for stopping by today and hope you give this card a try! It's so easy and fun to color! 

Thursday, December 9, 2021

Stamp Anniething: Design Team Day Shaker Card

I really love shaker cards, especially ones for Christmas. Today's shaker card is made with the adorable Adalaid - Hiya Gnomie stamp from Stamp Anniething. This is not an actual Christmas stamp, but I thought she'd be cute on a Christmas card! You can use many of Stamp Anniething's stamps for holiday cards by using holiday colors, papers, and die cuts. 


For this A6 size card, I first stamped the image on white cardstock and colored it with Copic markers. I then cut her out using the coordinated outline die.


Copic Markers Used:
Skin: E04, E11, E21, E00, E000
Cheeks: R20
Tongue: R22, R20
Hair: E29, E37, E35, E34, E31
Blue-Green: BG18, BG13, BG23, BG11
Red: R39, R37, R35, R32
Brown (dirt): E29, E35, E31

I used patterned papers from the Holidayville Grab and Go Box. This paper pack will be available separately at a later date. I matted all the patterned papers with black cardstock. 

For the shaker, I used the rectangle die from Shaker Basics Set #1 and the Shaker Basics Winter Add On - Candy Cane Frame. I filled the shaker with Very Merry Sprinkles. 

I printed the sentiment on my printer and then cut it out using one of the Banner Dies. I cut out another banner die with black cardstock for the mat. 

To finish the card, I added some paper poinsettias from Hobby Lobby. 


Thank you for stopping by! Hope you try making this shaker card. It’s so much fun! Have a wonderful holiday season. 

Wednesday, December 8, 2021

Conie Fong Art & Design: Season's Greetings

It's really starting to feel and look like the holiday season here in Northern California. It's getting fairly chilly here as it's been in the 50's. This week has been foggy one day and drizzly the next. People have put up their holiday lights and decorations so it's fun to drive around and see them even in the cold! I still love the traditional colored lights on trees, just like the lights the cute gnome, Christmas Lights Gnome, is holding. Conie Fong has the cutest gnome digital stamps; I can't get enough of them!

To make this 6x6 card, I first printed the digital stamp 4" tall on white cardstock and then colored it with Copic markers. The sentiment "Season's Greetings" is from the Christmas Present Gnome And Sentiment Bundle.

Copic Markers Used:
Skin: E11, E21, E00, E000
Cheeks: R20
Beard: C5, C3, C1
Green: YG17, YG07, YG05
Red: R46, R24, R22
Black: T7, T5, T3
White: T5, T3, T1, T0
Ground: W3, W1
String of lights - Purple: V15, V12; Blue: BG07, BG02; Yellow: Y19, Y13; Red: R46, R24, R22

All the patterned paper is from the Photoplay Gnome for the Holidays Christmas paper pack. The tree die cuts are from dies from my stash a friend gave me. 


Thank you for visiting today. It's not too late to make this card for the holidays. Have a wonderful holiday season!