Sunday, January 30, 2022

Scrappy Boy Stamps: Burlesque Beauties!

I am having so much fun making cards with my favorite burlesque stamp sets from this month's new release from Scrappy Boy Stamps! Check out the two stamp sets, Burlesque Beauties and Curve Appeal; the two stencils, Burlesque Background Stencil and Burlesque Stage Stencil; and the 6x6 and a 4x9 double-sided paper pack, Burlesque, that is now available in the  Scrappy Boy Stamps store. I really love all the coordinating products of this set. It makes it fun and easy to quickly make cards. Today I made two cards to share. 
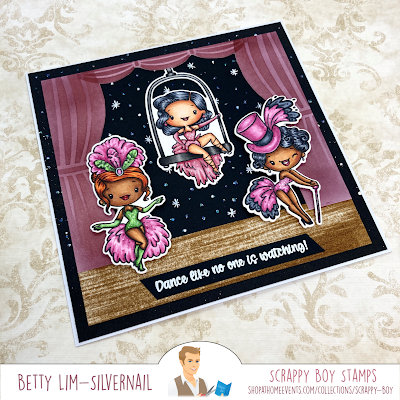

CARD #1
First I stamped the image and colored it with Copic markers. I then cut it out using the coordinating outline die. 


Copic Markers Used:
Skin: E04, E11, E21, E00, E000
Cheeks: R20
Red: R39, R37, R35, R32
Black: T7, T5, T3, T1

For this A2 card, I first used a stitched scalloped rectangle die to cut out the first mat from red cardstock. Then I used a paper trimmer to cut out the second mat from black cardstock. Then I trimmed one of the patterned papers from the Burlesque paper pack and and placed it on top. I used a stitched scalloped oval die and red cardstock and a stitched oval die and white cardstock to put mats behind the colored stamps. 

For the sentiment, I stamped it on black cardstock and used white embossing powder and trimmed it to size, along with a white mat, with my paper trimmer and used scissors to create the fish tail. I adhered everything down with liquid glue except for the sentiment, where I used double-sided adhesive foam tape. 
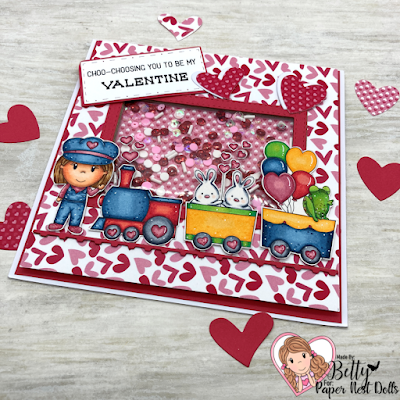

CARD #2
First I stamped the image and colored it with Copic markers. I then cut it out using the coordinating outline die. 

Copic Markers Used:
Skin: E04, E11,E21,E00, E0000
Cheek: R20
Lips: R29, R22
Hair: E37, E35, E33, E31
Blue: B18, B16, B14, B12
Pole: T3, T2, T1

I created the embossed background for this A2 card, using the Burlesque Background Stencil and Ocean Blue Stencil Butter from The Crafter's Workshop. I used a double stitched circle die and white cardstock to cut out the mat to put behind the stamp.

I stamped the sentiment in blue ink then trimmed it to the size to fit the card and added a blue cardstock mat under it. I used some small leaves dies that looked like feathers to accent this card. To finish the card, I added a bow to the top corner of the card. 


I hope you enjoyed this month's new release as much as I did! The stencils and patterned paper are so fun to use and so easy to make beautiful cards. I hope you give these cards a try!  

Thank you for visiting and hope you have a very crafty day! 


Thursday, January 27, 2022

Paper Nest Dolls: Love Shack Valentine's Day Card

There is still time to make some Valentine's Cards! I am loving this cute digital stamp set by Paper Nest Dolls called Love Shack. This set, inspired by the B-52's song, Love Shack, has seven digital stamps in this set. Check them out in the Paper Nest Dolls store! This set is also great for birthdays, anniversaries, love, and more. 


To make this A6 size card, I first printed the stamps I wanted to use for my card. I colored them with Copic markers then fussy cut them out. 


Copic colors used:
Girl:
Skin: E13, E11, E21, E00, E000, E0000
Cheeks: R21
Hair: E57, E55, E53, E51
Pink: RV13, RV02, RV11, RV000
Red: R29, R24, R22

Boy:
Skin: E13, E11, E21, E00, E000, E0000
Cheeks: R21
Hair: E57, E55, E53, E51
Red: R39, R29, R24, R22
Gray: C5, C3, C1
Green: YG17, YG05

Love Shack (Trailer)
Blue: BG57, BG53, B000, BG000
Pink: RV13, RV02, RV11, RV000
Gray: C7, C5, C3, C1

Patterned papers are from "I Love You Soy" by Catherine Pooler Designs, Double-stitched rectangular die is from Gina Marie Designs, and the hill and tree dies are from my stash. 


Thank you for stopping by and I hope you make some cards with these cute stamps from Paper Nest Dolls!


Tuesday, January 25, 2022

Conie Fong Art & Design: Lulu & Lonny Bundle of Love

It's time to get those Valentines cards made since Valentine's Day is just about a two weeks away. Today's card features Conie Fong Art & Design's digital stamp set called Lulu and Lonny Bundle of Love. This set comes with 4 images and 1 sentiment. This set is perfect for Valentine's Day, birthday, anniversary, and more! 


I printed the digital stamps on watercolor paper using my laser printer. I went out of my comfort zone of using alcohol markers and colored these stamps with Distress inks. I wanted a more pastel look for my pigs and sometimes it's hard to do that with the alcohol markers I have. 


Distress Ink colors used:
  • Pigs: Tattered Rose, Hickory Smoke
  • Hearts: Worn Lipstick, Dusty Concord
  • Bucket: Peeled Paint
Supplies for the card:
  • Watercolor paper - slimline size
  • Lace edge slimline die by Gina Marie Designs

This is a very simple one layer card to make. I hope you give it a try! Thank you for visiting and have a wonderful and crafty day!


Sunday, January 23, 2022

Scrappy Boy Stamps New Release: Burlesque!

This month's new release from Scrappy Boy Stamps is all about burlesque! Check out the two stamp sets, Burlesque Beauties and Curve Appeal; the two stencils, Burlesque Background Stencil and Burlesque Stage Stencil; and the 6x6 and a 4x9 double-sided paper pack, Burlesque, that is now available in the  Scrappy Boy Stamps store. I really loved all the coordinating products of this set. It makes it fun and easy to quickly make cards. Today I made two cards to share using stamps from the Burlesque Beauties set. 


CARD #1
First I stamped the image and colored it with Copic markers. I then cut it out using the coordinating outline die. 


Copic Markers Used:
Skin: E13, E11, E21, E00, E000
Cheeks: R20
Hair: E37, E35, E34, E31
Pink/Red: RV69, R56, RV95, RV93, RV91; plus silver metallic gel peN
Black: T7, T5, T3
White: T5, T3, T1, 0

This A2 card uses three different patterned papers from the Burlesque paper pack and the Burlesque Background Stencil. To create the stenciled background, I added pink fine glitter and black chunky glitter to transparent texture paste and mixed it together then used the stencil to create the pattern. This gives it a shaker card look, without having to make a shaker! I used a stitched circle die to cut out the circle and matted it with patterned paper cut using a stitched scalloped die.


I cut all the patterned pieces to fit onto an A2 card and matted it with black cardstock. I stamped and trimmed the sentiment and matted it with black cardstock as well. I adhered all the pieces using liquid glue except the scalloped circle mat and hat, where I used double-sided adhesive foam tape.


CARD #2

First I stamped the image and colored it with Copic markers. I then cut it out using the coordinating outline die. 


Copic Markers Used:
Skin: E04, E11, E21, E00,E000
Cheeks: R20
Lips: R29, R22
Hair: E18, E08, YR18, YR14
Purple: V17, V15, V12; White gel pen
Wine Glass: T3, T2, T1, 0
Olive: YG97, YG95, YG91; Silver metallic gel pen
Bubbles: B00, RV00, YG00, BG000

I created the embossed background for this A2 card, using the Burlesque Background Stencil and embossing powder in Aubergine from Stamp Anniething. I used the Circle Mat Die from Stamp Anniething and white cardstock to cut out the 'bubbles' to put behind the stamp.


I stamped and embossed the sentiment on purple cardstock with white embossing powder then trimmed to and matted it with white cardstock.  I added a purple mat under the stenciled background and under the circle in the middle. I adhered everything with liquid glue except for the girl and sentiment, where I used double-sided adhesive foam tape. 


Thank you for stopping by and I hope you give these cards a try! This stamp set is so much fun to create cards, scrapbook pages, decorations, etc. Have a creative day! 


Wednesday, January 19, 2022

Scrappy Boy Stamps Sneak Peek: Dance Like No One is Watching!

It's Day 1 of Sneak Peeks at Scrappy Boy Stamps! This month's two stamp sets are cute and fun burlesque-inspired stamps. The first set is called Burlesque Beauties and the second set is called Curve Appeal. The Burlesque Beauties set comes with 7 images and 11 sentiments that you can mix and match! The Curve Appeal set comes with 5 images and 12 sentiments! So much fun to mix it up with both sets to create some awesome cards, scrapbook pages, journal pages, etc. In addition to the stamp sets, there are two coordinating stencils. One is called Burlesque Background Stencil (this will be shown in a future card) and the other Burlesque Stage Stencil. Plus, there is a gorgeous 6x6 and a 4x9 double sided paper pack called Burlesque. So many fun things to create with!

All new releases will be available in the Scrappy Boy Stamps web store on release day, Friday, January 21, 2022. 


I created a 6x6 card so that I can include three of the burlesque girls. I first stamped all the images and colored them with Copic markers then cut them out with their coordinating outline dies. 


Copic markers used (girls from left to right)
Girl 1
Skin: E37, E35, E33, E53, E51
Hair: E08, E18, YR16, YR14
Cheeks: R83
Lips: R29, R22
Green: YG17, YG13, YG11; plus white gel pen
Pink: RV66, RV55, RV52

Girl 2
Skin: E11, E21, E00, E000, E0000
Cheeks: R20
Lips: R29, R22
Pink: R85, R83, RV32, RV91; plus pink glitter gel pen, white gel pen
Shoes: Black Metallic Gel Pen
Swing: T7, T5, T3, T2

Girl 3
Skin: E37, E35, E33, E53, E51
Cheeks: R83
Lips: R85, R83
Pink: RV66, RV55, RV52; plus white gel pen
Gray: C7, C5, C3


To make the background, I first used black cardstock and dotted it with Stickles to create some sparkle. Then I used the Burlesque Stage Stencil and inked it with Distress Ink in Aged Mahogany. I fussy cut the curtains and placed it on the black cardstock (not adhered yet). I then cut out a piece of white cardstock for the stage floor and dragged my Distress Ink in Vintage Photo over it to create a wood grain look. I glued that into place under the curtains and then adhered the curtains. I used a white gel pen to add some more sparkle to the background. I then adhered all the girls. I glued the girl on the swing flat and the other two with double-sided adhesive foam tape.

Lastly, I stamped and heat embossed the sentiment then trimmed it and adhered it to the card. I used a Spectrum Noir sparkle pen to add glitter onto the clothes of the girls. 


Thank you for stopping by today and I hope you enjoyed today's sneak peek! I will have 2 more cards to share this coming Sunday and next Sunday. See you then and have a crafty day! 


Monday, January 17, 2022

Stamp Anniething: My First MemoryDex Card! Iguana Kiss You!

Today is my Design Team Day where I get to use stamps and products of choice. I made my very first MemoryDex card for my brand new MemoryDex holder! I received the holder from my Stamp Anniething Secret Santa for Christmas. What is a MemoryDex you ask? It's like a Rolodex, but bigger. A standard Rolodex card is 4"W x 2-1/4"H and the MemoryDex card is 4"W x 4"H. Instead of putting names and addresses on the card, you decorate it like a greeting card and then display it in the holder. 


The stamp I used is from the Love Me Love My Pets Grab and Go Box. It doesn't have a name to the stamp, but it is marked, "Pets 2." Since Valentine's Day is approaching, I made a Valentine's MemoryDex card to display.

I first stamped the image, colored it with Copic markers, then cut it out using the coordinating outline die. 

Copic Colors Used:
Skin: E04, E11, E21, E00, E000
Cheeks: R21
Tongue: R21, R20
Hair: E49, E47, E44, E43, E41
Blue: B99, B95, B93, B91
Red: R59, R37, R24, R22
Green: YG17, YG07, YG05, YG03
Black: T9, W6

Stamp Anniething Products Used:
-Love Me Love My Pets - Paw Print Heart Edger Die
-Love My Pets Paper Pack
-Love is in the Air Paper Pack
-Edger Dies
-Enamel Dots

I cut a piece of patterned paper 4" x 4-1/4" then used the Edger Dies to create the holes on the bottom and the tab on the top. I used the Paw Print Heart Edger Die to cut out a decorative border using red cardstock that is available in the Grab and Go Box. I also used this die to cut out hearts from different patterned paper and inlaid the hearts. Then I used other patterned papers to decorate the card. I stamped and trimmed the sentiment and added it to the tab. To finish the card, I added a few enamel dots.
I really enjoyed making this MemoryDex card. I'll be making more in the future to add to my holder. Thank you for stopping by and have a creative day! 


Sunday, January 16, 2022

Paper Nest Dolls & Cheri's Digital Art Collaboration Stamp: Best Friends Forever

Yesterday we celebrated Paper Nest Dolls' 9th Birthday and for reaching 6000+ members in their Facebook Inspiration Group. One of the give-aways was a digital stamp created by Paper Nest Dolls in collaboration with Cheri's Digital Art called Celebration. What a cute and fun stamp that you can use for many occasions by creating your own sentiment. I added the sentiment, Best Friends Forever for my BFF! Perfect for a Galentine's Day card. 

Happy Birthday and Congratulations to Paper Nest Dolls (link to FB inspiration group) for reaching two milestones and to Cheri's Digital Art (link to FB inspiration group) for starting her new digital stamp business!


I printed this digital stamp at 3-1/2 inches tall to fit on a A2 size card. I wanted to make a clean and simple card so I designed it in Microsoft Publisher then printed it on a laser printer and it was ready to color with my Copic markers.

Copic Markers Used:
Doll #1
Skin: E13, E11, E21, E00, E000
Cheeks: R21
Eyes: B02, B01, B00
Hair: E49, E47, E44, E43, E41
Glasses: BG000
Purple: V17,V15, V12

Doll #2
Skin: E04, E11, E21, E00, E000
Hair: E18, E08, YR18, YR14
Blue: B06, B04, B02, B00
White: C5, C3, C00, 0

Heart/Pink: R85, RV34, R83, V01

Ground/Gray: T5, T3

After coloring the image, I trimmed it and adhered a black cardstock mat under it then adhered it to the top-folding A2 card base. To finish the card, I added highlights to the heart with a white gel pen. 


I hope you give this cute card a try! Thank you for stopping by and have a creative day! 


Saturday, January 15, 2022

Paper Nest Dolls: Happy 9th Birthday PND!

Paper Nest Dolls is celebrating their 9th Birthday and for reaching a whopping 6,000+ members in their Facebook inspiration group! Congratulations to Christine and Larry Young, owners of Paper Nest Dolls, and to their children, whom the stamps are modeled after! Today's card features the free digital stamp called Party Princess Ellie, which is given away free to all the 6,000+ Facebook members! 


Today's A6 card is somewhat a mixed media card. I used a combination of Copic markers, Primacolor pencils, and Distress Inks to color the stamp. I could not find the correct color combo of the blue green or pinks to match the patterned paper I wanted to use for this card so it was Distress Ink to the rescue! I also used a white gel pen to add a few highlights.


I printed the digital stamp 3" tall onto watercolor paper and colored it as follows:


Copic Markers for the skin and hair
Skin: E04, E11, E21, E00, E000
Cheeks: R21
Hair: E37, E35, E33, E31; plus Prismacolor pencils PC946, PC943, PC1003

Distress Inks for everything else
Blue Greens: Peacock Feathers
Yellow: Squeezed Lemonade and Wild Honey
Pink: Worn Lipstick and Hickory Smoke

Supplies used for the card:
Oval die and Scalloped oval die: Gina Marie Designs
Patterned paper and ephemera: Echo Park


Thank you for stopping by and have a creative day! 

Tuesday, January 11, 2022

Conie Fong Art & Design: Gnome with Balloons Bundle

It's the perfect time to get those Valentine's Day cards started! I love making my cards using digital stamps that are cute and easy to color, just like this new release by Conie Fong Art & Design called Gnome with Heart Balloon Without Grass from the Gnome With Balloons Bundle. This bundle comes with many different images, another one with a round balloon, and options with or without grass, plus several sentiments! This set has 4 character images and 5 sentiments and it's on sale for only $3!!


I wanted to make a slimline card and wanted the gnome to be floating in some clouds so I designed the card in Microsoft Publisher. I then printed it and colored the gnome with Copic markers and accented it with a white gel pen.


Copic Markers Used:
Skin: E11, E21, E00
Gray: T5, T3, T1
Red: R39, R35, R32, R30

After coloring the gnome, I used a white gel pen to add hearts and dots to the balloon and hat. I also added dots to his outfit.


I used masking paper to cover the gnome and then used a clouds stencil and Distress Oxide inks in Spun Sugar to create the background and the card was done. Fast and simple! I hope you give this card a try!


Thank you for stopping by and have a creative day! 


Sunday, January 9, 2022

Paper Nest Dolls: Choo-Choosing You to be my Valentine Shaker Card

Besides Christmas cards, my favorite cards to make are Valentine's Day cards. It's because I love the colors of red and pink and I love hearts! Today's card is using Paper Nest Dolls' newest release called Love Train. It's a set with 8 adorable images! This set comes in digital and in red rubber. I used the digital set so that I can make it the size I want for this 6x6 square card. 


I printed the images and colored them with Copic markers. I then fussy cut each one out, even the little hearts! 


Copic markers used:

Conductor
Skin: E04, E11, E21, E00, E000
Cheeks: R20
Hair: E37, E35, E33, E31
Blue: B97, B95, B93, B91
Pink: R85, R83, RV11

Engine
Red: R37, R35, R32
Blue: B97, B95, B93, B91
Pink: R85, R83, RV11
Black: C7, C5, C3, C1

Rabbits
White: C5, C3, C1, 0
Green: G09, YG06, YG03
Yellow: Y38, Y35, Y32
Pink: R85, R83, RV11
Black: C7, C5, C3, C1

Frog with Balloons
Green: G09, YG06, YG03
Brown: E35, E31
Yellow: Y38, Y35, Y32
Pink: R85, R83, RV11
Black: C7, C5, C3, C1


Supplies used to make the card:
  • Patterned paper from Stamp Anniething
  • Shaker sequins from Hobby Lobby
  • Shaker sprinkles from Stamp Anniething
  • Shaker dies from Stamp Anniething
  • Heart dies from Cricut Cuttlebug
  • Train track from Local King Rubber Stamp
  • Sentiment is created on my computer and printed, then cut using a die from C.C. Designs

Thank you for stopping by and I hope you have a wonderful and crafty day! 


Friday, January 7, 2022

Stamp Anniething Sneak Peeks Day 3: Timothy - Hunting for Adventure

Welcome to Day 3 of Stamp Anniething's Sneak Peeks! All items from Days 1, 2, and today are now available in the Stamp Anniething web store! Today's A2 size card features the adorable stamp called Timothy-Hunting for Adventure. I also used the new Foliage Card Mat die, the Wild word die, and the Let's Get Wild paper pack for this Wild Thang card. 

Other Stamp Anniething products used:
-Hybrid Inks: Parakeet, Willow Bough, Bamboo, and Pecan
-Jelly Dots

I first stamped the image and colored it with Copic markers. 


Copic markers used:
Skin: E37, E35, E33, E53
Beard: T9, T7, T5, T3
Tongue: R22, R20
Brown: E49, E47, E44, E43, E42
Gray: W8, W6, W4, W2
Binoculars: T7, T5, T3, T2, T0


This is a pretty simple card to make. I used Stamp Anniething's Hybrid inks (colors listed above) and inked in piece of Bristol water color paper. I then flicked some watered-down dark green, light green, and white acrylic paint using a paint brush onto the paper. I then used the Foliage Card Mat die to cut out the frame for my card.


I used one of the patterned papers from the paper pack to use for the card front and used the reverse side of the piece I trimmed off to die cut the word Wild. I cut out the outline for the Wild word die once using black cardstock and another one using Kraft cardstock and layered them. 

I stamped the sentiment and layered it with the same patterned paper I used for the Wild word die. 


I hope you enjoyed this month's sneak peeks/new release. It is one of my favorites! All products are now available in the store. Thank you for stopping by and have a wonderful and creative day! 


Thursday, January 6, 2022

Stamp Anniething Sneak Peek Day 2: Justin - Let's Get Wild

Welcome to Day 2 of Stamp Anniething's Sneak Peeks! Today's card features the cute and wild, Justin-Let's Get Wild stamp, coordinating outline die, the Wild word die, Monstera stencil, and the Let's Get Wild paper pack. I made a double easel card that fits into an A2 size envelope. The new release will be available tomorrow, January 7, 2022, beginning at 9:00 am PST/12:00 pm EST. 


Other supplies used from Stamp Anniething:
-Card Mat Dies
-Jelly Dots


I colored the stamp using Copic markers. Colors used:
Skin: E04, E11, E21, E00, E000
Cheeks: R20
Tongue: R22, R20
Hair: E18, E08, YR18, YR14
Purple: BV28, BV17, BV13, BV11
Green: G99, G94, G24, G21
Black (tires): C9, C7, C5
Silver: C5, C3, C1
Headlights: C3, C1, White gel pen


To make the A2 size double easel, please go the double easel link. I have previously made this style card and provided the measurements in a past blog post.  Link to double easel measurements: Double Easel.  This card will fit in a A2 size envelope when folded flat. 


Thank you for visiting and please come back tomorrow for Day 3 of Stamp Anniething's Sneak Peeks! Have a terrific day!