Monday, March 27, 2023

Paper Nest Dolls: Will Work For Carrots

Easter is just two weeks away so I’m getting my final Easter cards done today. I just love using digital stamps so that I can make the image the size I need. Today’s 5x5 card features the adorable digital stamp from Paper Nest Dolls called Will Work For Carrots. This stamp is also available in a red rubber stamp. I’m keeping the cards clean and simple since I’ll be making several of these cards. 

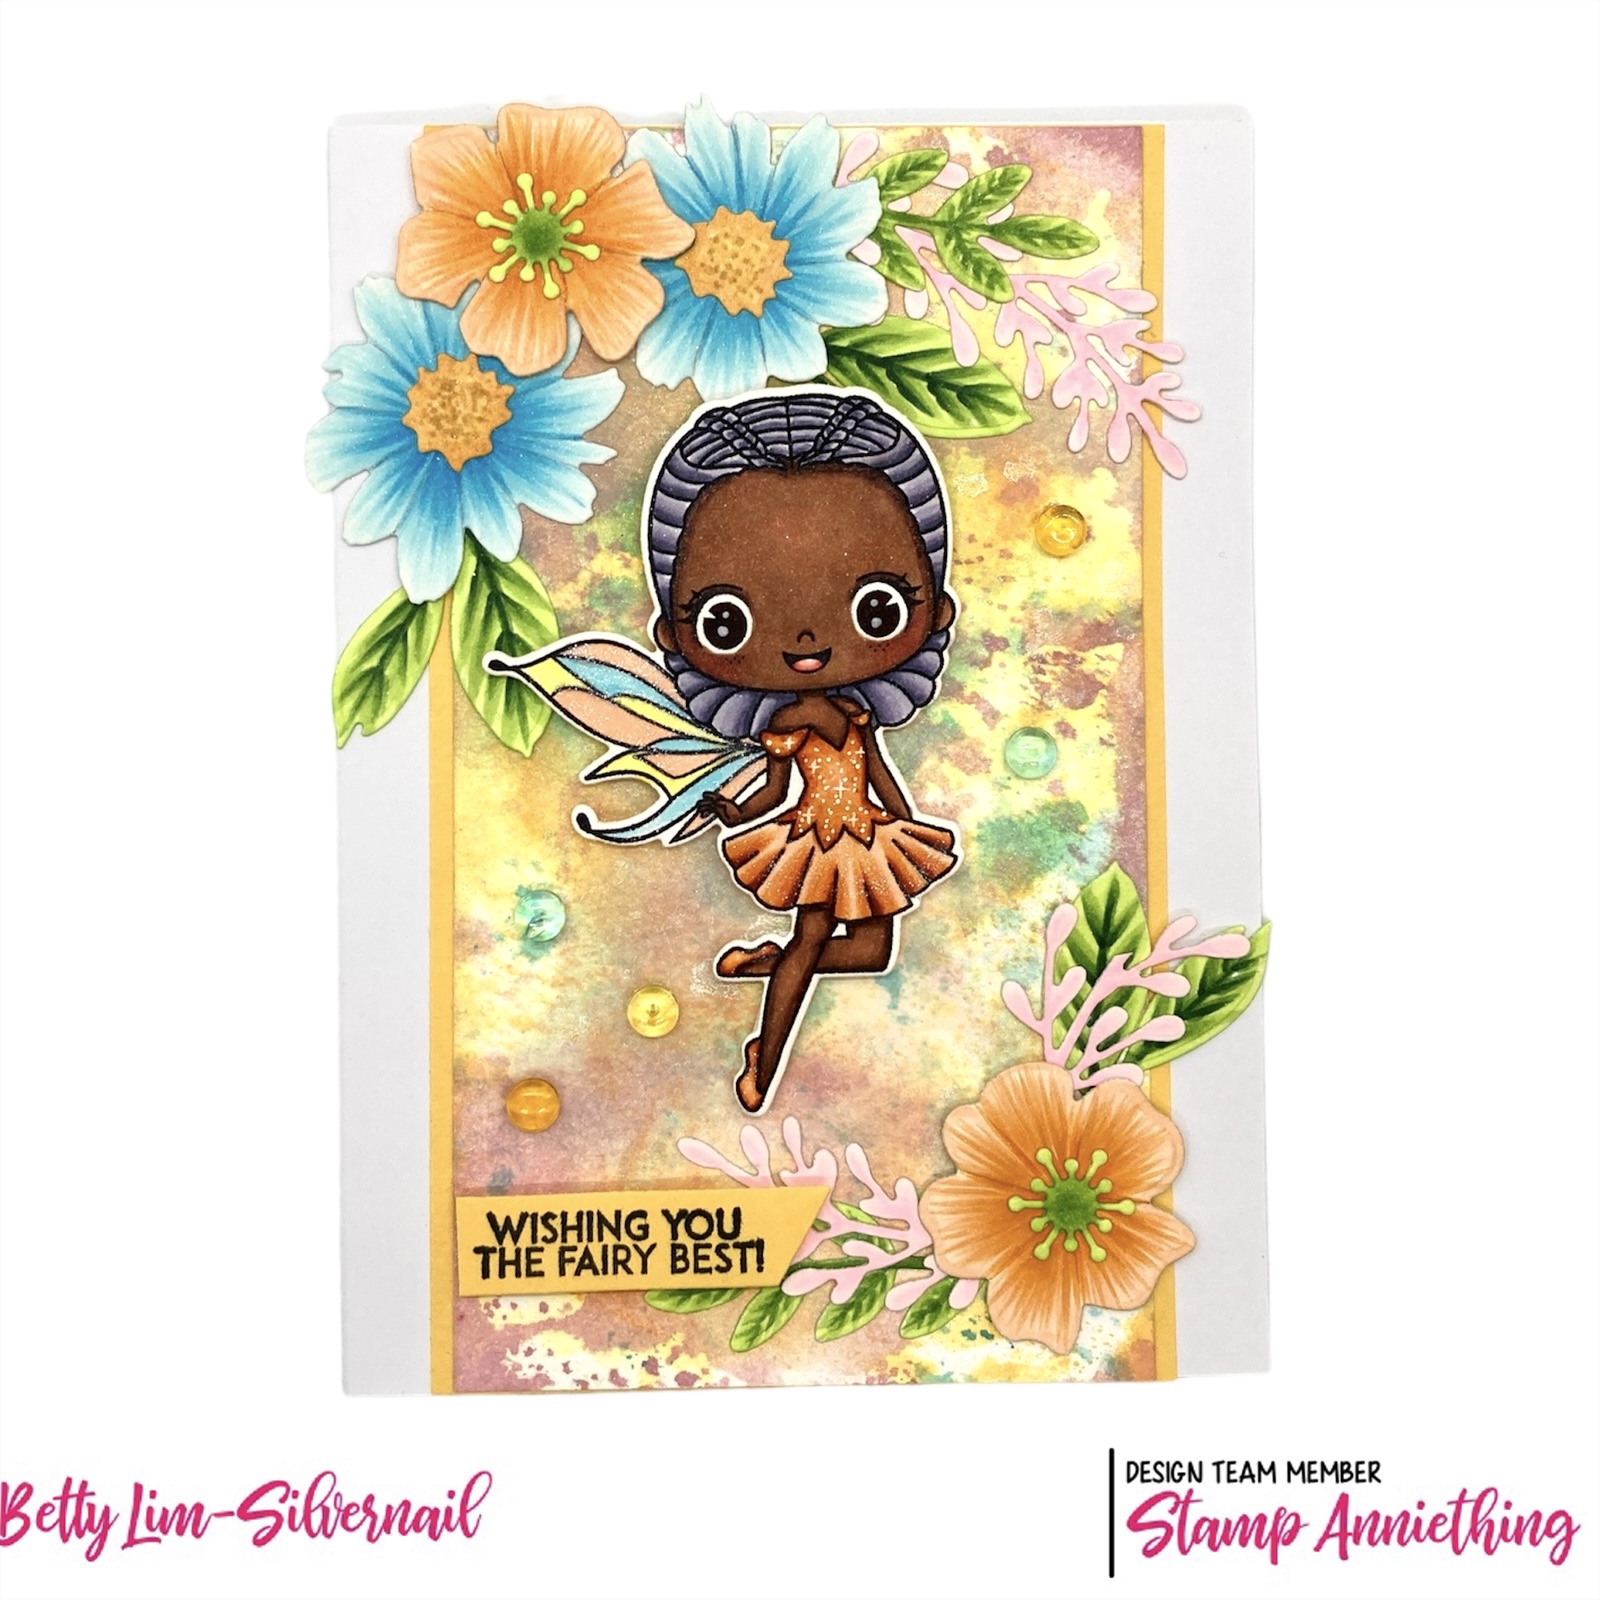
I printed the image 2-3/4”W x 3” H and colored it with Copic markers in the following colors:

White: N3, N1, 0
Pink: RV52, RV00
Yellow: Y38, Y35, Y32
Orange: YR04, YR02
Blue Green: BG13, BG23, BG11, BG000
Brown: E33, E31, E30
Green: YG07, YG05, YG01


I used the yellow patterned paper from Echo Park Welcome Spring and the pink patterned paper from Carta Bella Flora No. 4 to create the mats for the card.

The polka dot papers for the flowers, leaves, and butterfly are from PhotoPlay Say it With Stamps by Becky Moore. I used older flower and butterfly dies from Sizzix, but I don’t have the exact name of the set. These dies were given to me by a friend.

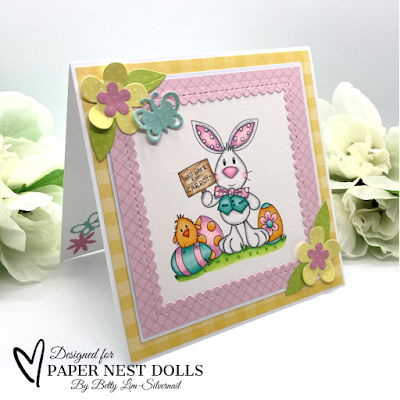
This is a fun, fast, and easy card to make for Easter. I hope you give this one a try!


Thank you for stopping by. Have a Happy Easter!


Sunday, March 26, 2023

Scrappy Boy Stamps: Your Wish is my Command!

I am really loving this month's Scrappy Boy Stamps new release. Today's card features stamps from "She's a Dream" stamp set, which was inspired by America's favorite 2,000 year-old genie! I also used patterned papers from the beautiful "She's a Dream"paper pack. This card was made to be a birthday card, but the card can be used for any occasion just by changing the sentiment. This stamp set comes with many more sentiments.


Scrappy Boy Stamps products used:
  • She's a Dream stamps and outline dies
  • She's a Dream Background stencil
  • She's a Dream paper pack

I stamped and colored all images using Copic markers in the following colors:

Genie
Skin: E15, E11, E21, E00
Cheeks: E93
Lips: R22, R20
Hair: E39, YR24, YR23, YR20
Pink: R59, R85, R83, R81


The genie bottle was colored using Arteza glitter gel pens. The genie smoke is colored with Copic markers RV63, RV52, RV00.

To create the overlapping gate fold card, start with a card base that measures 8.5"W x 5.5"H. Score at 1.75" and 5.75" and fold the flap inward. The smaller flap on the left overlaps the right flap. I covered the panels with purple cardstock then patterned papers from the She's a Dream paper pack.

The rectangular card front flap measures 2-5/8"W x 3-7/8"H. I used one of the Scrappy Boy Stitched Rectangle Dies to cut out the rectangle then used the She's a Dream Background stencil with Distress Oxide inks in Picked Raspberry and Dusty Concord to create the background.

I hope you give this card a try. I love making overlapping gate fold cards. They seem to stay closed better than the traditional gate fold design. 


Thank you for stopping by and have a creative day!


Scrappy Boy Stamps: Meeting You Has Been the Only Highlight!

This month's new release of the Cute Girls called "Goth Girl" is by far one of my most favorite Scrappy Boy Stamps sets! This set was inspired by one of the most popular supernatural comedy horror TV shows today. Today's slimline card features three of the stamps from the set, the Goth Girl Scene Builder stencil, and patterned papers from the Goth Girl paper pack.


Scrappy Boy Stamps Products used:
  • Goth Girl stamps and outline dies
  • Goth Girl Scene Builder stencil
  • Goth Girl Paper Pack
  • Wonky Stitched Slimline Die


I stamped and colored all images using Copic markers in the following colors:


Woman
Skin: E04 E11, E21, E00, E000
Cheeks: E95
Hair: 100, N9,N7, C5, N4, B18
Black: 100, N9, N7, C5, N3


Man
Skin: E17, E13, E11, E21, E00
Cheeks: E95
Hair: C9, C7, C5, C3
Blue: B39, B37, B34, B21


Hand: E11, E21, E00, E000


For the two-stencil Goth Girl Scene Builder stencil, I used Distress Inks Pumice Stone for the moon and Black Soot for the wolf, bats, and clouds. I first inked the moon, the masked it off with Eclipse Art Masking Tape. I then inked the sky with Distress Inks in Stormy Sky, Faded Jeans, and Black Soot. 

I created a mountain stencil using a mountain die from Stamp Anniething and created the mountains with the same Distress Ink colors as the sky. 

I took off the mask from the moon, then used the bats, wolf, and clouds from the Goth Girl stencil and inked it with Distress Ink in Black Soot. I also used Black Soot to create the ground and the branches from the Goth Girl stencil to create a couple of trees. 

I used the Wonky Stitched Slimline die to cut out the card front. I adhered the colored images onto the card front using double-sided adhesive foam tape. This slimline card measures 4-1/8"W x 9-1/8"H. I cut a black cardstock mat to go under the card front with a 1/8" border.


Such a fun card to make! I hope you give this one a try. Thank you for stopping by. Have a wonderful and creative day! 


Wednesday, March 22, 2023

Scrappy Boy Stamps Sneak Peek: She's A Dream

It's sneak peek time at Scrappy Boy Stamps! Today's card features stamps from "She's a Dream" stamp set, which was inspired by America's favorite 2,000 year-old genie and handsome astronaut! This stamp set comes with 7 images and many sentiments that can be mixed and matched! This card also consists of patterned papers from the beautiful "She's a Dream"paper pack. 

This new release will be available in the Scrappy Boy Stamps webstore on Friday, March 24, 2023.


Scrappy Boy products used:
  • She's a Dream stamps and coordinating outline dies
  • She's a Dream paper pack
  • Palm Tree from Little Buddy stamp set
  • Stitched Rectangle Dies


I stamped and colored all images using Copic markers in the following colors:

Genie
Skin: E13, E11, E21, E00, E000
Cheeks: E93
Lips: RV17, RV13
Hair: E44, YR23, E43, E40
Dark Pink: RV17, RV14, RV10
Light Pink: RV14, RV21, RV10

Astronaut
Skin: E04, E11, E21, E00, E000
Cheeks: R20
Hair: E39, E37, E35, E31
White: T5, T3, T1, 0
Gray/silver: T5, T3, T1

Bottle: V17, V15, V13, RV17, RV14, RV21, RV10 + Arteza Gold Metallic Gel Pen

Palm Tree
Brown: E29,E25, E23, E21
Green: YG17, YG05, YG03, YG01


I created the background scene using a cloud stencil and Distress Oxide ink in Victorian Velvet. I created the ocean using a stencil and Distress Oxide inks in Stormy Sky and Faded Jeans. The sand is created using Distress Oxide ink in Gathered Twigs. I sprinkled water over the inks to create some texture. 

Stay tuned for more cards made from this amazing new stamp set. I'm having so much fun creating! 


Thank you for stopping by. Have a wonderful and creative day!


Scrappy Boy Stamps Sneak Peek: Goth Girl

It's sneak peek time at Scrappy Boy Stamps! Today's card features stamps from the "Goth Girl" stamp set and the "Goth Girl Window" stamp, which was inspired by the popular supernatural comedy horror TV show.  This stamp set comes with 8 images and many sentiment quotes from the TV show. This card also consists of patterned papers from the The Goth Girl paper pack.

This new release will be available in the Scrappy Boy Stamps webstore on Friday, March 24, 2023.


Scrappy Boy Stamps products used:
  • Goth Girl stamps and coordinating outline dies
  • Goth Girl Window stamp
  • Goth Girl Paper Pack

I stamped and colored all images using Copic markers in the following colors:


Girl 1
Skin: E04, E11, E21, E00, E000
Cheeks: E95
Black: N7, N4, N3, N1
Blue: B39, B37, B34, B21


Girl 2
Skin: E04, E11, E21, E00, E000
Cheeks: R20
Hair: 100, C7, C5, C3
White: T3, T1, 0
Black: 100, T9, T7, T5, T3


Hand: E11, E21, E00, E000


I colored the Goth Girl Window stamp using Spectrum Noir Aqua Tints.

The purple background was created using Distress Inks in Dusty Concord and Black soot, then splattered with plum, white, and black acrylic paint. I used a notched corner die from Gina Marie Designs to cut the mat.

I used papers from The Goth Girl paper pack to mat the card base. 


Thank you for stopping by. I hope you love this stamp set as much as I do! Have a wonderful and creative day!


Monday, March 20, 2023

Stamp Anniething: Happy Easter

Happy Spring! It's spring-time here in the USA and here in Northern California, we are still experiencing quite a bit of rain. After years of drought, the rain is welcomed with open arms! Now it's time to celebrate Spring and Easter. Easter is just about three weeks away, so it's time to get those cards finished. I made this A2 Easter card using the adorable stamp from Stamp Anniething named Cherise - You Overwhelm Me. I used the Happy Easter sentiment from the retired stamp Jemma - Happy Easter.


Stamp Anniething products used:
  • Cherise - You Overwhelm Me stamp and outline die
  • Jemma - Happy Easter stamp (sentiment only)
  • Grass stencil from Feb 2023 Stencil Club
  • Clouds stencil
  • Card Mat Die
  • Shaker Basics Set #1 Rectangle Die
  • Welcome Spring paper pack

I stamped all the images and colored them with Copic markers in the following colors: 

Skin: BV23, E15, E13, E11
Cheeks: R22
Tongue: R22, R20
Hair: E49, E47, E44, E43
Purple: BV08, BV04, BV01, BV00
Pink: RV17, RV14, RV23, RV21
Green: G28, YG07, YG03, YG01
White: N3, N1, 0


For the background, I cut out the mat using the rectangle die from Shaker Basics Set #1. I inked the clouds stencil using Distress Ink in Blueprint Sketch and the grass stencil with Distress Oxide Ink in Mowed Lawn. I used the scalloped Card Mat Die to cut the mat using patterned paper from the Welcome Spring paper pack. I used purple cardstock from my stash for the final mat.


Thank you for stopping by today. I hope you give this Easter card a try! Have a wonderful and creative day!


Friday, March 17, 2023

Stamp Anniething Sneak Peek Day 3: Fern - Thank You Fairy Much

Welcome to Day 3 (final day) of Stamp Anniething's sneak peeks where the theme is fairies. Today's A2 card features the beautiful Fern - Thank You Fairy Much stamp and coordinating outline die, the Foliage Lace Stencil, and the Flowers and Leaves Builder Dies.

Stamp Anniething products used:
  • Fern - Thank You Fairy Much stamp and outline die
  • Foliage Lace Stencil
  • Flowers and Leaves Builder Dies
  • Banner Dies
  • Welcome Spring Paper Pack
  • Stripes and Dots Paper Pack


I colored the stamp using Copic markers in the following colors:

Skin: E17, E13, E11, E21, E00
Cheeks: E93
Tongue: R22, R20
Hair: BV29, BV25, BV23, V12
Green: G28, YG17, YG03, YG01
Pink: RV25, RV23, RV21
Wings: RV21, V01, white gel pen


I created a tri-fold card. The front panel is using the new Foliage Lace Stencil with The Craft's Workshop Stencil Butter in Chartreuse. 

I cut out the flowers using pink cardstock, then added a little dimension using Copic marker RV00. I cut out the leaves using the Stripes and Dots Paper Pack. 

I hope you enjoyed this week's sneak peeks of this month's new release. Cute stamps, dies, and stencils for you to play with! 

Have a wonderful and creative week! 


Thursday, March 16, 2023

Stamp Anniething Sneak Peek Day 2: Leif - You're My Favorite Sweet Pea

Welcome to Day 2 of Stamp Anniething's March 2023 sneak peeks! Today's A2 size card features the adorable Leif - You're My Favorite Sweet Pea stamp, coordinating outline die, Flowers and Leaves Builder Dies, and the Best Buds Word Dies.

Stamp Anniething products used:
  • Leif - You're My Favorites stamp and outline die
  • Flowers and Leaves Builder Dies
  • Best Buds Word Dies
  • Grass Dies
  • Welcome Spring Paper Pack


I colored the stamps and flower die cuts using Copic markers. The Copic colors I used are:

Leif
Skin: E04, E11, E21, E00, E000
Cheeks: R20
Tongue: R22, R20
Hair: BG49, BG05, BG02, BG000
Brown: E47, E44, E43, E42
Flower stem: G28, YG17, YG03, YG01
Flower: RV17, RV23, B79, FV2, B63

Die cut flower: BV01, BV00, BV000, RV00
Die cut Leaves: YG03, YG01, YG000


I used Yasutomo Pearlescent Watercolors in yellow, blue, pink, and green to randomly color all over a piece of watercolor paper. I then used the Best Buds Word Die to create the front flap of the overlapping gate fold card. I also used the remaining watercolored paper to cut out the grass..


I hope you enjoyed day 2 of the sneak peeks! I hope you come back tomorrow for day 3, the final day, of sneak peeks of the March 2023 new release.


Thank you for stopping by. Have a creative day! 


Wednesday, March 15, 2023

Stamp Anniething Sneak Peek Day 1: Juniper - Wishing You the Fairy Best!

Welcome to Day 1 of Stamp Anniething's March 2023 sneak peeks! This month's theme is fairies and the stamp I'm using today is the beautiful Juniper - Wishing You the Fairy Best! I also used the new Flower and Leaves Dies for this A6 size card.


Stamp Anniething products used:
  • Juniper - Wishing You the Fairy Best! stamp and outline die
  • Flowers and Leaves Builder Dies
  • Banner Dies
  • Jelly Dots


All stamps and die cuts are colored with Copic markers in the following colors:

Juniper
Skin: E27, E25, E23, E13
Cheeks: R32
Hair: V28, V25, V22, V20
Dress & shoes: YR18, YR16, YR15, YR12, YR00
Wings: YR01, Y02, B00

Orange flowers: YR16, YR15, YR12, YR00
Leaves/Green centers: G28, YG17, YG03, YG01
Blue Flowers: B01, B01, B000
Yellow Centers: YR23, YR21, YR20, Y13
Pink: RV02, RV00, RV000


The background was ink smooshed with Oxide Inks in Victorian Velvet, Carved Pumpkin, Mermaid Lagoon, and Squeezed Lemonade.

Thank you for stopping by and checking out day 1 of sneak peeks. Please come back tomorrow for day 2! 


Have a wonderful and creative day!


Sunday, March 5, 2023

Scrappy Boy Stamps: Envelope Memory Dex Card

It is so much fun creating Memory Dex cards using the new Envelope Memory Dex die from Scrappy Boy Stamps. This envelope die makes the perfect gift card holder. This is perfect if you are in a Memory Dex swap group or sending a gift to someone who collects Memory Dex cards. Not a Memory Dex collector? Then it's just as fun to mount it on a card or scrapbook page! This card features stamps from the Little Buddy set.


The Envelope Memory Dex die set comes with little embellishment dies in the shapes of a bunny, paw print, lips, and two wax seals for decorating your card.


Scrappy Boy Products used:
  • Envelope Memory Dex Die
  • Little Buddy Stamps and outline dies
  • Three Hour Tour Paper Pack


I stamped and colored all the stamps with Copic markers in the following colors: 

Little Buddy
Skin: RV34, E11, E21, E00
Cheeks: E93
Hair: E29, E35, E31
Hat (White): T3, T1, T0, 0
Jeans (Blue):B95, B93, B91
Shirt (Red): R37, R35, R32

Palm Tree
Brown: E29,E25, E23, E21
Green: YG17, YG05, YG03, YG01

Life Preserver
White: T3, T1, 0
Red: R37, R35, R32

Fish
Gray: T5, T3, T1 
Blue: B23, B21

Bananas
Yellow: YR23, Y08, Y02
Brown: E29, E23


For this card, I used papers from the Three Hour Paper Pack. In order for the envelope flap to stay closed, I used a thumb notch punch so that the tip of the envelop can slip into it. If you don't have a thumb notch punch, you can use two way glue or simply tie twine or ribbon around the card to close the flap.


Thank you for stopping by. I hope you give these new Memory Dex dies a try. I really love this Envelope Die since it creates a pocket for a gift card.