Products available Friday, April 19, 2024.
April release:
- Princess Pin Up Girls Stamps, Outline Dies, Paper Pack
- High Heels Background Stencil
- Princess Pin Up Girls Colored Die Cut Pieces
- Castle Mini Album Die
- Western Girls Stamps, Outline Dies
- Cow Print Background Stencil
- I Love Westerns Paper Pack
- Cute Girls Western Girls Colored Die Cut Pieces
- Three Little Pigs Stamps, Outline Dies, Paper Pack
- Three Little Pigs House Stamp & Outline Die
- Three Little Pigs House Decorator Stencils
- Three Little Pigs Colored Die Cut Pieces
- Shirt Card Die
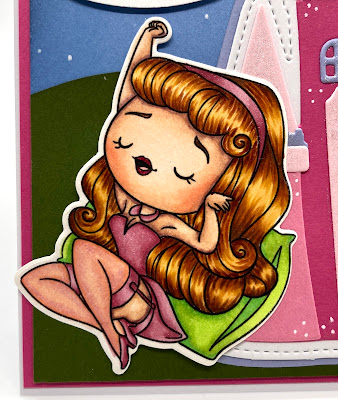
Project 1: Princess Pin Up Girls - I Woke Up This Cute!
Scrappy Boy Products used:
- Princess Pin Up Girls Stamps & outline dies
- Castle Mini Album Die
- Clouds Edger Dies
Supplies used:
- 6x6 white card base
- White, light pink, dark pink, lavender cardstock
- Distress Inks in Stormy Sky for clouds
- Distress Inks in Peeled Paint for hill
- Oval punch for sentiment
- White gel pen
Copic markers to color stamp:
- Skin: E04, E11, E21, E00, E000
- Cheeks: E93
- Hair: E37, YR27, YR24, Y32
- Lips: R37
- Tongue: R20
- Pink: R85, R83, R81
- Light Pink: R02, R01, R00
- Green: YG07, YG03, YG01
This card is easy and fun to put together. I first cut out all the pieces to the Castle and assembled it. Then I created the background by inking the sky, then die cut the clouds. I added Distress Ink in Stormy Sky to the edge of the clouds then adhered it to the card front. I hand cut the hill, inked it with Distress Ink in Peeled Paint, and adhered it to the card front. I then adhered the Castle and the Princess Pin Up Girl. I stamped the sentiment and used a oval punch to cut it out then adhered it to the card front. I adhered the card front to a dark pink mat and then adhered this to the card base.
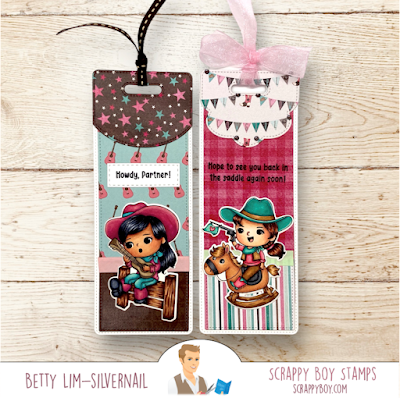
Project 2: Cute Girls - Western Girls Bookmarks
Scrappy Boy Products used:
- Cute Girls Western Girls stamps & outline dies
- I Love Westerns Paper Pack
- Bookmark & Toppers Dies
- Stitched Rectangle Dies
Supplies used:
- White cardstock
- Ribbon
- Stitched Rectangle Dies
- Washi tape
Copic markers used to color stamps:
Girl with guitar
- Skin: E15, E13, E11, E21
- Cheeks: R20
- Hair: 100, C7, C5, C3
- Blue green: BG75, BG57, BG53, BG10
- Pink: RV66, RV34, RV32
- Black: 100, C7, C5
- Brown (fence): E29, E25, E23, E21
- Brown (guitar): E44, E43, E42
Girl on wooden horse
- Skin: E04, E11, E21, E00, E000
- Cheeks: R20
- Tongue: R20
- Hair: E49, E77, E18, E15, E11
- Pink: RV14, RV13, RV11
- Blue green: BG18, BG13, BG11
- Gray: N7, N5, N3
- Horse Hair: E57, E55, E53
- Horse Body: E13, E11, E21
Making bookmarks are so simple using the Bookmark and Toppers Die. This set comes with 4 different topper dies. I used various patterned papers from the I Love Westerns Paper Pack to create these two bookmarks.
Project 3: Three Little Pigs
Scrappy Boy Products used:
- Three Little Pigs stamps & outline dies
- Three Little Pigs Paper Pack
- Stitched Oval Dies
- Stitched Rectangle Dies
Supplies used:
- White cardstock card base 8-1/2" x 4-1/4" scored and folded at 2", 3-1/8", 5-3/8", 6-1/2"
- White and black cardstock
Copic markers used to color stamps:
Three Little Pigs
- Pink: G0000, RV63, RV52, RV00, RV000
- Brown: E57, E55
- Blue: B26, B24, B23, B21
- Yellow: Y17, Y15, Y13, Y11
- Green: G28, G17, G14, G12
- Gray: N7, N5, N3
- Red: R39, R29, R24, R22, R21
Bricks: R27, R35, R14, R12
Wood: E29, E25, E23, E21
Straw: Y19, Y15, Y13, Y11
The front and the back of the card, with the exception of the center back panel, is covered with the patterned paper. Leave the center white for addressing and writing a note to the recipient. This card folds flat and will fit into an A2 envelope.
Project 4: Shirt Card
Scrappy Boy Stamps products used:
- Shirt Card Die
- Mermazing stamps & outline dies
- Under the Sea Paper Pack
Supplies used:
- Skin: E04, E11, E00, E000
- Cheeks: R20
- Hair: E18, E08, YR18, YR14
- Turquoise: BG49, BG45, BG01
- Green: YG17, YG06, YG03
I created a side folding card by moving the largest shirt die slightly over the crease of the paper so that it doesn't cut. I cut all the pieces and assembled as shown. I added the stamp and sentiment using double-sided foam tape.
This Shirt Card Die is a must for your die collection! Creating these cards are so quick and easy with patterned paper. Great for making a box of cards as a gift.
Thank you for checking out the Scrappy Boy Stamps April sneak peeks! There is much more that the Design Team will be sharing for the next few weeks. Such an awesome release! Have a creative day!


No comments:
Post a Comment