Showing posts with label Blank Page Muse. Show all posts

Friday, December 17, 2021

Blank Page Muse/I Brake For Stamps: Elephant and Gel Printing Plate Background Card

I was so excited this summer when I got a gel printing plate (Gelli Arts Printing Plate) for my birthday. I’ve wanted one for a while and when a friend sent me a gift card for Amazon, I decided that is what I wanted to get! It took me a few tries with different mediums before I decided that using Distress Oxide Inks gave me the best results. Using the oxide inks on the gel printing plate produced the perfect background for this amazing stamp called Elephants from Blank Page Muse/I Brake for Stamps. I love all things elephants so I will be keeping this card and displaying it on my shelf. 

You can save 15% on these stamps and all purchases at Blank Page Muse and at I Brake for Stamps by using my special code BPMBetty. 


Supplies:
  • Blank Page Muse/I Brake for Stamps: Elephants
  • White 6" x 6" card base
  • Black cardstock mat: 5-3/4" x 5-3/4"
  • White cardstock mat: 5-1/2" x 5-1/2"
  • White glossy cardstock: 5-1/4" x 5-1/4"
  • White and black cardstock for the word Peace: 3" x 3" each
  • Craft Mat
  • Distress Oxide Inks in Rusty Hinge, Spice Marmalade, Squeezed Lemonade, Candied Apple
  • Gel printing plate
  • Water spray bottle
  • Heat gun
  • Paper towels
  • Stamp positioner
  • Black solvent ink/archival ink (I used StazOn)
  • Uppercase alphabet dies (I used Sizzix Tim Holtz Alphanumeric Classic Upper dies)
  • Die cutting machine
  • Your favorite adhesive

Instructions:
  • Place the gel plate on top of the craft mat to protect the work surface.
  • Using the Distress Oxide in Squeezed Lemonade, apply ink directly onto the gel plate using the pad then spritz water on top. The ink will bead up. Place the glossy paper onto the ink and swirl it around. Use a heat gun to dry the ink. Keep the heat gun moving so the paper does not burn. Repeat this step with all the colors of oxide inks listed in the supplies.


  • After the ink is completely dry, use a paper towel and wipe the surface of the glossy paper. This will remove the oxide and bring back the shine to the glossy paper.
  • Using a stamp positioner, stamp the Elephant stamp using solvent/archival ink onto the glossy paper. It may take several times to stamp the entire image so it's best to use a stamp positioner. 
  • Cut out the word Peace out of black and white cardstock using the alphabet dies. To make it easier to line up, adhere the dies to blue painter's tape after aligning them on a ruler. Place it onto the cardstock and run it through a die cut machine. Starting with the white set, add glue to the letters and place it onto the card front then remove the blue tape. Repeat this step with the black set, but offset it a little to make the white set look like a shadow


  • Adhere the black mat to the card base, then the white mat, then the card front and the card is finished.

Thank you for stopping by today. I hope you give this card a try! Have a wonderful and creative week. 

Looking for more Inspiration? Click the links below!
The Blank Page Muse Shop https://blankpagemuse.com/
I Brake for Stamps Shop https://ibrakeforstamps.com/

Friday, November 26, 2021

Blank Page Muse/I Brake for Stamps: Make Ephemera from a Stencil

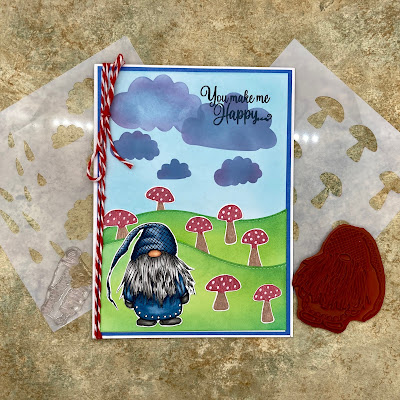
This month's theme at Blank Page Muse/I Brake for Stamps (BPM/IBFS) is "Stencil It," which means using a stencil in our project. I love using stencils for making backgrounds and scenes, but did you know you can also make ephemera (also called embellishments and die cuts)?  For today's card, I am using the adorable gnome stamp from BPM/IBFS called PJ Love Gnome designed by Pam Bray, the Cute Mushrooms Stencil designed by Donna Gray, and the Clouds and Drops 5x5 inch Mixed Media Stencil. I made the ephemera with the mushrooms stencil. So fun and easy to do. 

You can save 15% on this stamp, the stencils, and all purchases at Blank Page Muse and at I Brake for Stamps by using my special code BPMBetty. 


Supplies:
  • BPM/IBFS: PJ Love Gnome designed by Pam Bray
  • BPM/IBFS: Cute Mushrooms Stencil designed by Donna Gray
  • BPM/IBFS: Clouds and Drops 5x5 inch Mixed Media Stencil
  • A6 Card base, white cardstock
  • White cardstock to stamp image, 3"W x 3"H
  • Blue cardstock mat, 4-1/2" x 6-1/8"H
  • White cardstock, card front, 4-1/4"W x 6"H
  • White cardstock to cut hills, 4-1/4"W x 5"H
  • White cardstock to make mushrooms, 6"W x 3"H
  • Hill Die (I used one from Gina Marie Designs)
  • Distress Oxide in Mowed Lawn, Lucky Clover, Tumbled Glass, Stormy Sky, Dusty Concord and ink blending tool
  • Gel Pens in Red, Brown (I used Arteza Metallic Pens)
  • White Gel Pen (I used #10 Gelly Roll pen)
  • Coloring medium of choice (I used Copic markers)
  • Black ink pad
  • Stamping platform or block
  • Your favorite adhesive
  • Optional: Red and white twine
Instructions:
  • Cut out the cardstock as indicated in the supplies list
  • Stamp, color, and fussy cut the gnome image. I colored my stamp with Copic markers
    • Skin: E13, E11, E21
    • Beard: T5, T3, T1
    • Blue: B99, B97, B95, B91
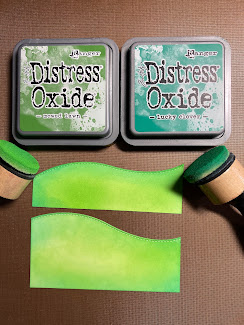
  • Using the hill die, cut out two hills the ink blend with Distress Oxides in Mowed Lawn and Lucky Clover. Put the Mowed Lawn in the center and the Lucky Clover towards the outer edges. Set aside.

  • Using the white cardstock card front, use the Distress Oxides in Tumbled Glass to ink the sky. Ink far enough down so the colors are just below the hill. I measured with the hills and marked it with a pencil.
  • Tape the clouds stencil over the sky area and use sticky notes paper to cover areas of the stencil you are not using. Using blender brushes, ink the cloud in Distress Oxide in Stormy Sky, then add a little Dusty Concord. Add various clouds to the sky.
  • To create the mushrooms, use the mushroom stencil and the gel pens to color 7 various mushrooms. Add white dots to the mushrooms with a white gel pen.

  • Fussy cut each mushroom
  • Assemble all the pieces onto the card and adhere with your favorite adhesive.
  • Using a stamp platform or acrylic block, stamp the sentiment.
  • Optional: Tie some twine to the card

Thank you for stopping by and I hope you give this card a try! Have a wonderful and creative week! 

Looking for more Inspiration? Click the links below!
The Blank Page Muse Shop https://blankpagemuse.com/
I Brake for Stamps Shop https://ibrakeforstamps.com/


Tuesday, November 9, 2021

Blank Page Muse/I Brake for Stamps: Snow Family

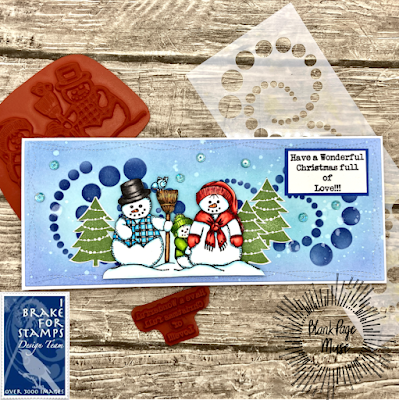
A friend and I were talking today about getting our Christmas/holiday cards finished, but we were both trying to figure out cards that we can mass produce that didn't take a long time to do. I think I found the stamp that I will be using for some of my cards this year! This is "Snow Family" from Blank Page Muse/I Brake for Stamps (BPM/IBFS). It's an adorable stamp that's easy to color and cut. Add a few trees and a snowy background and you have a beautiful card. 

This month's BPM/IBFS theme is "Stencil It" so the goal is to use a stencil on each project. I used the "Butterfly Trails Circles Patterns Mixed Media Stencil" from BPM/IBFS to create the snowy background. 

You can save 15% on this stamp and all purchases at Blank Page Muse and at I Brake for Stamps by using my special code BPMBetty. 

Supplies:
  • Blank Page Muse/I Brake for Stamps: Snow Family
  • Blank Page Muse/I Brake for Stamps: Butterfly Trails Circles Patterns Mixed Media Stencil
  • Blank Page Muse/I Brake for Stamps: "Have a Wonderful Christmas full of Love!!! sentiment from Classic Christmas Art Rubber Stamp Set by Pam Bray Designs
  • Slimline card base - white cardstock, 8-1/2"W x 7"H, scored at 3-1/2" and folded in half
  • Bristol watercolor paper, 8-3/8"W x 3-3/8"H (I cut mine using a slimline die from Gina Marie Designs called Wonky Stitch)
  • White cardstock to stamp image, 5"W x 4"H
  • White cardstock to stamp sentiment, 2-1/4"W x 1-1/2"H 
  • Blue cardstock to mat sentiment, 2"W x 1-1/8"H
  • 3 Christmas Tree die cuts, 1-3/4"H (I used a stamp from the Christmas-Noel set from Recollections)
  • Distress Inks in Broken China, Blueprint Sketch, and Chipped Sapphire & ink blending tool
  • Water spray bottle
  • Favorite adhesive
  • Favorite coloring medium (I used Copic markers)
  • Optional: Sequins (I used some from Hobby Lobby)
Instructions:
  • Cut out the cardstock as indicated in the supplies list
  • Stamp, color, and fussy cut the image. I colored my stamp with Copic markers
    • Black: T7, T5, T3, T1
    • Blue: B2, B00, B000, B0000
    • Red: R29, R24, R22, R21
    • Orange: YR07, YR02
    • Green: YG17, YG03, YG01, YG00
    • Brown: E57, E55, E53
    • Yellow: YR24, YR21, Y15
    • Snow (white): BG01, B000, Blender
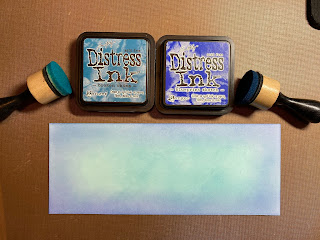
  • Using the Bristol watercolor paper, ink blend with Distress Inks in Broken China and Blueprint Sketch. Use the Broken China for the middle of the card and the Blueprint Sketch for the outer part.
  • Tape the Butterfly Trails Stencil onto the inked paper and use a blending brush to apply the Distress Ink in Chipped Sapphire. 
  • Sprinkle water onto the ink and blot with a paper towel to give it a snowy background.
  • Stamp and cut out 3 Christmas trees. Use any stamp or die you may have.
  • Stamp the sentiment on white cardstock and trim to 1-3/4"W x 1"H and mat it with blue cardstock.
  • Adhere the trees, snow family, and sentiment onto the card front; then adhere the card front to the card base.
  • Optional: Adhere a few sequins to the card.

Thank you for stopping by and I hope you give this card a try! Have a creative week.


Looking for more Inspiration? Click the links below!
The Blank Page Muse Shop https://blankpagemuse.com/
I Brake for Stamps Shop https://ibrakeforstamps.com/

Friday, October 29, 2021

My First Cat Lover's Hop

Welcome to my blog! I am participating in my first Cat Lover's Hop! This hop is to celebrate cats of all sizes and shapes during the last full week in October. This coincides with National Cat Day, which is October 29. This hop started on Monday, October 25 and runs until 11:50 PM PT, Saturday, October 30. There are many participants and we were all given a day to share our cat projects. 


Today is my day to share a project and I made this card using the adorable Mama Kat with her Kittens Rubber Stamp by Rick St. Dennis MFA from Blank Page Muse/I Brake for Stamps, who is one of the sponsors of this hop. This is an A6-sized birthday card made for a fellow cat lover. 

You can save 15% on this stamp and all purchases at Blank Page Muse and I Brake for Stamps by using my special code BPMBetty. 


Click here to see all the wonderful cat projects made by other participants of the Hop. 

Supplies:
  • Blank Page Muse/I Brake for Stamps: Mama Kat with her Kittens Rubber Stamp by Rick St. Dennis MFA
  • A6 white card base
  • 4"W x 4"H white cardstock to stamp image 
  • 5-7/8"W x 4-3/8"H Red cardstock mat
  • 3-3/4"W x 3-3/4"H Paw Print
  • 3-7/8"W x 3-7/8"H brown cardstock to mat paw print patterned paper
  • 5-7/8"W x 1-5/8"H Hearts patterned paper
  • Sentiment of choice (I created mine on my computer, printed, trimmed, and matted it)
  • Coloring medium of choice. I used Copic markers.
  • 3" circle stitched die
  • Distress Oxide in Tumbled Glass and blending brush
  • Adornments: Red hearts, jelly dots, red bow, and charm. You can substitute with rhinestones, sequins, enamel dots, twine, or jute.
  • Your favorite adhesive
Instructions:
  • Cut all the cardstock and papers in the supplies list
  • Stamp your image and color. I used Copic markers.
    • Fur: YR27, YR24, YR21, Y32
    • Nose and ears: RV95
    • Bow: R29, R24, R22
  • Assemble and adhere the cardstock and patterned papers with your favorite adhesive.
  • Stamp or print a sentiment of choice. Trim it to size and add a mat.
  • Adhere the adornments. You can decorate your card as you like! 


This is a fun and simple card to make. This stamp is versatile so you can change the sentiment to make it a different occasion. It's perfect for mother's day, a baby card, and holiday cards. 


Thank you for visiting and keep hopping to see other cat creations! 

Looking for more Inspiration? Click the links below!
The Blank Page Muse Shop https://blankpagemuse.com/
I Brake for Stamps Shop https://ibrakeforstamps.com/

Saturday, October 23, 2021

Blank Page Muse/I Brake for Stamps: Witch Sisters are Brewing It Up!

I needed a few Halloween cards that are less kid cutesy and more for for adults that are into scary Halloween, so I made this card using the Witch Sisters and Cauldron Silhouette Halloween stamp from Blank Page Muse/I Brake for Stamps. I love making fun backgrounds using my gel printing plate and using silhouette stamps. A fun and fast way to mass produce cards and you get an unique background each time. 

You can save 15% on this stamp and all purchases at Blank Page Muse and at I Brake for Stamps by using my special code BPMBetty.  

Supplies:
  • Blank Page Muse: Witch Sisters and Cauldron Silhouette Halloween Stamp
  • A6 White cardstock card base
  • Black cardstock mat - 4-3/8"W x 6-1/8"H
  • White cardstock 6"W x 4"H for inking background
  • White cardstock to stamp sentiment (size depends on size of your stamp)
  • Distress Oxide Inks in Wild Honey, Mowed Lawn, Mermaid Lagoon
  • Gel Printing Plate and Brayer
  • Circle Stencil of choice (I used one from Stamp Anniething)
  • White cardstock
  • Tree without leaves die of choice (I used one from Gina Marie Designs)
  • Halloween sentiment stamp of choice (I used a very old one from Hero Arts)
  • Distress Ink in Black Soot and blender brush
  • Black dye ink
  • Stamp positioner
  • Your favorite adhesive
Instructions:

For this project, we will be using a gel printing plate. I have an 8x10 one made by Gelli Arts. You can use any brand, but make sure that the plate is big enough for an A6 card, which is 6-1/4"W x 4-5/8"H.
  • The background:
    • Using the Distress Oxide ink pads, apply directly onto the gel printing plate. Keep the colors separate so you don't cross contaminate the ink pads.
    • Using a brayer, spread the ink and blend so the ink covers the plate at least the size of the A6 cardstock. Clean off the brayer on a piece of scrap paper.
    • Place the stencil over the ink and use the cleaned brayer and lightly roll over the stamp to ensure it is secured on the gel printing plate. 

    • Place the white cardstock over the stencil and use your hand to gently rub so the ink transfers to the paper.
    • Lift off the stencil and place your paper back on the gel printing plate at a different angle to pick up more of the ink.
    • Repeat the above steps until you get the desired look.
  • The stamp:
    • For silhouette-type stamps, it is best to use a stamp positioner. Insert the inked paper into the stamp positioner and place the stamp towards the bottom half of the card. Make sure you use a black ink pad for this stamp.
  • The trees:
    • Using a tree die without leaves, cut two trees. In order to make my trees fit, I cut them apart and some of the branches off and re-positioned them. Adhere the trees using liquid glue. Trim off the excess branches with scissors.
  • Finishing the card:
    • Adhere the card front onto the black cardstock mat, then adhere onto the card base. 
    • Using a sentiment of choice, stamp on white cardstock. Trim and use Distress Ink in Black Soot to ink the edges. Adhere the sentiment onto the card front and the card is finished. 

This is a quick and easy card to mass produce. It is so fun to create backgrounds using the gel printing plate. Each one you make will be unique! Then to use fabulous silhouette stamps on the card front is easy and your card will come out amazing! 


Thank you for stopping by and I hope you give this card a try! Have a creative week.

Looking for more Inspiration? Click the links below!
The Blank Page Muse Shop https://blankpagemuse.com/
I Brake for Stamps Shop https://ibrakeforstamps.com/