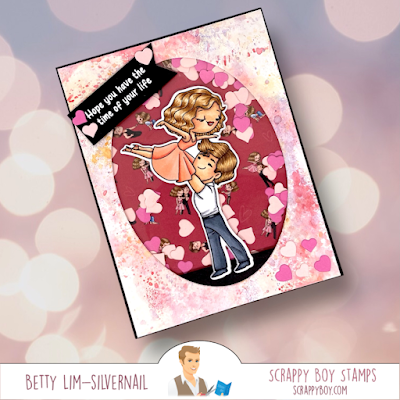
Project 1: Summer Fling - Hope you have the time of your life
Scrappy Boy Stamps products:
- Summer Fling 6x8 Stamp & Dies
- Summer Fling 6x6 paper packs
- Stitched Oval Die
- Hearts and Rhinestones Confetti Plate
Supplies used:
- A2 white cardstock
- Black cardstock for mat
- Black cardstock scrap for floor and sentiment
- Light pink cardstock for shaker bits
- Dark pink cardstock for shaker bits
- Bristol or watercolor paper for ink smooshing
- Distress Inks - Dried marigold, Shaded lilac, Worn lipstick
- Acetate
- Watermark ink pad
- White embossing powder
Copic markers used:
Woman
- Skin: E04, E11, E21, E00
- Cheeks: R20
- Lips: R24
- Hair: E37, E35, E33, E30
- Dress: R14, R12, R11
Man
- Skin: E04, E11, E21, E00
- Cheeks: R20
- Hair: E59, E57, E55, E53
- White: N3, N1, 0
- Black: C7,C5, C3
I first die cut the hearts from both light and dark pink cardstock using the Confetti Plate. The hearts will be used for the shaker.
I first cut a piece of black cardstock A2 size and adhered it to the card base. Then I trimmed one of the patterned papers leaving a 1/8" border on all sides and adhered it to the black cardstock.
I then created the front of the card with Bristol cardstock by ink smooshing with Distress Inks listed above. This is the card front. Trim to leave a 1/8" border on all sides. I then used an oval die to cut the shaker opening. I added a strip of black cardstock on the bottom of the oval on the backside to create the floor. I covered the back side with acetate using double sided tape.
I added double-sided foam tape all around the oval opening (back side).
Add the heart shaker bits on the patterned paper. Make sure you put them in the middle of the card. Don't over fill. Carefully place the top of the card over the bottom of the card.
Adhere the colored stamp onto the acetate with double sided tape.
Stamp and heat emboss the sentiment and adhere to the card using double sided foam tape. Add a few hearts to decorate the card.
Project 2: Cute Girls Cat Lovers - Hope You're FELINE Better Soon
My second project uses the cute stamps from Cute Girls Cat Lovers and the awesome I Love My Fur Babies Layered Background Stencil.
Scrappy Boys Stamps products used:
- Cute Girls Cat Lovers
- I Love My Fur Babies Layered Background Stencil
- Stitched Oval Dies (to create the heart)
- Stitched Rectangle Dies
Supplies used:
Thank you for stopping by! I hope you give these cards a try. Have a creative day!
- A2 white card base
- Black Cardstock mat
- Teal cardstock
- White cardstock for heart/sentiment
- Distress Inks in Peacock Feathers and Picked Raspberry for stencil
Copic markers used:
Girl
- Skin: E27, E25, E23, E13
- Cheeks: R22, R20
- Hair: C9,C7, C5, C3
- Green: G24, G21, G00
- Blue: B95, B93, B91
- Cat Fur: E99, E97, YR23, YR21
- Cat ears and cheeks: RV23, RV21
Cat 1
- Fur: W6, W5, W3, W2, W1
- Ears: E95, E93
- Cheeks: RV23
- Yarn: G07, B05, B03
Cat 2
- Fur: W6, W5, W3, W2, W1
- Ears: RV23
- Cheeks: RV23
- Yarn: RV23, RV21
I first cut the black mat using the Stitched Rectangle Die and adhered it to the card base. Then I cut the card front using the next smaller die out of teal cardstock. I used the I Love My Fur Babies Layered Background Stencil and Distress Inks to create the stenciled background.
Since I don't have a heart die of this size, I created the heart using an oval die. I placed the die on top of the cardstock and penciled the shape for placement. I placed a piece of white cardstock underneath then die cut through both layers. I then stamped sentiment and paws on the white heart then inlayed it onto the teal cardstock and adhered it to the black cardstock.
I used double-sided foam tape to adhere the colored images to the card.


No comments:
Post a Comment