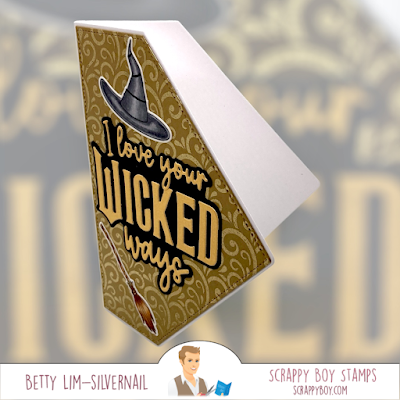
Project 1: I Love Your Wicked Ways
This is a fun shaped card that's easy to make.
Scrappy Boy Stamps products used:
- Witchy Good Friends stamps & dies
- Spell Book Mini Album Die
- Filigree/Grimmerie Background Stamp
Supplies used:
- White cardstock for card base
- Tan cardstock for card front
- Gold cardstock for sentiment
- Black cardstock for sentiment background
- Gold embossing powder for Filigree Grimmerie Background Stamp
Copic markers used:
Witch Hat
- Black: N5, N4, N3, N1
Broom
- Use the largest die of the Spell Book Mini Album Die to create the card base.
Project 2: Gift Box - Make a Splash on Your Special Day
Scrappy Boy Stamps products used:
- Little Mermaid Stamps and Dies
- Little Mermaid Paper Pack
- Shipwrecked Scene Builder Stencil
- Box Making Strips
- A2 Stitched Rectangle Dies
- A2 Stitched Scalloped Edge Dies
Supplies used:
- White cardstock to create the box
- Bristol cardstock for front of box
- Distress inks for Shipwrecked Scene Builder Stencil in the following colors:
- Sky: Tumbled Glass
- Ocean floor: Chipped Sapphire, Faded Jeans, Stormy Sky
- Seaweed: Mowed Lawn
- Corals: Seedless Preserves, Abandoned Coral
- Acrylic paint for splatters in white and blue
Copic markers used:
- Skin: E04, E11, E21, E00, E000
- Cheeks: R20
- Lips: R27
- Hair: E18, E08, YR18, YR14
- Tail: BG49, BG45, BG01, BG000
- Rock: E44, E43, E42
Notes:
- Die cut two of the 5-1/8" x 3-7/8" Stitched Rectangles for the front and back of the box using white cardstock. Cut two more using patterned paper, set aside.
- Die cut two of the medium size Box Making Strips with the teeth using white cardstock. These strips are for creating the sides and bottom of the box. (One is too short, but two will be too long, so the excess will need to be trimmed after adhering).
- Adhere the white strips to the box front and back with strong adhesive. Trim the excess strips.
- Adhere the patterned paper to the front and back of the box.
- Die cut two of the Box Making Strips without the teeth using patterned paper. Cut them to size for each side and bottom of box and adhere.
- Die cut the Bristol cardstock with the 4-1/2" x 3-3/8" Stitched Scalloped Die then stencil with the Shipwrecked Scene Builder Stencil and colors listed above and as shown.
- Using the acrylic paint, add splatters, let dry and adhere to the front of the box.
- Adhere the colored image and sentiment and it's finished!


No comments:
Post a Comment