My favorite season of the year is Spring. I love how the trees are bare one week then full of leaves the next, the smell of fresh cut grass, and the sound of birds chirping. My husband and I walk every morning and it's been a delight to see all the different flowers blooming everywhere. This inspired me to create my art journal pages called Nature's Art using stamps from Blank Page Muse Art Rubber Stamps (please see supplies list below for list).
This is the perfect project to make for the BPM monthly challenge for a chance to win a prize! The theme for April is "nature." Here is the link to the challenge: CHALLENGE.

- Blank Page Muse Art Rubber Stamps:
- Dragonfly Lady-The Femmes Series
- Girl with Basket of Flowers
- Small Sunflower Blossom by Pam Bray Designs
- Small Dragonfly by Pam Bray Designs
- Background Grunge by Pam Bray Designs
- Stamping block
- Washi tape, wax paper, Press and Seal (to protect coils, margins, and other pages)
- White gesso
- Paint brush
- Distress Spray inks: Bundled Sage, Salty Ocean, Chipped Sapphire, Seedless Preserves, and Picket Fence
- Water spray bottle
- Heat gun (optional)
- Floral patterned paper of choice
- White cardstock for stamping images
- Coloring medium of choice. I used both Prismacolor pencils and Copic markers
- Scissors
- Black cardstock
- Alphabet dies
- Press and Seal or Transfer tape
- Liquid glue
- Distress ink pad: Black Soot
- Distress ink blender brush/pad
- Water dropper
- Collage Medium (I used Tim Holtz Distress Collage Medium)
- Sentiment stickers (I used Tim Holtz - Small Talk stickers)
Instructions:
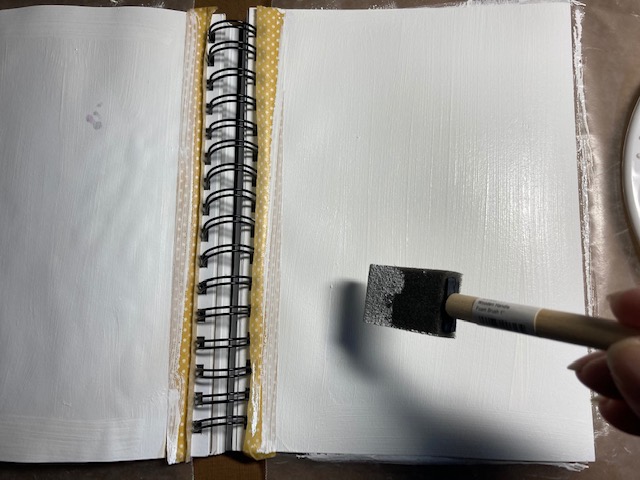
- Prepare the art journal pages by covering the coils with Press and Seal and the margins with washi tape. Add wax paper under the pages.

- Paint on a layer of gesso and let it completely dry.


- Place the journal into a box so the over spray is contained in the box.
- Spray the Distress Ink onto the pages, but don't overlap too much. Spray water over the ink so the ink will spread. Gently use a paper towel to mop up puddles. Use a heat gun to quick dry or air dry.

- Using the Background Grunge stamps, randomly stamp images using a stamp block or without. The entire image of the stamp does not have to stamp to create the background. Select a variety of stamps from the set to use.


- Tear patterned paper corners and adhere using collage medium.

- Stamp and color the butterfly, sunflower (stamp partial or cut flowers in half since they will be placed on edge of journal page), and dragonfly stamps then fussy cut. Use any colors you like, but here's what I used:
- Butterfly (Copic markers): Y17, B02, RV02
- Dragonfly (Copic markers): YG11, BV00, BV01
- Sunflower (Copic markers): Y17, Y35, Y13, E33

- Stamp and color the Girl with Basket of Flowers. Use any colors you like. Here are my Prismacolor pencil colors:
- Skin: 116, 018, 019, 020
- Cheeks: 082
- Hair: 117, 114, 010
- Blue: 042, 043
- Tree & Basket: 114, 116
- Green for leaves and flowers: 110, 061
- Pink flowers: 080, 082
- Grass: 057, 110, 061
- Sky: 101
- Walkway: 065

- Stamp and color the Dragonfly Lady. Use any colors you like. Here are my Copic colors:
- Hair: E39, YR27, YR24, Y32
- Skin: E04, E11, E21, E00, E000
- Cheeks: R20
- Lips: R21
- Dragonflies: YG11, BV00, BV01
- Stars: Y24, Y11, Y15
- Blue background: B00, B000
- Bubbles: Y00, B000, BV000; plus Castle Arts colored pencil #35 lavender light.

- Using the Distress Ink in Black Soot, ink the edges of each image. Set aside.

- Using alphabet dies and black cardstock, cut out the words "nature's art."
- Using a self-healing mat or surface with grid lines, add a line of removable adhesive onto the mat. Line up the die cuts onto the mat and place a piece of transfer tape or Press and Seal on top to pick up all the letters at once. Use a spatula to help lift the die cuts off the mat.


- Add liquid glue to the die cuts the place them onto your journal pages.


- Carefully peel off the transfer tape or Press and Seal.
- Using the end of the water spray pump, add a few big drops of water onto the journal pages for some texture (optional - this was a last minute, spur of the moment idea).

- Adhere all the images onto the journal pages using collage medium. Add the sentiment stickers.

- Lastly, apply a light coat of collage medium all over the pages.
The art journal page is complete! This was a really fun project to do. Give it a try!

Thank you for stopping by and have a very creative week!
Be sure to follow us at:
The Blank Page Muse Shop https://blankpagemuse.com/
FB Fan Page https://www.facebook.com/groups/bla...
Instagram - Shop https://www.instagram.com/blankpage...
Instagram - Blog https://www.instagram.com/blankpage...