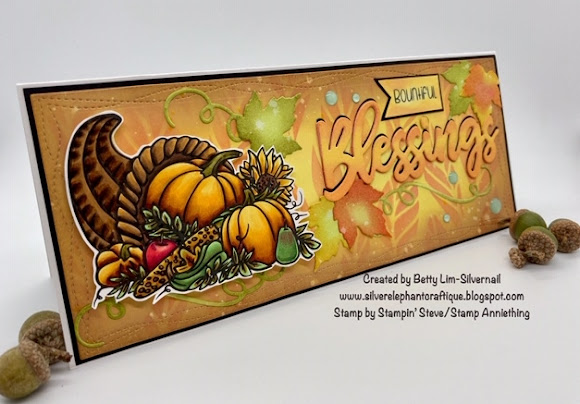
Watching Stephen gave me the inspiration to make this card, which uses the techniques he demonstrated. I didn't have all the colors and supplies Stephen had so I substituted with what I had.
Supplies:
- Stampin' Steve Bountiful Blessings stamp
- Stamp Anniething Pumpkin Shaker Add-on or any leaves and vines die
- Stamp Anniething Blessings Word Die or any large word die
- White cardstock for the base
- Black cardstock for the mat and shadow for the Blessings word die
- Bristol paper or watercolor paper for the front panel and die cuts
- Water bowl, fan paint brush or toothbrush and paper towel
- Distress Ink applicator (I used Ranger Mini Blending Tool)
- Distress/Distress oxide inks (colors listed below)
- Copic markers or color medium of choice (Copic colors listed below)
- Enamel dots, optional. You can use whatever embellishments you have.
- Basic card making kit: Paper trimmer, scissors, adhesive, foam dots/squares/strips/roll, stamping platform or acrylic block, black ink pad.
Distress or Distress oxide ink colors:
- Front panel: Squeezed Lemonade, Brushed Corduroy
- Leaves stencil: Wild Honey
- Leaves and vines die cuts: Twisted Citron, Peeled Paint, Wild Honey, Worn Lipstick
- Blessing word die: Squeeze Lemonade, Wild Honey
Copic colors used:
- Pumpkin: E18, E19, YR27, YR24, Y17; Stem: YG97, YG95, E89
- Cornucopia: E49, E59, E57, E55
- Pear: G29, YG67, YG63, YG13, R29; Stem: E55
- Apple: R59, R37, R35, R32; Stem: E55
- Gourd: G29, YG67, YG63, YG13
- Indian corn: Y11, Y15, YR23, E55, E57, YR27
- Corn husk: YG11, YG63, YG67
- Sunflower: Y17, Y15, Y13, Center: E49, E47, E25
- Maple leaf: Y11, Y17, Y15, R32
- Leaves: YG13, YG67, YG63, YR23
Instructions:
- Stamp and color the Bountiful Blessings stamp. Fussy cut the stamp.
- There is no standard measurement for a slimline card. I cut my front panel with a slimline die, so I cut the base card .25" larger. If you don't have any slimline dies, cut your base card 8.5" x 7" and fold in half to make a 8.5" x 3.5" card. Cut the black mat 1/8" smaller on all sides and the front panel, using Bristol or watercolor paper, 1/4" smaller on all sides.
- Die cut the leaves, vines, and the word Blessings with Bristol paper.
- Die cut the word Blessing with black cardstock. This will be the shadow.
- Ink the front panel with Distress or Oxide ink in Squeezed Lemonade. Cover the entire panel.
- Stencil the leaves die on the front panel with Wild Honey.
- Ink the edges of the panel with Brushed Corduroy.
- Using the fan paint brush, splatter some drops onto the panel. Wait a few seconds then blot with a paper towel.
- Ink the vines with Twisted citron and Peeled Paint. Keep the center lighter than the ends of the vines.
- Ink the leaves with Twisted Citron, Peeled Paint, Wild Honey, Worn Lipstick, keeping the centers light and edges darker.
- Using the fan paint brush, splatter some drops onto the leaves and vines. Wait a few seconds then blot with a paper towel.
- In the word Blessings with Squeezed Lemonade and Wild Honey, keeping the center lighter.
- Stamp your sentiment on Bristol paper and ink with Squeezed Lemonade and Wild Honey. Cut a fishtail tag. Then cut one slightly bigger using black cardstock and glue together.
- Arrange all the pieces onto your panel. All pieces are glued flat except for the cornucopia. Use adhesive foam to pop it up.
- Add your embellishments and you are done!


Simply lovely Your selection of colors and layering and eye for detail is always on point. Thank you for sharing your idea and talent.
ReplyDelete