Showing posts with label Distress oxide. Show all posts

Saturday, December 13, 2025

Stamp Anniething: Treasure Every Adventure

I'm having so much fun using Stamp Anniething's December release! I'm loving the fun and cute stamps called You Are Such a Darling.  I also used the London Skies 2 Layer Stencil to create this scene for this slimline card. 


Stamp Anniething products used:
  • You Are Such A Darling Stamps and Outline Dies
  • London Skies 2 Layer Stencil
Supplies used:
  • White slimline card base
  • White Bristol cardstock for background panel
  • Distress Oxides in Dusty Concord for background, sprinkled withwater
  • Distress Oxides in Stormy Sky & Faded Jeans for stencil
Copic markers used:


Boy 1
  • Skin: E04, E11, E21, E00, E000
  • Cheeks: E93
  • Hair: E18, E08, YR18, YR14
  • Dark Green: G29, G24, G12
  • Light Green: YG67, YG13, YG03, YG01
  • Red: R39, R37, R35, R32, R30
  • Light Brown (shoes and dagger): E09, E07, YR24, E02
  • Dark Brown: E47, E44, E43, E42
Dog
  • Light brown: E43, E42, E41
  • Dark brown: E37, E35, E34, E31
  • Blue: B97, B95, B93, B91
Bear
  • Brown: E57, E55, E53, E51
  • Blue: B97, B93
Boy 2
  • Skin: E04, E11, E21, E00, E000
  • Cheeks: E93
  • Hair: E39, YR24, YR23, YR20
  • Pink: N1, RV14, RV13, RV21, RV11
Boy 3
  • Skin: E04, E11, E21, E00, E000
  • Cheeks: E93
  • Glasses (blue): B91
  • Hair: E39, E37, E34, E31
  • Hat & shoes (black): C9, C7, C5, C3, C1
  • White: N3, N1, 0
  • Map: YG17, R29, B93, E15

Thank you for stopping by! I hope you love this release as much as I do. Have a creative day!

Friday, December 5, 2025

Stamp Anniething December Release: A Sprinkle of Magic Just For You!

It's Stamp Anniething's December release day! Below is my second project using the fun and cute stamps, dies, and stencil called You Are Such a Darling.  For this card, I also used the London Skies 2 Layer Stencil to create this scene. A perfect release to add to your collection.


Stamp Anniething products used:
  • You Are Such A Darling Stamps and Outline Dies
  • London Skies 2 Layer Stencil

Supplies used:
  • 6x6 white card base
  • Black cardstock mat/panel
  • Purple cardstock mat/panel
  • Distress ink for ink smooshing: Dusty Concord, Blueprint Sketch, Broken China, Black Soot
  • White embossing powder

Copic markers used:
  • Skin: E13, E11, E21,E00
  • Cheeks: R20
  • Hair: Y27, Y23, Y21
  • Green: YG67, YG13, YG03, YG01
  • Blue green (wings): BG13, BG23, BG11 plus white gel pen

Thank you for stopping by! I hope you give this card a try. So fun! 

Sunday, April 27, 2025

Scrappy Boy Stamps: More April 2025 release inspiration!

I have three more cards to share with you using Scrappy Boy Stamps' latest release! It's been so much fun playing with alcohol inks and creating galaxy backgrounds for my alien friends from the Aliens Landed in Roswell stamp set. While getting my alcohol ink galaxy to dry, I played with the Pirate Add On for Mouse Ears Die to create a couple cute mouse head square cards. 

Project 1: Our Friendship is Out of This World


Scrappy Boy Stamp products used:
  • Aliens Landed in Roswell Stamp & Dies
  • Aliens Landed in Roswell paper pack
  • Stitched Circle Dies
  • Stitched Rectangle Dies

Supplies used:
  • A2 white cardstock
  • Heavy weight Yupo paper for alcohol inked background. 
  • Pinata Alcohol inks in purple, green, red, black, yellow, silver (use any brand).
  • Transparent vellum
  • Vellum tape runner

Copic markers used:

Alien
  • Green: BG13, BG34, G00
  • Earth
    • Blue: B14, B12, B00
    • Brown: E33, E42, E41
    • Green: G14, G12
Planet
  • Yellow: Y38, Y35
  • Blue: B14, B12
  • Purple: V25, V22, V20
Shooting Star
  • Yellow: Y38, Y15, Y13
  • Orange: YR18, YR14, YR12
Tips:
  • If you've never created an alcohol inked background on Yupo paper, please check out my previous blog posts here: alcohol ink on Yupo

Project 2: Magical Wishes


Scrappy Boy Stamps products used:
  • Pirate Add On for Mouse Ears Die
  • Mouse Ears Mini Album Die
  • Oh My Word Die (used a combo): 1) Birthday Phrases and 2) Fairy Tale Princess
  • Hello Everyone Paper Pack

Supplies used:
  • 6x6 White card base
  • Black, white, dark pink, light pink cardstock for dies
  • Distress Ink in Worn Lipstick
Tips:
  • Use the Distress Ink to ink the edges of the card base.
  • Use a combination of words from the Oh My Word Dies to create your desired sentiment.

Project 3: Happy Birthday


Scrappy Boy Stamps products used:
  • Pirate Add On for Mouse Ears Die
  • Mouse Ears Mini Album Die
  • Oh My Word Die: Birthday Phrases
  • Pirates Paper Pack
Supplies used:
  • 6x6 White card base
  • Black, white, red, gold cardstock for dies

Thank you for stopping by. I just love the April 2025 new release. The card making dies are so fun!! 

Sunday, February 16, 2025

Scrappy Boy Stamps: Cute Kids Farmers and Beauty & the Beast

Today I am sharing my last two cards using two of the January 2025 releases. I will be working on the February release in the upcoming weeks. I've really enjoyed January's Cute Kids Farmers and the Beauty and the Beast stamp sets. I love the stencils and papers from both releases. Please scroll down to see both projects.

Project 1: Greetings From the Funny Farm

I used the Cute Kids Farmers to create this 6 x 6 card. I love the Buffalo Plaid Stencil and used it to create the background.


Scrappy Boy Stamps products used:
  • Cute Kids Farmers stamps and outline dies
  • Buffalo Plaid Stencil
  • Grass and Clouds Edger Dies
  • Stitched Oval Dies
  • Alphabet Dies for the word "Howdy"
  • Stitched Rectangle Die
Supplies used:
  • 6 x 6 white card base
  • I Love to Farm Paper Pack
  • White cardstock panel for stenciling
  • White cardstock for die cutting clouds and grass
  • Transparent acetate
  • Dark blue and light blue cardstock for the word Howdy
  • Distress Inks for Buffalo Plaid Stencil: Victorian Velvet and Peeled Paint
  • Distress Inks for Clouds: Victorian Velvet
  • Distress Inks for Grass: Peeled Paint

Copic markers used:

Boy
  • Skin: E13, E11, E21, E00
  • Cheeks and tongue: E93
  • Hair: E49, E47, E43
  • Blue: B97, B95, B93, B91
  • Red: R17, R14, R12, R11
  • Yellow: Y19, Y15, Y13
  • Black: C9, C7, C5, C3
  • Green: YG97, YG95, YG93, YG91
Girl
  • Skin: E04, E11, E21, E00
  • Cheeks: R20
  • Tongue: R22, R20
  • Hair: YR27, YR24, YR23, Y21
  • Pink: R56, R85, R83, R81
  • Blue: B16, B14, B12
  • Brown: E47, E44, E42
  • Orange: YR16, YR15
  • Red: R27, R05
  • Yellow: YR23, Y18
  • Purple: V28, V25
  • Green: YG97, YG95, YG93

Project 2: Read Dream, BELLE-EVE

I just love the Fairy Tale Book and Rose Builder Stencil! It creates such a beautiful background for cards. Of course, it goes perfectly with the Beauty and the Beast stamps!


Scrappy Boy Stamps products used:
  • Beauty and the Beast stamps and outline dies
  • Fairy Tale Book and Rose Builder Stencil
  • Beauty and the Beast Paper Pack
  • Stitched Rectangle Dies
Supplies used:
  • A6 white card base
  • Reddish orange cardstock panel/mat
  • Distress inks used for stenciling: Pumice stone (book), Barn door and fired brick (rose), Lucky clover (stem), Mustard green and wild honey (mirror)
  • Small scrap of clouds acetate for mirror

Copic markers used:

Feather duster - Plumette
  • Light brown: E57, E55, E53
  • Dark brown: E49, E47, E44, E43
  • Gray: N3, N1
  • Red: R27
Clock - Cogsworth
  • Light brown: E35, E33, E31
  • Gold: E23, Y38, YR21
  • Gray: N5, N3, N1
  • Dark brown: E47, E44, E43
  • Pink: R22
Belle
  • Skin: E04, E11, E21, E00
  • Cheeks: R20
  • Lips: R27, R20
  • Hair: E08, E57, E55, E53
  • White: C3, C1, 0
  • Blue: B26,B24, B23, B21
  • Purple: V06, V04, V01
Candle (Lumiere)
  • Gold: E23, Y38, YR21
  • Yellow (flame): Y38, YR21
  • White: N3, N1, 0
  • Pink: R22
Cup (Chip) and tea pot (Mrs. Potts)
  • White: N3, N1, 0
  • Gold: Y28, Y26
  • Pink: RV21
  • Blue: B02
  • Purple: V01


Both projects are fun and easy to create. Please give them a try!
Thank you for visiting. Have a creative day!


Thursday, January 9, 2025

Stamp Anniething: Welcome to the Neighborhood

Welcome to Stamp Anniething's January 2025 sneak peek! This month's new release was inspired by one of my favorite childhood cartoons!  This release consists of the following:
  • Yabba Dabba Doo! Stamp Set
  • Yabba Dabba Doo! Outline Dies
  • Bedrock Homestead Builder Die
  • Grand Poobah and Dino Builder Die
  • Fred Pattern Stencil
This new release will be available for purchase Friday, January 10, 2025.

Today's 6 X 6 card features the adorable Pebbles and Bamm Bamm stamps from the Yabba Dabba Doo stamp set, the Dino Builder Die, and the Bedrock Homestead Builder Die. Additional products used are from older Stamp Anniething dies and stencils that are now retired. I used these retired products since many of you have them. 
  • Palm Tree Dies (retired)
  • Clouds Stencil (retired)
Supplies used:
  • 6" x 6" white card base
  • Black cardstock panel/mat
  • Bristol cardstock for background
  • Distress inks to ink the Homestead Builder Die and Palm Tree Die cuts: Pumice Stone (base); Hickory Smoke (roof and walk way); Vintage Photo (garage door & tree trunk); Blueprint Sketch (front door); Lucky Clover (tree); Seedless Preserves (tree flower)
  • Distress inks to ink Dino: Victorian Velvet (snout); Seedless Preserves
  • Distress Oxide inks for background: Tumbled Glass (Clouds); Mowed Lawn (Grass)

Copic Markers used:

Pebbles
  • Skin: E04, E11, E21, E00, E000
  • Cheeks and Tongue: R20
  • Hair: E18, E08, YR18, YR14
  • Blue: BG07, BG05, BG02
  • Green: YG17, YG07, YG03
  • White: N3,N1, 0
Bamm Bamm
  • Skin: E04, E11, E21, E00, E000
  • Cheeks and Tongue: R20
  • Hair: W3, W1, E41
  • Green: YG95, YG93
  • Brown: E37, E35, E31
Notes:
  • I used a fine tip pen to draw the stones on the chimney and the walk way (The walk way was hand cut) and the lines on the front door.

Thank you for stopping by. Please come back tomorrow for Day 2 of the new release reveal! 

Wednesday, August 21, 2024

Scrappy Boy Stamps: August 2024 Sneak Peeks!

We just passed the halfway point for summer so it's time to start thinking about fall and Halloween projects. Scrappy Boy Stamps' August 2024 new release is full of spooky-cute, spooky-fun, and spooky-fabulous stamps, dies, papers, and stencils! There are two Halloween/Fall sets for the August release and for the Once Upon a Time Series, it is Little Red Riding Hood! I have three projects to share today using these new releases. Please scroll down to see them all. 

The new release will be available in the webstore on Friday, August 23, 2024.

This month's new release includes the following:
  • Haunted Halloween 
    • Haunted Halloween 6x8 Stamp & Dies
    • Haunted Halloween 6x6 & 4x9 paper packs
    • Spooky Eyes Background Stencil
    • Haunted Halloween Colored Die Cut Pieces
    • Tombstone Die
  • Cute Kids
    • Halloween Dress Up 6x8 Stamp Set & Dies
    • Witch Hats & Bats Background Stencil
    • I Love Halloween 6x6 Paper Pack
    • Cute Kids Halloween Dress Up Colored Die Cut Pieces
  • Once Upon a Time Series: Little Red Riding Hood
    • Little Red Riding Hood 6x8 Stamp & Dies
    • Basket Weave Background Stencil
    • Little Red Riding Hood 6x6 paper pack
    • Little Red Riding Hood colored die cut pieces
  • Dies:
    • Alphabet Set
    • 11 new confetti die plates (Hanukkah, Happy Birthday, Paw, Rainbows & Arrows, X's & O's, Christmas Candy, Christmas Icons, Dinosaurs, Filmstrip & Popcorn, Halloween Icons, Halloween Monsters)
Project 1: Tombstone Happy Halloween Card


The Tombstone Die is so fun. It comes with many dies that can be used to decorate the tomb. It comes with spiders, bats, crosses, a spider web, two word dies, and label dies. The Tombstone Die is great for mini-albums as well. 


Scrappy Boy Stamps products used:
  • Haunted Halloween 6x8 Stamp & Dies
  • Tombstone Die
  • Grass and Clouds Edger Dies
Supplies used:
  • White cardstock to create the base
  • Black cardstock for the mat layer and scraps for spiders, sentiment, RIP word and label mat dies.
  • Gray cardstock scraps for RIP word and label dies.
  • Transparent vellum for stamps and spider webs
  • White Bristol cardstock to in background and add water spots
  • Distress Inks in Pumice Stone, Hickory Smoke, Black Soot to ink background
  • White pigment ink for sentiment
  • White embossing powder for sentiment
  • Black pigment ink to stamp the ghosts
  • Transparent embossing powder for ghosts

Prismacolor pencils used for vellum ghosts:
  • PC904, PC1023
Coloring Instructions:

I stamped the ghost images using black pigment inks onto transparent vellum. I think used transparent embossing powder over the pigment ink. I colored the ghosts using the Prismacolor pencils listed above.


Project 2: Cute Kids Halloween Dress Up: Witch Way To The Candy?


I love using stencils and patterned papers to create a quick and simple background for my cards. This card uses the new Witch Hats & Bats Background Stencil and the I Love Halloween paper pack. I used the new Alphabet Die Set to create the word BOO! This Alphabet Die Set is the perfect size to customize your own sentiments, words, and names for your cards. 


Scrappy Boy Stamps products used:
  • Witch Hats & Bats Background
  • I Love Halloween Paper Pack
  • Alphabet Die Set
  • Wonky Stitched Rectangle Die
Supplies used:
  • A6 white card base
  • Orange cardstock for stenciling
  • White and purple cardstock scraps for the word BOO!
  • Black dye ink for stenciling (I used Memento Tuxedo Black)

Copic markers used:

Pumpkin Girl
  • Skin: E37, E35, E33, E31
  • Cheeks: R32
  • Hair: N7,N5, N3 + Copic Multi-liner in black
  • Green: YG67, YG63, YG61
  • Orange: E04, YR07, YR04, R02
Witch
  • Skin: BG00, BG96, BG93, YR93
  • Hair: YR18, YR14, YR12
  • Purple: BV29, BV25, BV23, BV20
  • Brown: E47, E44, E43

Project 3: Little Red Riding Hood Shaker Book Mark


I love giving books as gifts for friends who love to read. Whenever I give a book, I like to include a book mark. I made this shaker book mark filled with shaker bits made from the X's and O's Confetti Plate Die. I cut out the shaker bits using different color cardstock. I added two of the colored stamps from the Little Red Riding Hood stamp set to the front of the bookmark. I used the Little Red Riding Hood Paper Pack for this bookmark.


Scrappy Boy Stamps products used:
  • Little Red Riding Hood Stamps and outline dies
  • Little Red Riding Hood Paper Pack
  • X's & O's Confetti Plate Die
  • Bookmark & Toppers Die
Supplies used:
  • Red, blue, green, yellow cardstock to cut X's & O's Confetti Plate Die for shaker bits
  • Multi-colored sequins
  • We R Memory Makers Fuseables (or clear acetate) to create shaker pouch
  • We R Memory Makers Fuse Tool to seal shaker pouch
  • Craft knife to cut window of shaker
  • Strong double sided tape or strong liquid glue
  • Tule or ribbon
Copic markers used:


Wolf
  • Light gray: W3, W1, W0
  • Dark gray: W7, W5, W3
  • Pink (ears): E93
  • Red: R17, R14, R22
  • Blue: B16, B14, B01
  • Yellow: YR24, YR23,Y21

Red Riding Hood
  • Skin: E15, E11, E21, E00
  • Cheeks: R20
  • Lips: R29
  • Hair: E29, E25, E21
  • Green: G99, G94, YG63, G82, G40
  • Red: R89, R29, R17, R14, R22
  • Brown: E29, E25, E21
Instructions:
  • Use the X's & O's Confetti Plate to cut shaker bits. Put aside.
  • Cut two of the bookmarks using patterned paper using the Bookmark Die. I used 6x6 papers and the die is 6-1/2" tall. The top of the die won't be cut and will be covered by the topper.
  • Use a craft knife to cut out a window in the front panel, leaving a 1/4" border on all edges. 
  • Cut two of the toppers that fit all the way across the bookmark.
  • The shaker pouch is made using We R Memory Keepers Fuseables and the Fuse tool to seal the edges. Use the Bookmark Die to cut two of the Fuseables (you can use light weight clear acetate, such as a page protector, as well). 
  • Using the Fuse Tool, seal the left, right, and bottom edges, leaving the top open to create the shaker pouch.
  • Fill the pouch with the X's & O's die cuts and sequins. Put as much or as little bits as you like. Use the Fuse Tool to seal the top. 
  • Sandwich the pouch between the top and bottom of the bookmark and adhere using strong double adhesive tape or liquid glue. 
  • Adhere the topper to the front and back, aligning the holes.
  • Adhere the colored images using doubles sided tape or liquid glue. If using liquid glue, make sure it does not ooze out onto the acetate.
  • Tie the ribbon onto the bookmark.

Thank you for stopping by and checking out this month's sneak peeks! The design team will be sharing more inspirational projects for the next several weeks. 

Have a wonderfully creative day!


Sunday, April 28, 2024

Scrappy Boy Stamps: More April Release Inspiration!

I've been having so much fun creating with two of this month's Scrappy Boy Stamps new releases called Princess Pin Up Girls and Three Little Pigs. It's fun to pair the Princess Pin Up Girls with the past Corset Die to make today's card. The Three Little Pigs set makes a wonderful congratulatory new home card! Please scroll down to see both projects.

Project 1: Princess Pin Up Girls - Who Needs a Glass Slipper? I'd Rather Have a Glass of Wine!


Scrappy Boy Stamps products used:
  • Princess Pin Up Girls stamps, outline die, and paper pack
  • High Heels Background Stencil
  • Corset Mini Album die
  • Stitched Scalloped Edge Dies
Supplies used:
  • A2 white card base
  • White cardstock
  • Distress Inks in Broken China and Blueprint Sketch for stencil
  • White gel pen


Copic markers used for coloring stamps:
  • Skin: E04, E11, E21, E00, E000
  • Cheeks: E93
  • Lips: R35, R32
  • Hair: E99, E55, E3, YR31
  • Dark Blue: B18, B16, B14, B12
  • Light Blue: B02, B01, B000
To create the Corset, I first inked white cardstock with Distress Ink in Broken China. Then I used the High Heels Background Stencil and inked it in Blueprint Sketch. I used the Corset Die to cut out all the pieces and assembled as shown.

I stamped the sentiment on the inside of the card before I started the front of the card.


I used the Stitched Scalloped Edge Die to cut out the pink patterned mat. The blue patterned strip measures 3-1/2"W x 2-1/4" H and is backed by white cardstock with a 1/8" border on the top and bottom. 


I adhered all the pieces using liquid glue, except for the princess, where I used double-sided foam tape.

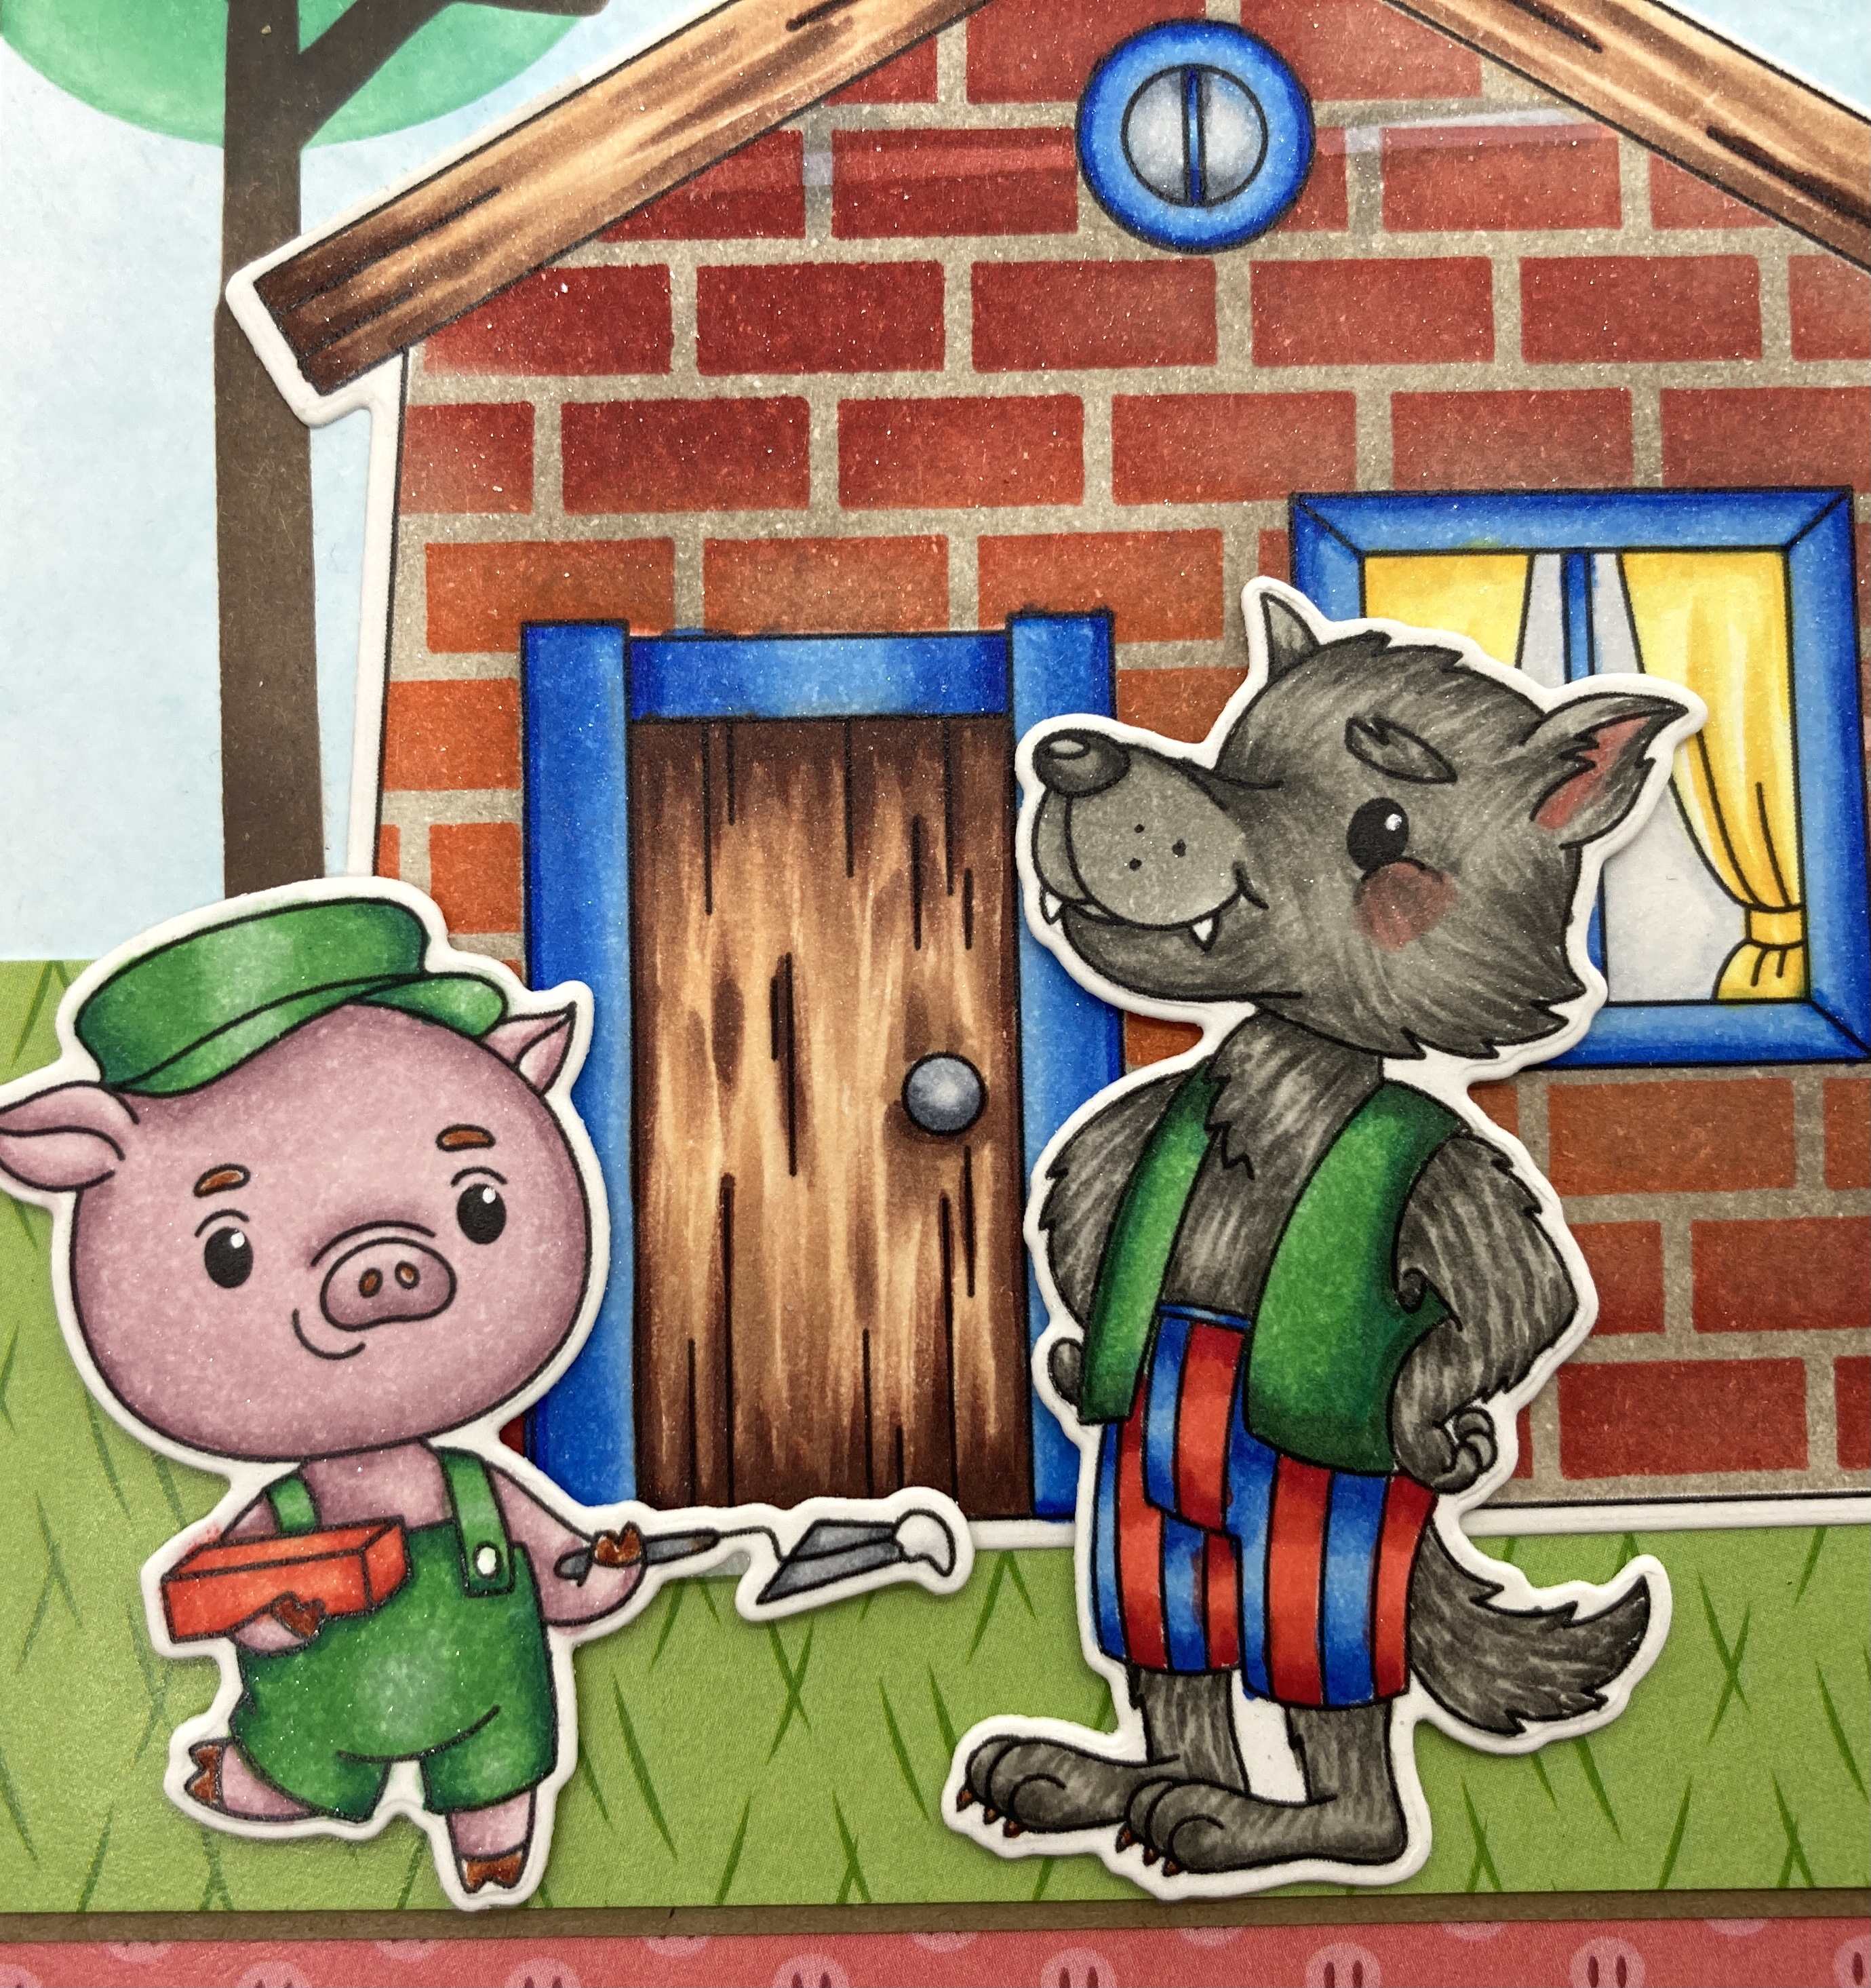
Project 2: Three Little Pigs - Congratulations On Your New Home!


Scrappy Boy Stamps products used:
  • Three Little Pigs Stamps, Outline Dies, Paper Pack
  • Three Little Pigs House Stamp & Outline Die
  • Three Little Pigs House Decorator Stencils
Supplies used:
  • A6 white card base
  • Distress Oxide in Tumbled Glass
  • Distress Inks in Pumice Stone, Ripe Persimmon, Fired Brick (house)
  • Distress Inks in Vintage Photo, Lucky Clover (tree)
  • Kraft cardstock 
  • White cardstock

Copic markers used to color stamps:

Pig
  • Skin: RV95, RV93, RV91
  • Brown: E15
  • Green: G17, G14, G12
  • Red: R17, R14, R12
  • Silver: N5, N3, N1
Wolf
  • Fur: W7, W6, W5, W3, W1
  • Blue: B26, B24, B21
  • Green: G28, G17, G14, G12
  • Red: R29, R24, R22
  • Pink: R21
  • Brown: E15
House
  • Blue: B28, B24, B21
  • Brown: E29, E25, E23, E21
  • Dark Gray: C1, C00
  • Yellow: Y19, Y15, Y13, Y11
  • Light Gray (window): C1, C00
I created the background using Distress Ink in Tumbled Glass. I used the Three Little Pigs House Decorator to create the tree using the inks listed above in the supply list. I then stamped the sentiment.

For the house, I first stenciled the wall with the Three Little Pigs House Decorator stencils before coloring them with Copic markers (Distress Ink colors in the supply list above). I cut the green patterned paper for the grass and adhered it to the card front. I matted this with Kraft cardstock with a 1/8" border and placed it on top of more patterned paper before adhering it to the card base.

I adhered the house onto the card front using liquid glue and for the pig and wolf, I used double-sided foam tape. 


Such fun and cute cards to make! I hope you give them a try! Thank you for visiting. Have a crafty day!