
Updated 8/14/2021: You can use discount code BPMBetty to get 15% off your entire order at Blank Page Muse!!! Check out their website: Blank Page Muse.


This is a really fun card to make. Change the sentiment and it can be for any occasion! Thank you for stopping by and have a creative week!

Supplies:
- Blank Page Muse Vintage Transportation Steampunk Art Rubber Stamp Sheet
- Blank Page Muse Background Grunge Art Rubber Stamp Sheet designed by Pam Bray
- Rice paper with vintage planes (or substitute with patterned paper)
- White cardstock A6 size card base
- Black cardstock mat 6-1/8"W x 4-1/2"H
- White cardstock card front 5-7/8"W x 4-1/4"H
- Black cardstock to stamp sentiment 3-1/2"W x 1-1/2"H
- Gears and Cogs die
- Watercolor paper to cut out gears and cogs 6"W x 4"H
- Black dye ink pad
- Stamp positioner or stamping block
- Glue stick or tape runner plus your favorite liquid adhesive
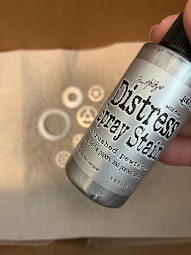
- Distress Stains (spray or bottle): Brushed Pewter, Tarnished Brass, Rusty Hinge
- Acrylic paints: Turquoise, Black
- Distress Inks: Salvaged Pantina, Tea Dye, Black Soot
- Watermark Stamp Pad (i.e. VersaMark)
- White Embossing Powder
- Heat Gun
Instructions:
- The first thing to prepare are the gears and cogs. If you don't have gears and cogs dies, you can purchase them already made. However, it's more fun to make your own. Using gears and cogs dies, cut out several out of white cardstock to make and save the extras for future cards.

- Place these die cuts into a box so when spraying with Distress Spray Stains, the over spray is contained in the box. Spray the following colors and let each color dry before spraying the next color: 1) Brushed Pewter, 2) Tarnished Brass, and Rusty Hinge. I used the bottle with the dauber since I didn't have Rusty Hinge in a spray. Let dry.


- Place the die cuts on wax paper and add some turquoise and black paint to make it look old and dirty. Set aside and let dry.

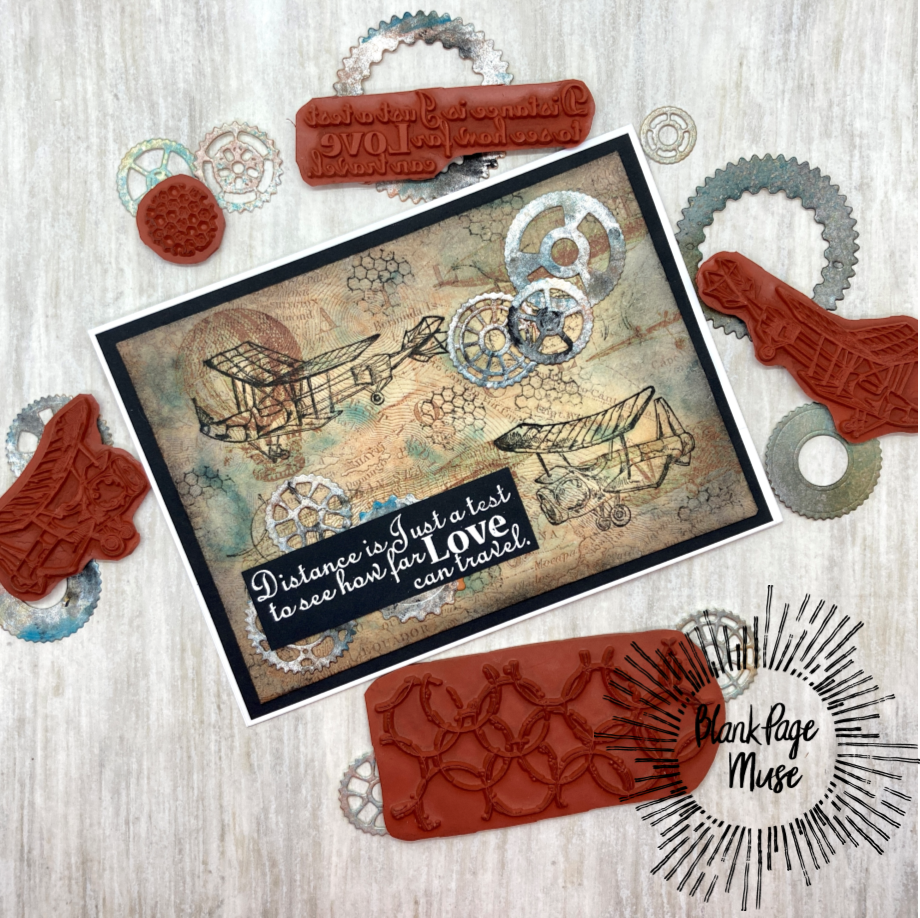
- Using steampunk or vintage rice paper OR patterned paper, measure, trim and glue onto the White cardstock card front (5-7/8"W x 4-1/4"H). Make sure the corners are mitered to decrease bulkiness at the corners. If using rice paper, use a glue stick. Do not use liquid glue or your paper will wrinkle.


- Now age the paper by applying Distress Inks in Salvaged Patina, Tea Dye, and Black Soot with a blending brush.

- Stamp two airplanes from the Blank Page Muse Vintage Transportation Steampunk stamp set.

- Use two background stamps from the Blank Page Muse Background Grunge stamp set to add some designs to the card front.


- Adhere some gears and cogs to the card front.
- Select a sentiment from the Vintage Transportation Steampunk stamp. Before stamping on black cardstock, use an embossing buddy to add some powder to decrease the static. Stamp with a watermark stamp pad onto the black cardstock, add white embossing powder and heat. Trim to fit the card front and adhere with glue.

- Adhere the card front onto the card base and the card is finished.
This is a really fun card to make. Change the sentiment and it can be for any occasion! Thank you for stopping by and have a creative week!
Looking for more Inspiration? Click the links below!
The Blank Page Muse Shop https://blankpagemuse.com/
FB Fan Page https://www.facebook.com/groups/bla...
Instagram - Shop https://www.instagram.com/blankpage...
Instagram - Blog https://www.instagram.com/blankpage...
Twitter https://twitter.com/BlankPageMuse
Pintrest https://www.pinterest.com/blankpage...
No comments:
Post a Comment