
Supplies:
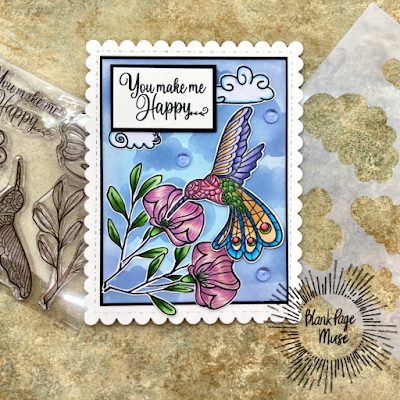
- Blank Page Muse: You Make Me Happy Hummingbird Clouds Flower Clear Stamp Set
- Card Base, white cardstock: 3-1/5"W x 9-3/4" H; scored at 4-7/8"; fold in half for top folding card
- Card front, white cardstock: 3-3/8"W x 4-1/2"H
- Card mat, black cardstock: 3-1/2"W x 4-5/8"H
- Card mat, cut using A2 scalloped edged rectangle die
- White cardstock to stamp your stamps, approx 5" x 8"
- Sentiment mat, black cardstock: 2"W x 1-1/4"H
- Your favorite coloring medium (I used Copic alcohol markers)
- Black ink pad - use ink pad that is compatible with your coloring medium
- Stamping block or stamp positioner
- Distress Oxides in Stormy Sky and Tumble Glass
- Ink blending brush/pad
- Your favorite adhesive
- Double-sided foam tape
- Optional: Jelly dots or enamel dots
Instructions:
- Cut out all the cardstock to the sizes indicated above
- Stamp 2 of the flowers and 2 of the leaves stamps, one of each cloud, and one hummingbird
- Using your favorite coloring medium, color all the stamps. I used Copic Markers. Listed below are the colors I used.
- Leaves: YG67, YG17, YG13, YG11
- Flowers: G40, V05, V04,RV63, R81, RV00
- Clouds: B01, B000, Blender
- Hummingbird-
- Blue: B06, B04, B02, B01
- Green: YG17, YG09, YG03
- Yellow: YR23, YR21, YR20
- Purple: BV04, BV02, BV01, BV00
- Pink: RV17, RV14, RV13, RV11
- Fussy cut out all the colored images and set aside

- Starting with Distress Oxide in Tumbled Glass, using a blending brush or pad lightly ink the center of the card front
- Now ink the edges lightly with Distress Oxide in Stormy Sky

- Using the cloud stencil and the Distress Oxide in Stormy Sky randomly add clouds to the card front. Have some of the clouds go off the page. Tape the stencil down with low-tack tape so the stencil doesn't shift.


- Adhere the card front to the black cardstock mat
- Trim the sentiment to 1-7/8"W x 1-1/8"H and adhere to the sentiment black mat
- Using your favorite adhesive, adhere the clouds, leaves, and flower to the card front
- Using double sided foam tape, adhere the sentiment and the hummingbird to the card front
- Adhere the card front to the scalloped mat, then adhere to the card base.

- Finish the card by adding a few jelly dots or enamel dots (optional)


Thank you for visiting today. This is a very fun and fast card to make. Have a very creative week!
Looking for more Inspiration? Click the links below!
So beautiful. Your shading and detail are spectacular.
ReplyDelete