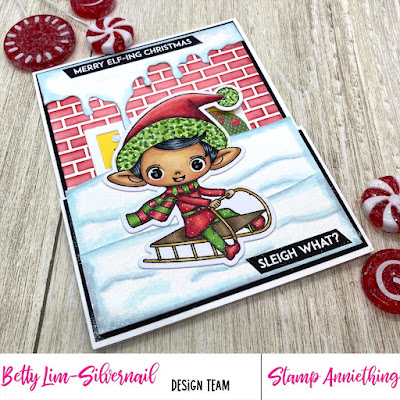
Stamp Anniething products used:
- Treat Yours"elf" stamps and outline dies
- Holiday Scene Builder
- Sentiment Strips
- Hybrid Inks for stencil: Chili Peppers
- Party Time Stencil for the dripping snow (retired)
- Edger Dies for the snow on the ground (retired)
- Brick Stencil (retired)
Supplies used:
- A2 top folding white card base
- 4.25" x 5.5" white cardstock scored at 1/2" and 3" and folded. Adhere 1/2" fold onto the white card base to form an easel
- Black cardstock for mat/panel
- White cardstock for dies and stencil panel
- Yellow cardstock for inside window
- Patterned paper (cut out of Santa) - Hobby Lobby Hollies Jolllies
- Patterned paper (wreath) - Hobby Lobby Very Merry Christmas
- Spectrum Noir Sparkle Pen
- White gel pen
Copic markers used:
Elf
- Skin: E33, E11, YR31, E30
- Tongue: R22, R20
- Cheeks: R20
- Hair: 100, C7, C5, C3
- Red: R39, R46, R35, R32
- Green: YG67, YG07, YG03
- Yellow: YR24, YR23, YR31
- Brown: E47, E44, E43, E42
Tree
- Red: R39, R46, R35, R32
- Green: YG67, YG07, YG03
- Yellow: YR24, YR23, YR31
- Brown: E47, E44, E43, E42
Snow
- C3, C1, BG000, BG0000
Notes:
- Create the card base: 4.25" x 5.5" white cardstock scored at 1/2" and 3" and folded. Adhere 1/2" fold onto the A2 white card base to form an easel.
- Cut black cardstock leaving 1/8" border and adhere to the card base.
- Cut white cardstock for stencil leaving 1/8" border. Stencil the brick pattern using the hybrid ink. Adhere to the black cardstock.
- Cut out the snow, color Copic markers and adhere to the card as shown.
- Cut out the windows, add the tree and a Santa Clause (optional), then add the yellow cardstock.
- Cut out the wreath, assemble, and adhere to the front of one of the windows.
- Adhere the images and sentiments.
- Add sparkle to the snow, tree, wreath, and the elf (except the skin) using the Spectrum Noir Sparkle pen. Add some white dots with the white gel pen.
I love making easel cards. They add so much dimension to a card.
Thank you for stopping by. Have a creative day!


No comments:
Post a Comment