Here's a list of the entire June new release:
- Hollywood Vixen 6x8 Stamp & Dies
- Hollywood Vixen 6x6 & 4x9 paper packs
- Hollywood Vixen Colored Die Cut Pieces
- Rodeo Drive Shops Scene Builder Die
- Cute Kids Dog Lovers 6x8 Stamp Set & Dies
- Cute Kids Dog Lovers 6x6 Paper Pack
- Cute Kids Dog Lovers Colored Die Cut Pieces
- Dog House Gift Card Holder
- Moments in History: Spirit of 1776 6x8 Stamp & Dies
- Moments in History: Spirit of 1776 6x6 paper pack
- Moments in History: Spirit of 1776 colored die cut pieces
- Moments in History: American Flag 2 ways Die
- Happy Birthday Pop Up Envelope Add On Sets
- Christmas
- Halloween
- Farm Truck
Sneak Peeks!
Project 1: Hollywood Vixen - You'll Never Want To Let Me Go
Scrappy Boy Stamps products used:
- Hollywood Vixen stamps and outline dies
- Hollywood Vixen Paper Pack
- Rodeo Drive Shops Scene Builder Die
- A2 Grass & Clouds Edger Dies
- A2 Scalloped Edge Dies
Supplies used:
- The easel card I used is from "Stamping on the Back Porch" by Karen Titus. Please see the measurements on her website here: Easel. I used a scalloped die for the front panel instead of the postage stamp die she used.
- Gold cardstock for the base of the easel card.
- White cardstock for the front panel of the easel card (scalloped pieced) and for the front panel for the clouds.
- Black cardstock for the panel/mat & sentiment.
- Distress Oxide Ink in Faded Jeans for the clouds in the background.
- White embossing powder for sentiment.
- Double-sided adhesive foam tape.
Copic markers & Distress Inks used:
Woman
- Skin: E04, E11, E21, E00
- Cheeks: R20
- Lips: R29, R24
- Hair: E39, YR24, YR23, YR20
- White: N3, N1, 0
- Blue: B97, B95, B93, B91
- Black: C9, C7, C5, C3
- Red: R39, R46, R24, R22, R20
Palm Tree
- Brown: E25, E23, E21
- Green: YG17, YG06, YG03, YG01
Rodeo Drive Shops
- I cut out the Rodeo Drive Shops and colored it, but you can also cut them out of colored cardstock.
- Assemble the card as shown. I used double-sided adhesive foam tape to adhere the colored stamp.
Project 2: Cute Kids Dog Lovers & Dog House Gift Card Holder - Make A Wish
Scrappy Boy Stamps products used:
- Cute Kids Dog Lovers Stamps & Outline Dies
- Cute Kids Dog Lovers Paper Pack
- Dog House A2 Gift Card Holder
- Birthday Phrases Word Dies
Supplies used:
Girl
- Skin: E95, E11, E21, E00
- Cheeks: E93
- Hair: 100, C7, C5, C3
- Yellow: Y19, Y15, Y11
- Pink: RV17, RV55, RV52
- Gray: N5, N3, N1
Dog
- Die cut the body of the dog house using patterned papers from the Cute Kids Dog Lovers Paper Pack.
- Die cut the roof lines and bottom edge from white cardstock.
- Assemble the dog house as shown then adhere the colored stamps (front) and sentiment (back).
- Add an eyelet onto the gift card holder piece and tie on the baker's twine.
Project 3: Spirit of 1776 & American Flag 2 Ways Die - Happy Independence Day
Scrappy Boy Stamps products used:
- Spirit of 1776 Stamps and Outline Dies
- Spirit of 1776 Paper Pack
- Alphabet Dies
- Stitched Rectangle Dies
Supplies used:
- A6 white card base
- Black carstock panel/mat
- Blue and white cardstock
- Distress Ink in Brushed Corduroy
Copic markers used:
Boy 1
- Skin: E04, E11, E21, E00
- Cheeks: R20
- Hair: E29, E25, E23, E21
- Gold/Yellow: Y17, Y15, Y13
- Blue: B29, B26, B24, B21
- Red: R29, R37, R32
- Black: C7, C5, C3
- Tan (drum top): E43, E42
- Silver: N3, N1
Boy 2
- Skin: E23, E13, E11, E21
- Cheeks: R20
- Hair: C9, C7, C5, C3
- Brown (vest): E19, E15, E11
- White: N3, N1, 0
- Black: C7, C5, C3
- Tan (drum top): E43, E42
- Silver: N3, N1
Boy 3
- Skin: E04, E11, E21, E00
- Cheeks: R20
- Hair: YR27, YR23, YR20
- Gold/Yellow: Y17, Y15, Y13
- Blue: B29, B26, B24, B21
- Red: R29, R37, R32
- Tan: E43, E42
- Brown: E19, E15, E11
- Silver: N5, N3, N1
Flag
- Die cut the 1776 using the alphabet dies
- Die cut the flag using the American Flag 2 Ways Die and assemble as shown
- Using Distress Ink in Brushed Corduroy, add ink onto the flag to make it look distressed
- Adhere the colored stamp and sentiments onto the card front.
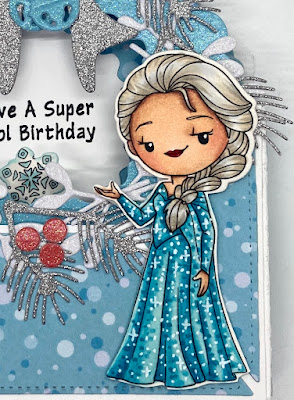
Project 4: Happy Birthday Pop-Up Envelope Christmas Add On Die - Have A Super Cool Birthday
Scrappy Boy Stamps products used:
- Christmas Add On Die
- Happy Birthday Pop-Up Envelope Die
- Queen of Snow stamp and outline die
- Queen of Snow Paper Pack
Supplies used:
- White cardstock
- White glitter cardstock
- Silver glitter cardstock
- Blue glitter cardstock
- Red glitter cardstock
- Double sided adhesive foam tape
Copic markers used:
- Skin: E04, E11, E21, E00
- Cheeks: R20
- Lips: R29
- Hair: W3, W1, E1, C1
- Blue: BG05, BG02, BG01, BG000
Notes/Tips:
- Die cut and assemble the Happy Birthday Pop-Up Envelope Card Die leaving out the inside piece so that there is an opening to add the Christmas wreath.
- Die cut the Christmas add on pieces to create the wreath. Be creative and decorate the wreath however you desire!
- Adhere the sentiment so that it is centered inside the wreath.
- Adhere the colored stamp using double sided adhesive foam tape.


No comments:
Post a Comment