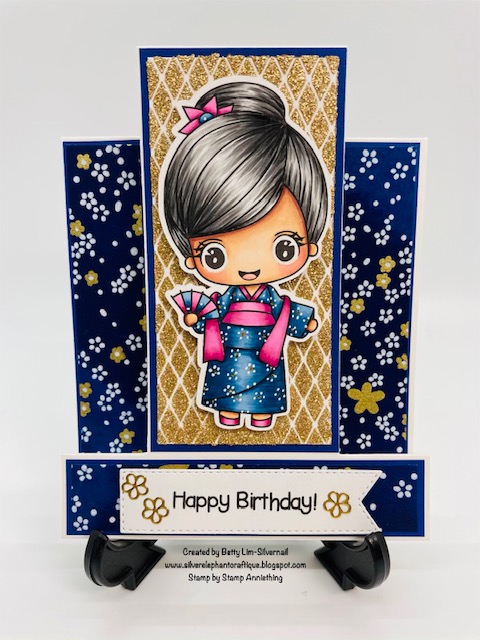
This step card is fun to make and not hard to do. Just be careful when cutting and scoring using the template I have provided. I made the gold background using a stencil and texture paste mixed with gold glitter. The pretty patterned paper is washi paper. Give this card a try! Fun one and it did take a little time to make, but it was worth the results.
Supplies:
- Stamp Anniething Stamp - Eloise-Arigato
- Stamp Anniething Stencil - Diamond Ball Crosshatch
- Stamp Anniething Banner Die
- Ranger Texture Paste - Transparent Gloss
- Fine gold glitter
- Palette knife to spread texture paste
- White cardstock cut to 4-1/4"W x 11" H. This is your A2 size base card.
- White cardstock cut to 2"W x 4-1/4" H for the gold stenciled background
- White cardstock cut to 3-1/2"W x 1-1/2"H for the sentiment
- Blue cardstock cut to 2-1/8"W x 4-1/2"H for the mat behind Eloise
- Blue cardstock cut to 1"W x 4 3/8" H for the mat on the sides
- Blue cardstock cut to 4-1/8"W x 7/8"H for the mat on the bottom
- Washi paper (you can substitute with patterned paper) cut to 7/8"W x 4-1/4"H for the sides
- Washi paper cut to 3/4"W x 4"H for the bottom
- Bone folder
- Paper trimmer
- Gold flower stickers from Starform (you can substitute with stamps)
- Coloring medium of choice - I used Copic markers
- White gel pen
- Gold Stickles/glitter glue
- Your favorite adhesive (for the washi paper, use double sided tape or tape runner, not liquid glue)
- Sentiment stamp - Eloise came with the sentiment Arigato (Thank You), but I used a Happy Birthday sentiment.
Copic markers used:
- Skin: E04, E11, E21, E00, E000
- Cheeks & Tongue: R32, R30
- Hair: T7, T5, T3, T1
- Blue: B99, B97, B95, B91
- Pink: RV66, RV34, RV02, RV52
Instructions:
- Color the stamp and fussy cut. Us the white gel pen and gold Stickles to add flowers onto her kimono.
- Create a sentiment of choice using any stamp. Cut it out using the Stamp Anniething a banner die. The set comes in many shapes. Use one you like.
- For the base card, use a paper trimmer (or craft knife) and cut slits as shown below:
- Score as shown below:
- To create the gold textured background, mix approximately 1 teaspoon of glitter into 1 tablespoon of texture paste. I work on a teflon craft sheet, but you can use wax paper or any non-porous surface for this. Place the stencil over the 2"W x 4-1/4" H white cardstock and tape it down on the work surface. Make sure the stencil doesn't move. Using a palette knife, gently apply the texture paste evenly. Carefully lift off the stencil. If there is any texture paste left over, get another piece of cardstock and stencil again and save this for a future card. Let this dry completely. I used a heat gun to speed up the process.
- Adhere all the mats and washi or patterned paper as shown below. If you are using washi paper, use double sided tape and not liquid glue. Liquid glue will make the washi paper wrinkle and buckle.
- Add the gold flower stickers to the sentiment then adhere the sentiment to the card.
Thank you for stopping by today. This stamp is so cute, I have used it for many other cards. I hope you give this card a try! If you have any questions or comments, please leave them below.


Adorable! Lovely color work and shade thank you for the clear steps on recreating this lovely step card.
ReplyDeleteThank you Silvia!
Delete