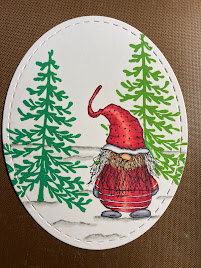
Some countries in the Southern Hemisphere, such as Australia, celebrate Christmas in July since it's summer there in December. To have more of a winter feel, these countries will have an unofficial holiday in July. How fun is that?! So for those celebrating Christmas in July, I've made this holiday card using a stamp from Blank Page Muse called Sir Holiday Gnome Tree - No Place Like Gnome Words designed by Pam Bray. This is a five piece stamp set that you can combine or use alone to make holiday and winter cards.
Supplies:
- Blank Page Muse Sir Holiday Gnome Tree - No Place Like Gnome Words stamp
- A6 white card base
- Black card mat cut to cut to 4-3/8"W x 6-1/8""H
- Green patterned paper cut to 4-1/4"W x 6"H
- White cardstock die cut in oval shape 3-3/4"W x 4-7/8"H
- White cardstock to stamp stars and sentiment (sentiment of choice on front of card is optional)
- Black cardstock to mat the sentiment on front of card (optional)
- Coloring medium of choice. I used Copic markers.
- Black fine tip marker
- Black stamp pad
- Two different shade of green stamp pads. I used Distress Oxides in Mowed Lawn and Lucky Clover.
- Masking tape/paper
- Red Glitter gel pen
- Clear Glitter pen
- Optional embellishments: Enamel dots
- Using a stamp positioner or stamp block, stamp one tree and the gnome.
- Color the gnome with your favorite coloring medium. I used Copic markers.
Copic markers used
Skin: E13, E11, E21, E00
Red: R39, R37, R35, R32
Gray: C5, C3, C1, C00
White: C5, C1, C00, 0
Snow: T3, T1, T0
Sky: BV00, B00, B000
Stars: YR24, Y17, Y15, White gel pen
Holly: G17, G14, R29, R22
- After coloring the gnome, I used a Copic Multi-liner to add in more hair for the beard
- Using masking tape or paper, stamp another gnome and mask it
- Stamp the second tree with a different shade of green
- Peel off the masking tape
- Add in the snow
- Add the sky
- Stamp and color two stars, then fussy cut them out
- Adhere the stars to the top of the trees
- Using a red glitter gel pen, add ornaments to the trees
- Using the A6 card base, stamp the sentiment and holly inside the card
- Color the holly
- Optional: Add a sentiment to the front of the card
- Optional: Add enamel dots to the front of the card
Thank you for visiting! I hope this card reminds you it's time to start your Christmas cards. This one is easy and fun to make so I hope you give it a try. Have a great and creative week!
Be sure to follow Blank Page Muse at:
The Blank Page Muse Shop https://blankpagemuse.com/
FB Fan Page https://www.facebook.com/groups/bla...
Instagram - Shop https://www.instagram.com/blankpage...
Instagram - Blog https://www.instagram.com/blankpage...


Love your Christmas Card Betty...the gnomie love just makes me smile! TFS
ReplyDeleteSo cute. Makes me look forward to Christmas.
ReplyDelete