You can save 15% on this stamp, the stencils, and all purchases at Blank Page Muse and at I Brake for Stamps by using my special code BPMBetty.
Supplies:
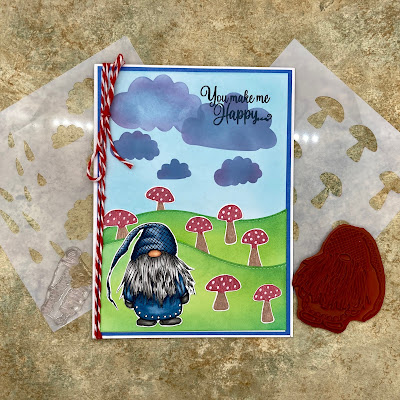
- BPM/IBFS: PJ Love Gnome designed by Pam Bray
- BPM/IBFS: Cute Mushrooms Stencil designed by Donna Gray
- BPM/IBFS: Clouds and Drops 5x5 inch Mixed Media Stencil
- A6 Card base, white cardstock
- White cardstock to stamp image, 3"W x 3"H
- Blue cardstock mat, 4-1/2" x 6-1/8"H
- White cardstock, card front, 4-1/4"W x 6"H
- White cardstock to cut hills, 4-1/4"W x 5"H
- White cardstock to make mushrooms, 6"W x 3"H
- Hill Die (I used one from Gina Marie Designs)
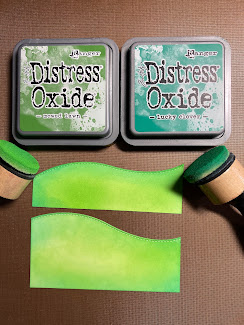
- Distress Oxide in Mowed Lawn, Lucky Clover, Tumbled Glass, Stormy Sky, Dusty Concord and ink blending tool
- Gel Pens in Red, Brown (I used Arteza Metallic Pens)
- White Gel Pen (I used #10 Gelly Roll pen)
- Coloring medium of choice (I used Copic markers)
- Black ink pad
- Stamping platform or block
- Your favorite adhesive
- Optional: Red and white twine
Instructions:
- Cut out the cardstock as indicated in the supplies list
- Stamp, color, and fussy cut the gnome image. I colored my stamp with Copic markers
- Skin: E13, E11, E21
- Beard: T5, T3, T1
- Blue: B99, B97, B95, B91
- Using the hill die, cut out two hills the ink blend with Distress Oxides in Mowed Lawn and Lucky Clover. Put the Mowed Lawn in the center and the Lucky Clover towards the outer edges. Set aside.
- Using the white cardstock card front, use the Distress Oxides in Tumbled Glass to ink the sky. Ink far enough down so the colors are just below the hill. I measured with the hills and marked it with a pencil.
- Tape the clouds stencil over the sky area and use sticky notes paper to cover areas of the stencil you are not using. Using blender brushes, ink the cloud in Distress Oxide in Stormy Sky, then add a little Dusty Concord. Add various clouds to the sky.
- To create the mushrooms, use the mushroom stencil and the gel pens to color 7 various mushrooms. Add white dots to the mushrooms with a white gel pen.
- Fussy cut each mushroom
- Assemble all the pieces onto the card and adhere with your favorite adhesive.
- Using a stamp platform or acrylic block, stamp the sentiment.
- Optional: Tie some twine to the card
Looking for more Inspiration? Click the links below!
I Brake for Stamps Shop https://ibrakeforstamps.com/


No comments:
Post a Comment