Showing posts with label Asian. Show all posts

Monday, February 16, 2026

Stamp Anniething: Happy Lunar New Year with a new Betty stamp!

Happy Lunar New Year! The new Betty Happy Lunar New Year digital stamp from Stamp Anniething is here! The owners, Annie and Kevin, at Stamp Anniething surprised me with an updated Lunar New Year stamp, featuring me! I just love it so much! This digital stamp is free from February 15 through February 22, 2026 in celebration of Lunar New Year. The original Betty Good Luck digital stamp is also available and free until February 22 as well, so get them both! These stamps can also be used for any occasion by adding your own sentiment.

Here's a simple and quick card you can make for Lunar New Year. The new lunar year starts on February 17 and is typically celebrated for 15 days. My family is having our annual family celebration on February 28.


Stamp Anniething products used:
  • Betty Happy Lunar New Year Digital Stamp
Supplies used:
  • A2 white card base
  • Washi paper scraps
  • Gold mirror cardstock
  • Starfoam Gold Outline Corner Stickers
  • Gold Gel Pen

Copic markers used:
  • Skin: E04, E11, E21, E00, E000
  • Cheeks and Tongue: R20
  • Hair: 100, C7, C5, C3
  • Red: R39, R46, R24, R22, R20
  • Gray (shadow): N3, N1
Notes/Tips:
  • Cut the washi paper as follows:
    • Cut 2: Square 1-1/4" x 1-1/4"
    • Cut 3: Rectangle 2-1/2" x 1-1/4"
    • Cut 2: Rectangle 2-5/8" x 1-1/4"

  • Arrange the washi paper to leave 1/8" borders as shown. You can place the shapes anywhere on the cardstock. I put my two squares on opposite corners then placed the other pieces to fit.
Thank you for stopping by! I hope you LOVE this new Betty Happy Lunar New Year digital stamp as much as I do! Wishing everyone a Happy Lunar New Year! 


Saturday, March 9, 2024

Stamp Anniething: Liang - Year of the Dragon

My family celebrates Chinese New Year (Lunar New Year) every year. This year, the new year began on February 10, 2024. We celebrated Chinese New Year's Eve, the "closing" of the old year, on the 9th and have postponed celebrating the new year until all of my family are able to get together. The day we will "open" the new year is planned for March 23. A lot later than we normally do, but it's the only weekend most are available. According to my mom, who knows all the Chinese traditions, says it's not a problem to celebrate late. This gave me some extra time to make a few Chinese New Year cards, like this one using the adorable digital stamp called Liang - Year of the Dragon from Stamp Anniething. 


I imported the digital stamp in Microsoft Publisher and sized it for an A2 size card at 3"W. I let it automatically adjust the height. It is about 3" high. I created the sentiment and centered it to fit the card. 


I added a some detail to the face with light pencil markings. I used Copic markers to color the digital stamp in the following colors:

Liam:
  • Skin: E04, E11, E21, E00, E000
  • Hair: 100, C7, C5, C3
  • Cheeks: E93
  • Tongue: R22, R20
  • Shirt and Pants (Red): R39, R24, R22, R21
  • Belt (Yellow): YR23, Y15 ,Y13, Y11
Dragon:
  • Yellow: YR23, Y15, Y13, Y11
  • Orange: YR18, YR16, YR15
  • Green: G28, YG17, YG03
  • Red: R39, R24, R22, R21
  • Black (Pole and Ground: C5, C3, C1)

I used a Prismacolor colored pencil (PC925/Crimson Lake) to create the scales on the dragon.

I trimmed the card front, matted it with black cardstock, and then with gold cardstock and adhered it to a top-folding A2 white card base. 

I love clean and simple cards, since they keep the focus on the stamp. I hope you give this card a try. It's not too late to send a Chinese New Year card!


Thank you for visiting. Have a creative day!


Monday, June 21, 2021

Stamp Anniething: Masking and Swapping Heads!

Happy Summer Everyone! Today is the first day of summer here in the USA and in my part of the country, we have been going through a heat wave all week. I think the highest it got was 111 degrees. Yesterday was 100, and today we get back down to about 90. So it's another great day to stay indoors and make some cards! I made this A6 card with two different stamps where I swapped heads. I used the head of Mei Yin - Our Friendship is a Gift and the body of Eloise - Arigato. 


Supply list:
Happy Birthday sentiment from Stacey - Sign Board

There are several ways you can do the head swapping. The way I did it was I stamped each image, scanned it into my computer, and used my Silhouette Studio software to swap the heads. I call it digital masking! The reason I did it this way was because I needed to make the body of Eloise a little bit bigger to fit the head of Mei Yin so it was a bit better in proportion. However, it would have also been fine without increasing the size. I think it was just my OCD!

We do have a head-swapping guru on our Stamp Anniething Design Team, Timothy Thomas. He can show you another way to swap heads without using a computer and actually doing the art of masking. Join the Stamp Anniething Facebook Group and watch his video. Here is the link to the video: Timothy's Video

After I printed the head-swapped stamp, I colored it using Copic markers. I used a #5 white Gelly Roll pen and drew flowers on her kimono to match the flowers on the washi paper that's on the shoji screens. I fussy cut her out, leaving a thin white border.


Copic markers used:
Skin: E04, E11, E21, E00, E000
Cheeks: R20
Tongue: R22, R20
Hair: T9, B37, T5, B32
Purple: BV29, V28, V25, V22
Green: YG09, YG06, YG03

For the background, I used the new Asian Living Stencil Builders. I used all the stencils in the set except for the pagoda, which I will save for a future card. I used Distress Inks and Distress Oxide inks to stencil. I first started with the fence, then I stenciled the two shoji screens. Next, I cut out washi paper to fit, stenciled the lines on them, trimmed, and placed it over the shoji screens on the card. 

I then masked the screens and stenciled the bamboo leaves around them. Next, I masked off the screens and fence and inked in the ground. I used a blender brush and inked the sky, concentrating on the edges of the card, leaving a small halo effect around the image to make it pop. To finish the card, I stamped the sentiment and cut it with one of the banner dies and adhered it to the card. 


Thank you for stopping by and hope you give this head swapping technique a try. You can do this with many stamps. Have a creative week! 


Saturday, March 6, 2021

Stamp Anniething: Happy St. Patrick's Day Card

I just love my Stamp Anniething chibi doll! This digital stamp is called Betty - Good Luck and she debuted last month during my Craft with Betty video for Chinese New Year. Now she's back celebrating St. Patrick's Day. A versatile stamp that can be used for any holiday and occasion! 


I printed out this stamp on Hammermill 80lb cardstock then colored it with Spectrum Noir Illustrator markers (colors listed below). I created the Happy St. Patricks Day using MS-Word, printed it, then used the banner dies to cut it out. 


Spectrum Noir Illustrators used:
Skin: AP3, FS8, FS7 FS6, FS9
Cheeks: FS4, FS1
Tongue: PP4, PP1
Hair: True Black, IG9, IG6, IG2
Green: DG3, LG4, LG2, LG1
Blue (Glasses): IB1

For this A2 size card, I used the nested stitched oval dies from Gina Marie Designs to cut out the stamp. I used patterned papers from Luck of the Irish paper pack to mat the oval and the card front. I adhered everything as shown and added a few enamel dots from my stash.


St. Patrick's Day is March 17, 2021, so there's plenty of time to make a few cards to send to your family and friends. Thank you for visiting and have a crafty weekend! 


Friday, March 5, 2021

Stamp Anniething New Release (Day 3): Liang - Checkmate

Welcome to Day 3 and the final day of Stamp Anniething's new release. Today's card features the cute stamp called Liang - Checkmate, coordinating outline die, and part of the Game Spinner Add On Builder Die. Isn't Liang a cutie? He is Stamp Anniething's first Asian boy chibi stamp! 


I first stamped the image then cut him out using the coordinating die. I colored this stamp using a Copic markers (colors listed below).


Copic Markers used:

Hair: T9, T7, T5, T1
Skin: RV34, E13, E02, E01, E00
Cheeks: R21, R20
Tongue: RV14, RV11
Red: R59, R37, R24, R32
Blue: BG06, BG05, BG02, BG01
Yellow: Y17, Y13, Y11
Brown: E49, E47, E44, E42

To make this card, I first used a 1-1/4" square punch to cut 6 squares out of black cardstock to make the checker board background. Then I used the circle and circle frame from Shaker Basics Set #1 to cut the spinner base. I used the Chess stencil and distress ink to create the spinner background. I used the arrow and center circle from the Game Spinner Die and cut them out using black cardstock. I used a brad to fasten the two pieced together and added it onto the game spinner with a glue dot.


I cut out the word fun (and the outline die) twice and added it to the game spinner. I stamped the sentiment and used a banner die to cut it out. I cut two fish tales from the same banner die. I added Liang to the card using foam squares. Lastly, I added a few enamel dots from my stash.

I hope you enjoyed this month new releases of fun and cute stamps, dies, and a stencil. I sure had fun creating these cards!  

Thank you for visiting and have a creative week! 

Tuesday, March 2, 2021

Blank Page Muse Art Rubber Stamps - Lotus Flower Beauty (Masking Technique)

The lotus flower is one of the most significant flowers in the Chinese culture. The lotus flower grows in muddy waters, but it will rise and bloom into a beautiful flower. This symbolizes perfection and purity of both the heart and mind. In addition, the lotus represents long life and honor. For this reason, it's a perfect flower to put on a birthday card. Today I am sharing a card I made using a stamp from Blank Page Muse Art Rubber Stamps called "Lotus Flower on Stem with Small Dragonfly." This is a red rubber stamp. This is a single flower stamp, so I stamped it twice. I used the Happy Birthday Phrase Stamp for the sentiment.


Supplies:

  • Blank Page Muse Stamp: Lotus Flower on Stem with Small Dragonfly and Happy Birthday Phrase
  • White cardstock 6" x 6" for card base
  • Black cardstock 5-7/8" x 5-7/8" to mat card base
  • Patterned paper 5-3/4" x 5-3/4" to mat card base. Use any paper to match the colors of your flower.
  • White cardstock 4" x 4" to stamp image
  • Gold cardstock 4-1/8" x 4-1/8" to mat stamped image
  • Black cardstock 4-1/4" x 4-1/4" to mat stamped image
  • White cardstock 3"W x 1/2"H to stamp sentiment
  • Gold cardstock 3-1/8"W x 5/8" H to mat sentiment
  • White cardstock 3-1/4"W x 3/4"H to mat sentiment
  • Masking tape: 4" x 4"
  • Scrap bond paper or light weight cardstock: 4" x 4"
  • Embellishments of choice - I used Pearl rhinestones
  • Your favorite adhesive
  • Stamping block or stamp positioner
  • Your favorite coloring medium. I used Copic alcohol markers.
    • Flower: Pink - R85, R83, R81
    • Flower: Yellow - Y17, Y15, Y11
    • Flower: Brown - E1, E15, E13
    • Dragonfly: YG13, V25, V22, V20
    • Background: B000
Instructions:
  • Stamp the lotus flower stamp onto the 4" x 4" white cardstock
  • Put the masking tape over the scrap bond or light weight cardstock and stamp the lotus flower. 
  • Fussy cut the flower, then place the mask over the stamped image


  • Ink the stamp then wipe the ink from the dragonfly using a baby wipe or wet paper towel. Only one dragonfly is stamped on the card. 
  • Stamp over the exiting lotus flower that has been masked and then remove the mask. The flower that was just stamped will appear behind the first flower that was stamped.

  • Stamp the Happy Birthday sentiment 
  • Color your stamped images with your favorite coloring medium
  • Adhere all the layers as shown with your favorite adhesive
  • Adhere the pearl rhinestones and the card is finished

Thank you for stopping by today and I hope you give this card a try. It is a very versatile stamp so you can use it for many occasions. Have a creative day! 
~Betty~

    Thursday, February 11, 2021

    Stamp Anniething: Betty - Good Luck Stamp

    I am so EXCITED to share a new stamp called "Betty - Good Luck" made by Stamp Anniething. I was beside myself when the folks at Stamp Anniething offered the design team a chibi doll of their own. The owner and designer, Ann Preziosi Kelly, said that all we had to do was pick out the outfit and a sentiment. I decided she needed to be wearing a traditional Chinese dress, called a cheongsam, and carrying a fan. The two sentiments that come with this digital stamp set are "good luck" and "gung hay fat choy," which is Happy Chinese New. I decided to use the gung hay fat choy sentiment since tomorrow is Chinese New Year!

    If you would like to see a video on how I colored and made this card, please join the StamSilver Elephant Craftiquep Anniething Stampers Facebook Group (fan club). The pre-recorded video will air today, at 4:00 PM PST and I will be online to answer any questions!

    Update:  Here is the link to the video. It is now on YouTube. 


    I colored the stamp using Copic markers (colors listed below) then fussy cut her out.

    I cut the A2 card base at 4-1/4"W x 11"H and scored it at 5-1/2" and folded it for a top folding card. I matted the card with red cardstock and a layer of black cardstock that I ran through an embossing folder. The embossing folder is by Cuttlebug.

    I used the Stamp Anniething circle frame die from Shaker Basics Set #1 to cut out both the washi paper circle and gold cardstock frame. I cut two gold strips using the scraps I had left over from cutting the circle. 

    I cut the sentiment with one of the dies from the Stamp Anniething Banner Dies set and ink blended the edges with distress ink in barn door (you can use any brand and any shade of red).

    After adhering everything, I added red and white Nuvo Drops onto the card. 


    Copic Markers Used:
    Skin: RV34, E13, E02, E01, E00
    Cheeks: R21
    Hair: T9, T7, T5, T3
    Red: R59, R37, R24, R32
    Glasses: B00, white gel pen


    Thank you Annie and Kevin (Marketing Director) for making me a chibi doll. It's truly a dream come true! It's been such a fun experience and I just LOVE this stamp!!! 

    Thank you for stopping by today and GUNG HAY FAT CHOY!  I hope you have a wonderful and creative week!

    Friday, January 15, 2021

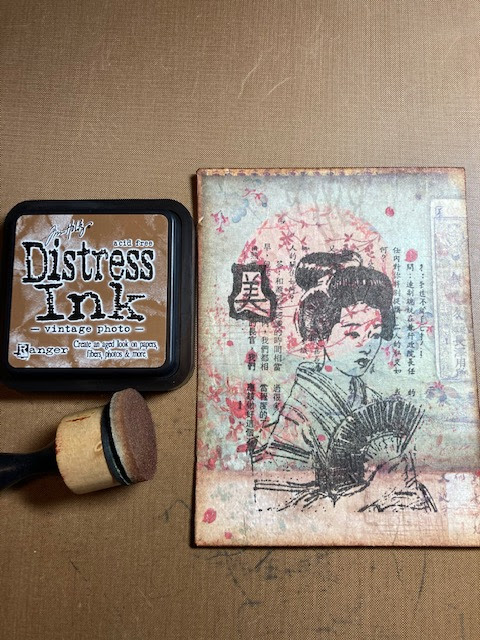
    Blank Page Muse - Geisha Collage Card with Rice Paper

    Today I am using rice paper as the background for my card. The rice paper being used today for arts and crafts is not made out of rice. It is made from bark fibers of a mulberry tree. This rice paper is very thin, but strong since it is fibrous and makes a beautiful background for my card. Add a stamp from Blank Page Muse, and you have this gorgeous card! This red rubber stamp is called Geisha Collage and when stamped with black ink, it just makes it pop! This card will fit in an A7 size envelope.

    This month's challenge theme is Vintage/Classic. This card is easy to make and can be done in less than an hour, but it looks like you spent hours making it. Try making this and entering it into the challenge to win a prize!


    Supplies:
    • Blank Page Muse Stamp: Geisha Collage
    • Rice paper: Stamperia, Branch & Writings
    • Kraft cardstock (base card): 6"H x 4-5/8"W
    • White cardstock (card front): 5-3/4"H x 4-1/4"W
    • White cardstock (line inside card): 5-3/4"H x 4-1/4"W
    • Black cardstock (card mat): 4-3/8"H x 5-7/8"W
    • Black ink pad (dye or hybrid)
    • Glue stick - ensure it drys clear
    • Scissors
    • Distress ink - Vintage Photo
    • Distress ink applicator
    • Your favorite adhesive
    • Embellishments (optional)
      • D-ring picture hanger - I used Stampin' Up's Hodgepodge Hardware that has been retired. You can buy picture hangers at the hardware store that come in brass. Color it with a brown alcohol marker to make it look vintage.
      • Brad
      • Chinese coin - Purchased from my local craft store. You can find on Etsy.
      • Brown twine - 6 inches
      • 3 Black plastic rhinestones or enamel dots
    Instructions:
    • First determine what part of the rice paper you want as the background. You can place your white card underneath the rice paper to assist you. Fold the rice paper over the cardstock to mark it or use a pencil. Do not cut yet!

    • Put an even layer of glue with the glue stick onto the white cardstock (card front). Cover the entire cardstock.
    • Adhere the cardstock onto the backside of the rice paper where you marked it.

    • Trim the rice paper leaving 1/2" all the way around.
    • Miter the corners by gluing them down (use glue stick) as shown below.

    • Glue (use glue stick) the edges down
    • Press down gently on the rice paper with your fingers to make sure the paper is adhered.
    • Stamp your image onto the rice paper. I used a stamp positioner to ensure the image is very dark.

    • Distress ink the edges of the rice paper.

    • Using a paper piercer, poke a hole into the card to add the picture hanger. Secure the picture hanger with the brad.

    • Using the twine, tie the coin to the picture hanger

    • Using your favorite adhesive, adhere the card front to the black cardstock then adhere onto the base card. Adhere the white cardstock to the inside of the card, add the rhinestones, and you are finished! 


    I love using rice paper and will be making some more in the future. It's quick and easy and makes beautiful cards. I hope you will give it a try!  Thank you for stopping by and have a great day! ~Betty~