You can save 15% on this stamp and all purchases at Blank Page Muse and at I Brake for Stamps by using my special code BPMBetty.
Supplies:
- Blank Page Muse: Witch Sisters and Cauldron Silhouette Halloween Stamp
- A6 White cardstock card base
- Black cardstock mat - 4-3/8"W x 6-1/8"H
- White cardstock 6"W x 4"H for inking background
- White cardstock to stamp sentiment (size depends on size of your stamp)
- Distress Oxide Inks in Wild Honey, Mowed Lawn, Mermaid Lagoon
- Gel Printing Plate and Brayer
- Circle Stencil of choice (I used one from Stamp Anniething)
- White cardstock
- Tree without leaves die of choice (I used one from Gina Marie Designs)
- Halloween sentiment stamp of choice (I used a very old one from Hero Arts)
- Distress Ink in Black Soot and blender brush
- Black dye ink
- Stamp positioner
- Your favorite adhesive
Instructions:
For this project, we will be using a gel printing plate. I have an 8x10 one made by Gelli Arts. You can use any brand, but make sure that the plate is big enough for an A6 card, which is 6-1/4"W x 4-5/8"H.
- The background:
- Using the Distress Oxide ink pads, apply directly onto the gel printing plate. Keep the colors separate so you don't cross contaminate the ink pads.
- Using a brayer, spread the ink and blend so the ink covers the plate at least the size of the A6 cardstock. Clean off the brayer on a piece of scrap paper.
- Place the stencil over the ink and use the cleaned brayer and lightly roll over the stamp to ensure it is secured on the gel printing plate.
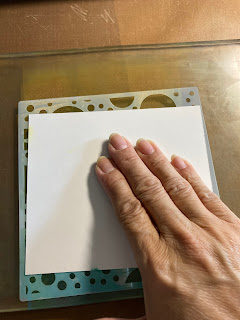
- Place the white cardstock over the stencil and use your hand to gently rub so the ink transfers to the paper.
- Lift off the stencil and place your paper back on the gel printing plate at a different angle to pick up more of the ink.
- Repeat the above steps until you get the desired look.
- The stamp:
- For silhouette-type stamps, it is best to use a stamp positioner. Insert the inked paper into the stamp positioner and place the stamp towards the bottom half of the card. Make sure you use a black ink pad for this stamp.
- The trees:
- Using a tree die without leaves, cut two trees. In order to make my trees fit, I cut them apart and some of the branches off and re-positioned them. Adhere the trees using liquid glue. Trim off the excess branches with scissors.
- Finishing the card:
- Adhere the card front onto the black cardstock mat, then adhere onto the card base.
- Using a sentiment of choice, stamp on white cardstock. Trim and use Distress Ink in Black Soot to ink the edges. Adhere the sentiment onto the card front and the card is finished.
This is a quick and easy card to mass produce. It is so fun to create backgrounds using the gel printing plate. Each one you make will be unique! Then to use fabulous silhouette stamps on the card front is easy and your card will come out amazing!
Thank you for stopping by and I hope you give this card a try! Have a creative week.
Looking for more Inspiration? Click the links below!
I Brake for Stamps Shop https://ibrakeforstamps.com/


So spooky cute. Love the silhouettes and the background layering of colors.
ReplyDeleteThank you very much Silvia!
Delete