Showing posts with label Hybrid Ink. Show all posts

Monday, June 2, 2025

Stamp Anniething: You Are One in a Chameleon

I made another card using the amazing May 2025 release from Stamp Anniething. The May 2025 awesome release, inspired by Rapunzel, includes the stamp set called Best Day Ever, an amazing Tower Builder Die and a Tangled Floral Stencil. I used the beautiful stencil to create this colorful background for Rapunzel and her chameleon friend. I just love coloring Rapunzel's long hair! 

Stamp Anniething products used:
  • Best Day Ever stamps and outline dies
  • Tangled Floral Stencil
  • Hybrid Ink Cubes: Freesia, bamboo, Lavender 
  • Card Mat Dies (retired)
Supplies used:
  • A2 white card base
  • White cardstock to cut scalloped card mat and for stenciled panel
  • Lavender cardstock for mat/panel

Copic markers used:
  • Skin: E04, E11, E21, E00, E000
  • Cheeks: R20
  • Tongue: R22, R20
  • Hair: E39, YR24, YR23, YR20
  • Purple: V09, V06, V04, V01
  • Pink: R85
Tips:
  • For the stenciling, start with the yellow ink (Freesia) first. 

Thank you for stopping by. Have a creative day! 

Thursday, April 24, 2025

Stamp Anniething: Have a Tigger-ific Day

I just LOVE the latest release from Stamp Anniething! How cute are these two images from the Oh Pooh stamp set? It so fun putting this card together using the Hundred Acre Wood Builder Die. I used an action wobble behind the Tiger since he's a very bouncy tiger!


Stamp Anniething products used:
  • Oh Pooh stamps and outline dies
  • Hundred Acre Wood Builder dies
  • Hybrid Ink Cubes in Bamboo, Willow Bough, Clear Skies, Caribbean Sea
  • Autumn Life Paper Pack (retired)
Supplies used:
  • A2 white cardstock
  • White cardstock for background and dies
  • Distress Inks in Chipped Sapphire, Vintage Photo
Copic markers used:

Tiger
  • Tan: E44, E43, E42, E41
  • Orange: YR18, YR07, YR04, YR02
  • Black: N9, N5, N3
  • Pink: R83, RV91, RV00
Rabbit
  • Pink: R85, R83, R81
  • Cream: YR23, YR21, Y21
  • White: N3, N1, 0
  • Black: N9, N5, N3
  • Orange: YR16, YR14
  • Green: YG17
Beehive
  • Yellow: YR21, YR15, YR12, YR01
Tips:
  • To color the tree, swipe the Vintage Photo Distress Ink pad over the card stock. This will give the impression of wood texture.
  • I used the grass die from the Hundred Acre Wood Die to cut a stencil using scrap cardstock. Then inked the grass using the two green Hybrid Inks.
  • Ink the sky as shown, first with the two blue Hybrid Inks, then the Distress Ink. 
  • Adhere the tree, and beehive then stamp the bees in black ink.
  • Adhere an action wobble behind the tiger then adhere to the card.
  • Using a black marker, add black dash lines.
  • Adhere the rabbit and sentiment as shown.
Thank you for stopping by. I hope you give this card a try! Have a wonderful and creative day!


Friday, January 10, 2025

Stamp Anniething: Yabba Dabba Doo!

It's Stamp Anniething's January 2025 release day! This release, inspired by my favorite animated prehistoric family, consists of the following:

  • Yabba Dabba Doo! Stamp Set
  • Yabba Dabba Doo! Outline Dies
  • Bedrock Homestead Builder Die
  • Grand Poobah and Dino Builder Die
  • Fred Pattern Stencil
This new release is available for purchase today, January 10, 2025.

Additional Stamp Anniething products used:
  • Hybrid Ink Cube in Obsidian (for stenciling)
Supplies used:
  • A2 white card base
  • Black cardstock panel/mat
  • Orange cardstock
  • Grand Poobah Hats: Distress Inks in Salty Ocean; Mustard Seed

Copic markers used:

Fred
  • Skin: E04, E11, E21, E00, E000
  • Tongue: R22, R20
  • Hair: 100, C7, C5, C3
  • Orange: YR68, YR65, YR61
  • Blue: BG09, BG07, BG02
  • Black: C7, C5, C3
Barney
  • Skin: E04, E11, E21, E00, E000
  • Tongue: R22, R20
  • Hair: YR27, YR24, YR21
  • Brown: E37, E35, E33, E31
Bowling pins and ball
  • Pins: N3, N1, 0; R37, R24, R32
  • Ball: C7, C5, C3
I hope you love this release as much as I do! It's my all time favorite cartoon and now it's a Stamp Anniething stamp set!
Thank you for stopping by. Have a creative day!

Monday, November 25, 2024

Stamp Anniething: Treat Yours"elf"!

There's still time to get some cute holiday cards done in time to be mailed out. Here's a fun one I made using Stamp Anniething's Treat Yours"elf" stamps and Holiday Scene Builder dies. So easy and fun with the awesome Holiday Scene Builder Dies!

Stamp Anniething products used:
  • Treat Yours"elf" stamps and outline dies
  • Holiday Scene Builder
  • Sentiment Strips
  • Hybrid inks (trees): Willow Bough, Bamboo
  • Hybrid inks (presents): Caribbean Sea, Azure, Chili Peppers, Crimson
  • Shaker Basics Set #1 (circle)
  • Glitter cardstock (retired)
Supplies used:
  • A6 white card base
  • White mat/panel
  • Bristol cardstock (for all die cuts)
  • Patterned paper from my Close to my Heart (retired)
  • Patterned paper from CC Designs (retired)
  • Vellum
  • Spectrum Noir Sparkle Pen
  • White gel pen

Copic markers used:
  • Skin: E04, E11, E21, E00, E000
  • Cheeks: R20
  • Tongue: R22, R20
  • Blue: B16, B05, B02, B00
  • Red: R39, R46, R35, R32
  • Pinecone: E29, E25, E23, E21
Notes:
  • Trim white cardstock mat leaving a 1/8" border and adhere to card base.
  • Trim one of the patterned papers leaving a 1/8" border and adhere to white panel.
  • Trim the other patterned paper 1-3/4" wide and 1/8" border at the top and bottom then adhere to card as shown.
  • Die cut 3 sets of trees. Ink with hybrid ink colors listed above. Assemble together. Die cut the ornaments and stars using glitter cardstock and adhere to the tree.
  • Die cut 2 sets of presents. Ink with hybrid ink colors listed above. Assembled together. Adhere the trees and presents onto the card. 
  • Die cut the vellum with the circle die. Adhere to the card using a vellum tape runner or clear double sided tape. Adhere the elf image using double sided tape.
  • Add a few of the tree ornaments onto the vellum using a small drop of glue.
  • Adhere the sentiment.
  • Ad sparkle to the card using the Sparkle Pen. Add it everywhere except for the elf skin. Add white dots with the white gel pen.

Thank you for visiting today. Have a creative day!

Saturday, November 16, 2024

Stamp Anniething: Heard You've Been Good

The Elf on the Shelf became popular in 2005. My youngest child was about eight years old then. I've always had a couple of elves I would put on the mantel as Christmas decorations, but I never thought of hiding them in different places. Probably because they were quite big and hard to hide. These elves are cute, just like this stamp from Stamp Anniething's November 2024 release called Treat Yours"elf". Instead of using traditional colors of red and green, I love using this shade of purple, grape, for this card.

Stamp Anniething products used:
  • Treat Yours"elf" stamps and outline dies
  • Elf Layering Stencil
  • Hybrid Inks (for stencil) - Lavendar Bloom, Graphite, Freesia
  • Hybrid Inks (for sentiments) - Amethyst and Crimson
  • Shaker Basics #1 (rectangle)
  • Sentiment Strips
  • Stripes and Dots Paper Pack (retired)
Supplies used:
  • A6 white card base
  • Purple/grape colored cardstock mat/panel
  • White cardstock for stenciling
  • Vellum
  • Rectangle die 4-1/4" x 3-1/8" (to cut vellum)
  • Spectrum Noir Sparkle Pen
  • White gel pen

Copic markers used:

Elf
  • Skin: E27, E25, E23, E13
  • Cheeks and tongue: R22
  • Hair: N9, N5, N3, V04
  • Purple/grape: Layer 1: V99, V95, V93; Layer 2: V06, V05, V04
  • Brown: E29, E25, E23, E21
Tree, Presents and Banners
  • Green: G07, YG06, YG03
  • Purple: V99, V04
  • Yellow: Y17, Y35, Y32
Notes:
  • Cut the purple/grape cardstock leaving a 1/8" border and adhere to the card base.
  • Cut the patterned paper 1" x 4-1/8" and adhere to the sides of the card as shown.
  • Cut the white card stock 5" x 4-1/8". Use the Elf Layering Stencil and Hybrid inks listed above to create this background panel.
  • Die cut or cut a piece of vellum 4-1/4" x 3-1/8" and adhere to card using vellum tape runner or double sided clear tape.
  • Adhere the colored images and sentiments as shown.
  • Using the Sparkle Pen, add sparkle to the banner, presents, stars, and the elf (except the skin). Add some white dots with the white gel pen.
Such a cute elf and a fun card to make. I hope you give this a try!


Thank you for stopping by. Have a wonderful and creative day!


Thursday, October 3, 2024

Stamp Anniething: Seize Your Moment

This month's new release from Stamp Anniething, called Go Poco Loco, was inspired by one of my favorite animated films, Coco! If you haven't seen this film, it delves into the traditions of the Day of the Dead, a holiday that involves family and friends gathering to pay respects and to remember those who have died. Coco is centered around a child's desire to become a musician despite his family's wishes. A must see film! I created my card using the new Ernesto de la Cruz stamp and the Skulls & Marigold Card Mat die.


Stamp Anniething products used:
  • Go Poco Loco/Ernesto de la Cruz stamp & outline die
  • Skulls & Marigold Card Mat die
  • Sentiment Strips
  • Hybrid Ink Cubes: Crimson, Azure, Tangerine, Shocking Pink
  • Card Mat Die (retired)
Supplies used:
  • White A2 card base
  • Black cardstock mat
  • White cardstock to cut out Skulls & Marigold Die
  • Orange cardstock scrap to mat the sentiment
  • Black cardstock scrap to stamp sentiment
  • White embossing power
  • Double-sided adhesive foam tape

Copic markers used:
  • Face & hands: W3, W1, W00
  • Hair: 100, C7, C5, C3
  • Hat, clothes, shoes: W5, W3, W1
  • Red: R39, R29, R22
  • Green: G07, G03
Notes:
  • Die cut the Skulls & Marigold Card Mat. Place the black cardstock mat behind it and adhere to the card base.
  • Die cut 4 marigolds and color the background colors with Hybrid Inks. Adhere as shown.
  • Adhere the colored image using double-sided adhesive foam tape.

Such a fun die to use. So simple to put a card together when one has the perfect die!

Thank you for stopping by. Have a creative day! 

Friday, September 6, 2024

Stamp Anniething: Release Day!

Welcome to Stamp Anniething's September 2024 Release Day! If you did not see my Reveal Day post from yesterday that explains the changes at Stamp Anniething, please check it out. It's the post below this one.

Today is Release Day which means I have another project to share with you using this month's Bewitched, Bothered, and Bewildered stamp set, the Cityscape Builder Die, and the Retro Stars Stencil Die. The stamp I used from the set is Endora. Remember her from the TV show Bewitched?

This month's release can be used for all your Halloween cards, but can be used for birthdays, friendship, get well, and more! The entire release is now available for order at the Stamp Anniething webstore. Due to a sudden increase of Monthly Club sign ups, the set is temporarily sold out, but a new shipment is on its way!


Stamp Anniething products used:
  • Bewitched, Bothered, and Bewildered stamps and outline dies
  • Cityscape Builder Die
  • Retro Stars Stencil 
  • Hybrid Ink Cube in Amethyst


Supplies used:
  • A2 white cardbase
  • Black cardstock for mat
  • Bristol cardstock for stenciling
  • Black cardstock for Builder Die
  • Yellow cardstock for Builder Die and moon

Copic markers used:
  • Skin: E04, E11, E21, E00, E000
  • Cheeks: R20
  • Lips: R29
  • Eyeshadow: B00
  • Hair: E18, E08, YR18, YR14
  • Purple: V17, V15, V12, V000
  • Green: G17, YG17, YG13, YG03
I hope you love the September release as much as I do! It's one of my favorite sets of all time!

Thank you for visiting today. Have a creative day!


Wednesday, August 7, 2024

Stamp Anniething Sneak Peeks Day 1: Aladdin - Do You Trust Me?

Welcome to day 1 of Stamp Anniething's sneak peeks! This month's theme is inspired by the timeless tale of love and adventure, Aladdin! Today's shaker card features the stamp, Aladdin-Do You Trust Me?, his pet monkey Abu, the magic lamp (the lamp is from sneak peeks Day 3's set), and the Agrabah Stencil. Such a fun shaker card to make!

Stamp Anniething products used:
  • Aladdin-Do You Trust Me? stamp set and outline die
  • Lamp from stamp set Day 3 Sneak Peeks (can't reveal today)
  • Agrabah Stencil
  • Shaker Basics Set #2
  • Delicate Moroccan Stencil from November 2023 Stencil Club
  • Acetate Sheets
  • Itty Bitty Beads
  • Sentiment Strips
  • Obsidian Hybrid Ink Cube (for Agrabah Stencil)

Supplies used:
  • A2 top folding white card base
  • Black cardstock (for Delicate Moroccan Stencil)
  • Transparent Texture Paste (for Delicate Moroccan Stencil)
  • Gold fine glitter (mix into texture paste for Delicate Moroccan Stencil)
  • Bristol cardstock (for ink smooshing)
  • Distress inks in Mustard Seed, Candied Apple, Wild Honey (for shaker background)
  • Gold sequins

Copic markers used:

Aladdin
  • Skin: E15, E13, E11, E21, E00
  • Cheeks: R20
  • Tongue: R22, R20
  • Hair: E59, E57, E55, E53, E51
  • White: N5, N3, N1, 0
  • Purple: V17, V15, V12
  • Red: R89, R29, R22
  • Belt: E09, R22, R02
Abu
  • Brown: E37, E35, E33, E31
  • Tongue: R22
  • Purple: V17, V15, V12
  • Blue: BG15, BG11
Lamp
  • Gold: E23, Y38, YR21
  • Agua: BG05, BG15, BG11

Thank you for stopping by today for Day 1 of sneak peeks. Please come back for Day 2 of sneak peeks for more inspiration! 

Have a wonderful and creative day!


Saturday, July 20, 2024

Stamp Anniething Design Team Day: An Enchanting Card

For this month's Stamp Anniething Design Team Day Project, I created this "enchanting" card using the cute stamp, Snow - Just to be Fair. For the background, I used two different stencils and stenciled on transparent vellum. I love using vellum as it gives it a softer look. I'll be giving this card to a birthday girl.


Stamp Anniething products used:
  • Snow - Just to be Fair stamp and outline die
  • Enchanting Word Die
  • Forest Stencil with Hybrid Inks in Caribbean Sea, Freesia, and Tangerine
  • Wood Grain Stencil from November 2023 Stencil Club with Hybrid Inks in Mocha and Pecan
  • Card Mat Dies
  • Shaker Basics Oval Die
  • Jelly Dots
Supplies used:
  • A2 white card base
  • A2 size Vellum (to stencil wood grain background)
  • A2 size Vellum (to stencil forest background then cut out with oval die)
  • White cardstock to cut out oval to put behind vellum and for background of word die
  • Light blue glitter paper for Enchanting Word die
  • Double sided tape (don't use liquid glue on vellum)

Copic markers used:

Skin: E04, E11, E21, E00, E000
Cheeks: R20
Tongue: R22, R20
Lips: R29
Hair: 100, C7, C5, B24
Yellow: YR24, Y26, Y23, Y02
Red: R39, R27, R29, R24, R22
Blue: B18, B16, B14, B12
White: N3, N1


Thank you for stopping by. I hope you give this card a try. Have a creative day!


Saturday, June 22, 2024

Stamp Anniething: Happy 4th of July Inspiration Card

It's time to get ready for the 4th of July (Independence Day) here in the USA. I don't make a lot of cards to send, but I do make a few to decorate my house. Today's card features the beautiful stamp, Jett - You Make My Heart Sing from Stamp Anniething. She's kicking off the 4th of July celebration by rocking out some songs!


Stamp Anniething products used:
  • Jett - You Make My Heart Sing stamp and outline die
  • When Stars Align stencil from August 2023 Stencil Club
  • Annie's Alphabet
  • Shaker Basic Set #1 (rectangle die)
  • Hybrid Inks in Aspen Gold, Celestial, Crimson
  • Stripes and Dots paper pack (retired)
Supplies used:
  • A2 white card base
  • A2 White cardstock for stenciling
  • Red cardstock 
  • Blue cardstock (small scrap)
  • Number 4 die (I used Sizzix Thinlets Alphanumeric Lowercase dies)
  • Transparent vellum
  • Red and silver gel pens for microphone and buckles


Copic markers used:
  • Skin: E04, E11, E21, E00, E000
  • Hair: RV17, RV14, RV13, RV11, B06, B04, B02, B00
  • Blue: B28, B24, B21
  • Red: R46, R24, R21

This is a fun and easy card to put together.  
  1. Trim two pieces of patterned paper at 4.25" x 1" and adhere to the top and bottom of the card base.
  2. Stencil the stars onto the white cardstock with hybrid inks (in the order listed above). Trim 1/2" from the top and bottom and adhere to the card base.
  3. Using the rectangle die from Shaker Basic Set #1, die cut the vellum then adhere to the card front with double-sided tape or a tape runner (don't use liquid glue). I put the tape only on the corners of the vellum so it wouldn't show.
  4. Adhere the Jett stamp onto the card as shown.
  5. Die cut the "Happy 4th of July" sentiment and adhere to the card as shown.

Thank you for stopping by. Wishing you a very Happy 4th of July!

Wednesday, June 12, 2024

Stamp Anniething Sneak Peek Day 1: Vegas Baby!

Welcome to Day 1 of Stamp Anniething's June 2024 sneak peeks! This month's theme is all about Las Vegas, often called just Vegas. Today's card features one of the biggest music stars, the King of Rock and Roll, the handsome Elvis! This card showcases the Elvis - Thank You, Thank You Very Much stamp and the Vegas baby bold word die. I used the Concert Stage Builder Die from a prior release to create the scene. Fabulous stamp for all you Elvis fans like me!

Stamp Anniething products used:
  • Elvis - Thank You, Thank You Very Much Stamp and Outline Die
  • Vegas Baby Word Die
  • Concert Stage Builder Die
  • Multi-layered Circles Stencil from February 2024 Stencil Club
  • Hybrid Inks in Chili Peppers, Crimson, Merlot
  • Awakening Glitter Paper Pack (retired)
Supplies used:
  • A6 white card base (4-1/2"W x 6-1/4")
  • Black Cardstock for mat (4-1/2"W x 6-1/4")
  • Black cardstock scrap for Concert Stage Builder Die
  • White cardstock to create bokeh background (4-1/4"W x 6"H)
  • Stampin' Up White Pigment Ink (use any white pigment ink)


Copic markers used:
  • Skin: E04, E11, E21, E00, E000
  • Cheeks: E93
  • Hair: 100, C7, C5, C3
  • Lips: 395, E93
  • Glasses: E23, Y38, YR21, C3,C1
  • Gold Cape: YR27, YR24, YR23, YR21
  • White clothes & shoes: C5, C3, C1
    • Dots on clothes: Arteza Glitter Gel Pens in red, blue, yellow

Instructions:
  1. Apply the three shades of Hybrid Inks (listed above) using a blending brush making sure that it's a little lighter towards the bottom. 
  2. Use the white pigment ink and solid circles stencil from the Multi-layered Circles Stencil to ink up circles. I used a heat gun to quickly dry the pigment ink.
  3. Cut out the Vegas Baby word die and adhere to the top of the card front
  4. Cut out the "hands" from the Concert Stage Builder and adhere to the bottom of the card front.
  5. Stamp the sentiment directly onto the card front.
  6. Adhere the card front onto a black cardstock mat then adhere to the card base.

If you, your family, or your friends are Elvis fans, this stamp is a must-have for your collection! So perfect for birthdays, thank yous, celebrations, and more. 

Thank you for stopping by. Have a creative and crafty day!


Saturday, May 18, 2024

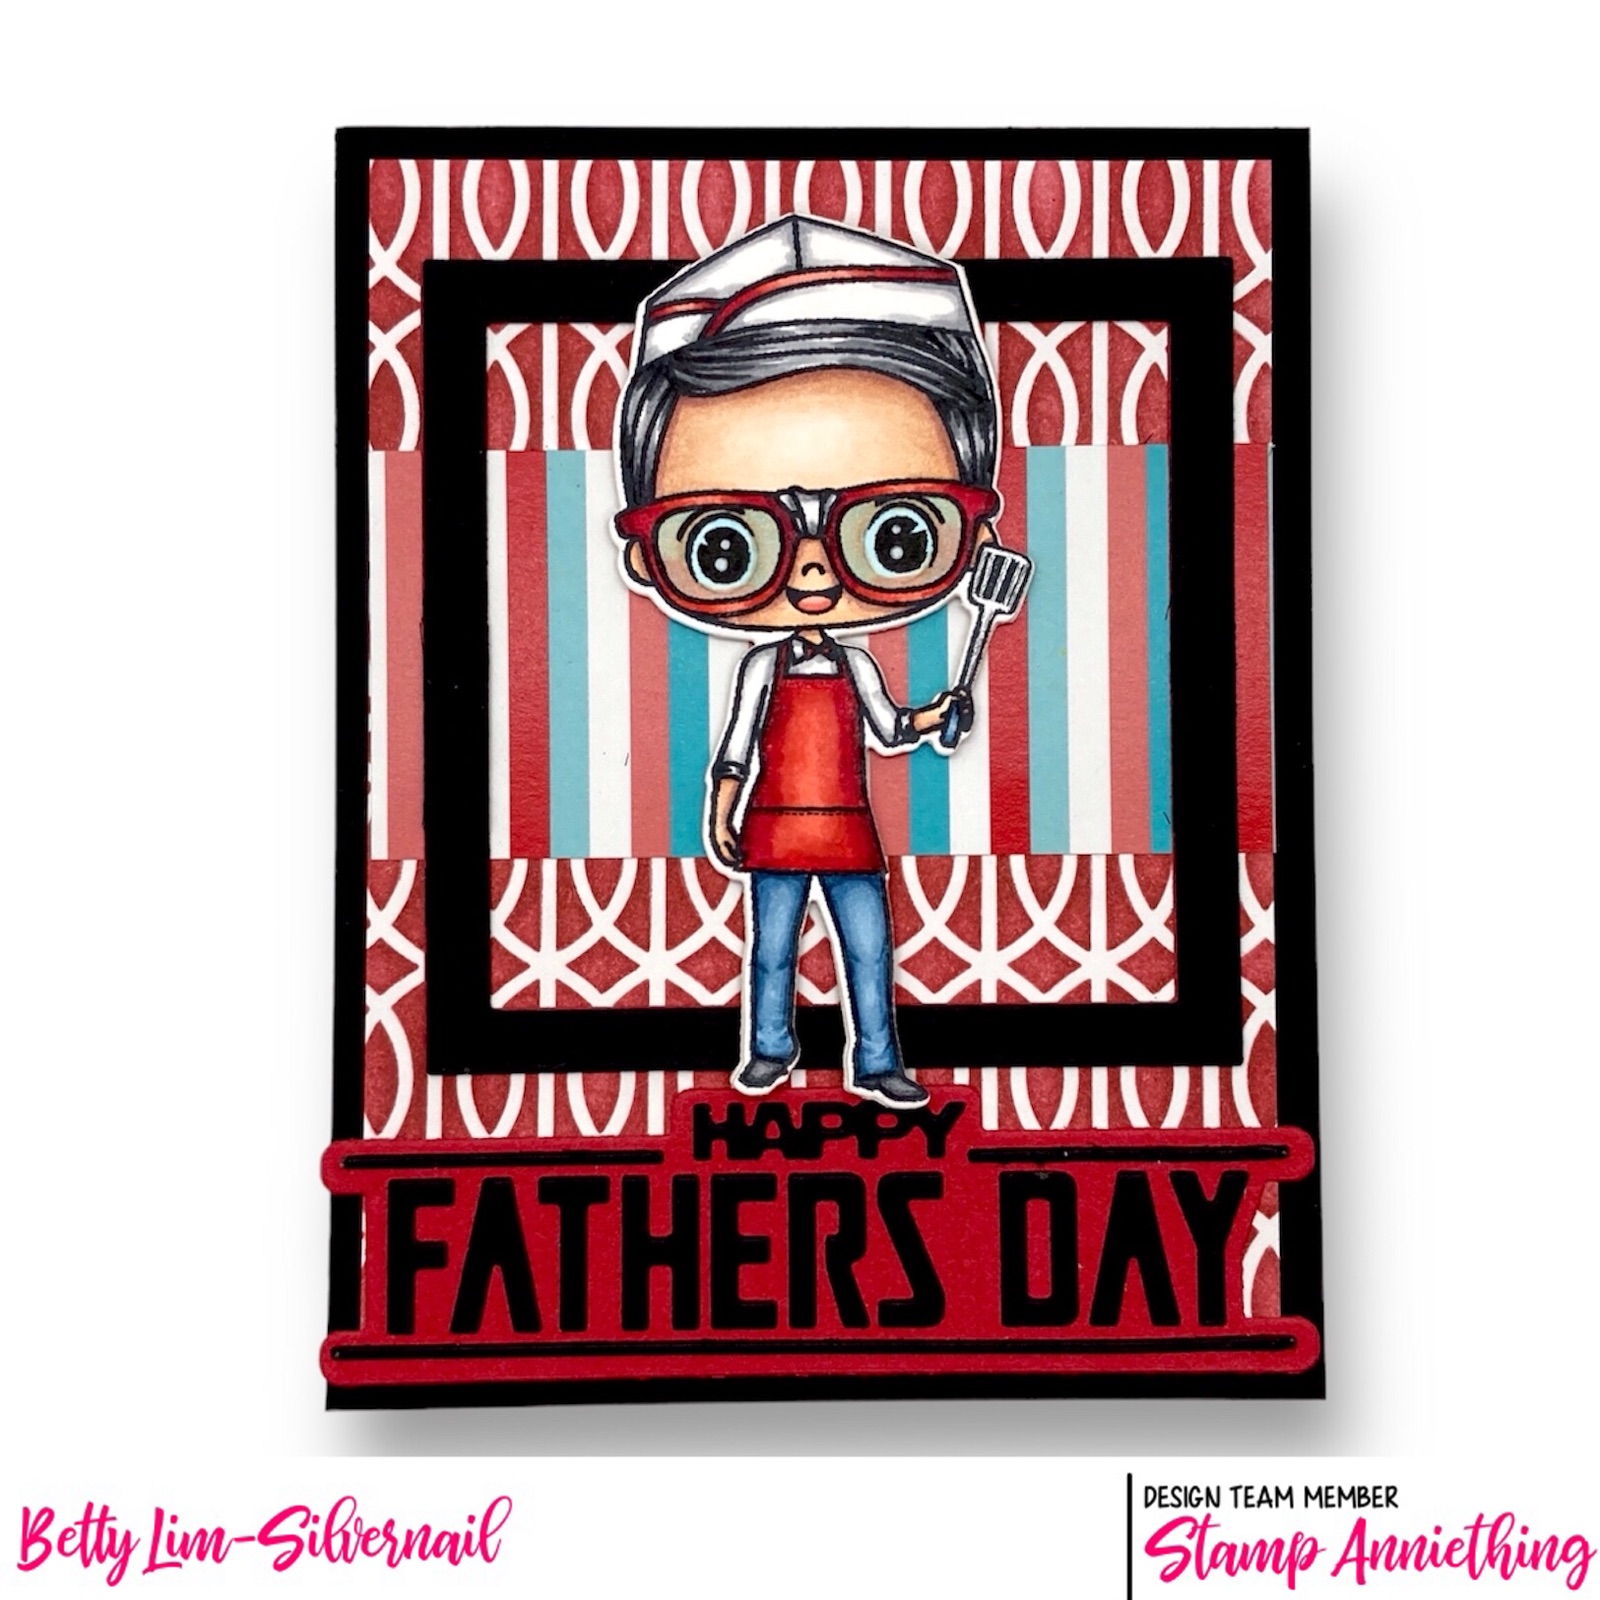
Stamp Anniething: Happy Father's Day Card

Father's Day is just about four weeks away so it's time to get your projects done! I've created a Father's Day card using Arnold-What's Cookin'? from Stamp Anniething. I need to make a few of these cards, so to make it easier on myself, I used stencils, patterned paper, and dies to create this quick card.

Stamp Anniething products used:
  • Arnold-What's Cookin' stamp and outline die
  • Happy Father's Day Word Die
  • Stencil from June 2023
  • Hybrid Ink Cube in Crimson
  • Shaker Basics Set #2
  • Retro Kitchen Paper Pack (retired)

Supplies used:
  • A2 white card base
  • Black cardstock for mat, frame, and word die
  • Red cardstock for word die
  • White cardstock for stencil

Copic markers used:
  • Skin: E04, E11, E21, E00, E000
  • Cheeks: R20
  • Tongue: R22, R20
  • Hair: N9, N5, N3
  • Red: R39, R29, R24, R21
  • White: N5, N3, N1, 0
  • Blue: B97, B95, B93,B91
  • Black Shoes: N7, N5, N3
  • Glass in glasses: B00
  • Arteza silver glitter gel pen for spatula

Thank you for stopping by! I hope you give this Father's Day Card a try! Have a creative day!


Saturday, April 27, 2024

Stamp Anniething: Golden Girls Happy Mother's Day Card

Mother's Day is just two weeks away and Stamp Anniething has the perfect stamps to make your Mother's Day card! It's the golden girls, Sophie and Dorothy! I made this easel card so that my mom can display it on Mother's Day.  So fun to make!


Stamp Anniething products used:
  • Dorothy-I Hope Your Day is Golden stamp and outline die
  • Sophia-Picture This (digital stamp)
  • Miami Parlor Stencil
  • Hybrid Ink Cubes in Apple Green, Bamboo, Mocha
  • Flowers & Leaves Dies
  • Shaker Basics Set 1 (circle die)
  • Summer Tropics paper pack (retired)
  • Farm Life paper pack (retired)
  • Let's Get Wild paper pack (retired)
Supplies used:
  • A2 white card base
  • White cardstock 4.25"W x 5.5"H - scored and folded at 1/2" and 3" (for easel)
  • White cardstock 3 7/8" x 5" (for stencil)
  • White cardstock scraps for flowers and leaves
  • Brown cardstock (mat)
  • Patterned paper
  • Happy Mother's Day sentiment (I used MS-Word to create)


Copic markers used:

Dorothy
  • Skin: E04, E11, E21, E00, E000
  • Cheeks: E93
  • Tongue: R22, R20
  • Hair: C7, C5, C3, C1
  • Pants: C9, C7, C5, C3
  • Scarf: YR18, YR14, YR12
  • Blouse: V17, V15, V12
Sophia
  • Skin: E04, E11, E21, E00, E000
  • Cheeks: R20
  • Tongue: R22, R20
  • Hair: N3, N1, T0
  • Glasses frame, purse, shoes: E77, E74, E71
  • Glasses lens: B0000
  • Dress: B28, B24, B21
Flowers and Leaves
  • Flowers: V17, V15, V12
  • Leaves: G28, G16, G12
To create the easel, start with a top folding A2 card base. Attach the white cardstock that is 4.25"W x 5.5"H, scored, and folded at 1/2" and 3" onto the card base so that the 1/2 fold is adhered onto the bottom of the card base. The card should stand up as shown. Then add the mat and patterned paper.


Adhere the brown cardstock mat onto the card base. Stencil the background using the Miami Parlor Stencil then adhere to the brown cardstock. 

I created the sentiment using Microsoft Word, printed it, trimmed it, and added a brown cardstock mat.

I cut out a circle using patterned paper then adhered this to the easel. Then added all the colored stamps to create the card front.

This is an easy and fun way to make a fancy fold card. I just love the way this card turned out. I hope you give it a try!


Thank you for visiting and I hope you have a creative day!