Showing posts with label Spectrum Noir. Show all posts

Monday, November 25, 2024

Stamp Anniething: Treat Yours"elf"!

There's still time to get some cute holiday cards done in time to be mailed out. Here's a fun one I made using Stamp Anniething's Treat Yours"elf" stamps and Holiday Scene Builder dies. So easy and fun with the awesome Holiday Scene Builder Dies!

Stamp Anniething products used:
  • Treat Yours"elf" stamps and outline dies
  • Holiday Scene Builder
  • Sentiment Strips
  • Hybrid inks (trees): Willow Bough, Bamboo
  • Hybrid inks (presents): Caribbean Sea, Azure, Chili Peppers, Crimson
  • Shaker Basics Set #1 (circle)
  • Glitter cardstock (retired)
Supplies used:
  • A6 white card base
  • White mat/panel
  • Bristol cardstock (for all die cuts)
  • Patterned paper from my Close to my Heart (retired)
  • Patterned paper from CC Designs (retired)
  • Vellum
  • Spectrum Noir Sparkle Pen
  • White gel pen

Copic markers used:
  • Skin: E04, E11, E21, E00, E000
  • Cheeks: R20
  • Tongue: R22, R20
  • Blue: B16, B05, B02, B00
  • Red: R39, R46, R35, R32
  • Pinecone: E29, E25, E23, E21
Notes:
  • Trim white cardstock mat leaving a 1/8" border and adhere to card base.
  • Trim one of the patterned papers leaving a 1/8" border and adhere to white panel.
  • Trim the other patterned paper 1-3/4" wide and 1/8" border at the top and bottom then adhere to card as shown.
  • Die cut 3 sets of trees. Ink with hybrid ink colors listed above. Assemble together. Die cut the ornaments and stars using glitter cardstock and adhere to the tree.
  • Die cut 2 sets of presents. Ink with hybrid ink colors listed above. Assembled together. Adhere the trees and presents onto the card. 
  • Die cut the vellum with the circle die. Adhere to the card using a vellum tape runner or clear double sided tape. Adhere the elf image using double sided tape.
  • Add a few of the tree ornaments onto the vellum using a small drop of glue.
  • Adhere the sentiment.
  • Ad sparkle to the card using the Sparkle Pen. Add it everywhere except for the elf skin. Add white dots with the white gel pen.

Thank you for visiting today. Have a creative day!

Thursday, November 7, 2024

Stamp Anniething Sneak Peek Day 1: It's That Special Time of Year

It's time to get some Christmas/holiday cards done and Stamp Anniething has the cutest set of elves! Today is Day 1 of the November 2024 sneak peeks of the Treat Yours"elf" stamps, dies, and stencil. I'm starting with the only girl elf in the set. I'm going out of my color comfort zone! Instead of using traditional red and green Christmas colors, I used a dusty pink and blue green combo. I really love this color combo!

Stamp Anniething products used:
  • Treat Yours"elf" stamps and outline dies
  • Christmas word die
  • Sentiment strips die
Other supplies used:
  • A2 top folding white card base
  • Black cardstock mat/panel with 1/8" border, sentiment mat, and word die outline panel
  • Patterned paper from Stampin' Up (Silver & Gold pack)
  • Spectrum Noir Sparkle Pen
  • White gel pen

Copic markers used:

Elf
  • Skin: E04, E11, E21, E00, E000
  • Cheeks: R20
  • Tongue: R22, R20
  • Hair: E59, E57, E55, E53
  • Pink: R56, R85, R83, R81, RV00
  • White: N3, N1, 0
  • Blue Green: BG78, BG75, BG72, BG90
Trees
  • Pink: R56, R85, R83, R81, RV00
  • Blue Green: BG75, BG72
  • Gray: N7, N4
  • Yellow: Y17, Y35, Y32
Cards
  • White: N3, N1, 0
  • Blue Green: BG75, BG72
  • Pink: R56, R85, R83, R81, RV00
Notes:
  • After coloring stamps and assembling the card, put on a light coat of Spectrum Noir Sparkle Pen to add some glitter to the card. Add some white dots with the white gel pen.

Thank you for stopping by! Please come back tomorrow for Day 2 of Stamp Anniething's sneak peeks! Have a creative day!


Thursday, December 7, 2023

Stamp Anniething Sneak Peek Day 2: Thought I'd Check In

Welcome to Day 2 of Stamp Anniething's December 2023 sneak peeks where this month's theme is inspired by social media! Today's card features the cute stamp, Penelope - Thought I'd Check in and the awesome Grid Die. Instead of using my usual Copic markers, I used Spectrum Noir Tri-Blend markers to color the stamps.

Stamp Anniething products used:
  • Penelope - Thought I'd Check in stamp and outline die
  • Grid Die
  • Banner Dies
  • Card Mat Dies
  • Enamel Dots

Spectrum Noir Tri-Blends used:
  • Skin: Earth Brown Blend (Medium & Dark), Tan Blend (Light)
  • Cheeks: Pink Violet Blend (Medium & Light)
  • Hair: Gold Brown Blend, Gold Yellow Blend (Dark)
  • Turquoise: Green Turquoise Blend
  • Purple: Pink Violet Blend
  • White: Brown Grey Blend + Blender
  • Pink: Antique Pink Blend


To create the background, I used the Grid Stencil with Hybrid Ink Cubes in Rose Cheeks and Lavender Bloom.

Thank you for visiting today! Please come back tomorrow for Day 3 of sneak peeks. Have a creative day!

Wednesday, August 16, 2023

Scrappy Boy Stamps Sneak Peeks! Let's Get Ready for Halloween!

We are heading to the last weeks of summer and soon it will be the fabulous fall season. It is my favorite time of year even though it is the busiest time with Halloween, Thanksgiving, Winter Holidays, and New Years. Now is the time to get started on your Halloween projects! Today's Scrappy Boy stamps sneak peeks feature three new Halloween/Fall stamp sets, dies, stencils, and papers! 

  1. Halloween Pin Up Girls (stamps, outline dies, stencil, papers)
  2. Cute Girls - I Put a Spell on You (stamps, outline dies, stencil, papers)
  3. Halloween Build-a-Gnome Home (stamps, outline dies)
Since these three sets are all Halloween themed, everything can be mixed and matched for all your projects! This release will be available on Friday, August 18, 2023 at the Scrappy Boy Stamps webstore. 

Please scroll down to see all three of my projects.

1. Halloween Pin Up Girls Card: Happy Halloween!


Products used:
  • Halloween Pin Up Girls stamps and outline dies
  • Halloween Pin Up Girls Scene Builder Stencil
    • Distress Ink in Dusty Concord, Seedless Preserves, Black Soot
  • Halloween Pin Up Girls Paper Pack

Spectrum Noir Tri-Blend markers used:
  • Skin: AP4, Fair Skin Blends
  • Cheeks: AP2, Fair Skin Blends
  • Hair: Earth Brown Blend
  • Purple: Lavender Blend
  • Yellow: Gold Yellow Blend
  • Orange: Orange Blend & CR1, Coral Blend


2. Cute Girls - I Put a Spell on You Card: It's Just a Bunch of Hocus Pocus!

Products used:
  • I Put a Spell on You stamps and outline dies
  • I Put a Spell on You Scene Builder Stencil
    • Distress Ink (Moon): Squeezed Lemonade, Wild Honey
    • Distress Oxide: Hickory Smoke, Dusty Concord, Mowed Lawn, Black Soot
  • I Put a Spell on You Paper Pack
  • Stitched Circle Die


Copic markers used:

Witch 1
  • Skin: E04, E11, E21, E00, E000
  • Cheeks: E20
  • Lips: R22, R20
  • Hair: 100, C7, C5, C3
  • Dress: E79, E09, E04, E02, RV69, R56, R83
  • Vacuum: B26, B24, B21
Witch 2
  • Skin: E04, E11, E21, E00, E000
  • Cheeks: E20
  • Hair: E18, E08, YR16,YR14
  • Green: G99, G46, G24, G12
  • Purple: V17, V15, V12
  • Brown: E37, E35, E31
Witch 3
  • Skin: E04, E11, E21, E00, E000
  • Cheeks: E20
  • Hair: E57, E55, E53, E51, Y11
  • Red: R89, R85, R83, R81
  • Green: YG09, YG05, YG03


3. Halloween - Build-a-Gnome Home Card: You Are Too Cute to Spook!

Products used:
  • Halloween Build-a-Gnome Home stamps and outline dies
  • Fall Build a Gnome Home
  • Stitched Rectangle Dies
    • Distress Ink: Shaded Lilac, Dusty Concord, Seedless Preserves
  • Grass Edger Die
Copic markers used:

Bat Gnome
  • Skin: E04, E11, E21, E00, E000
  • Cheeks: R20
  • Hair: E37, E35, E31
  • Purple: BV29, BV25, BV23, BV20
  • Green: YG67, YG63, YG61
Pumpkin Gnome
  • Skin: E04, E11, E21, E00, E000
  • Cheeks: R20
  • Hair: C5, C3, C1
  • Orange: YR27, YR16, YR14
  • Purple: BV17, BV13, BV11, BV00
Gnome Home
  • Orange: YR27, YR16, YR14
  • Purple: BV17, BV13, BV11, BV00
  • Yellow: YR27, YR24, YR23, YR21
  • Green: YG17, YG05, YG03
  • Window: V000
Wreaths
  • Orange: YR16, YR21
  • Green: YG17, YG05, YG03
  • Purple: BV17, BV13, BV11
Bats
  • Purple: BV29, BV25, BV23, BV20
Pumpkin with Witch Hat
  • Purple: BV17, BV13, BV11, BV00
  • Orange: YR16, YR14, YR21
  • Green: YG17, YG05, YG03

Thank you so much for visiting today. This month will be full of projects using these new releases. Come back often! Have a wonderful and crafty day!


Tuesday, July 18, 2023

Stamp Anniething: Life without you wouldn't be "ferret" all

Today is my design team day at Stamp Anniething where I use an older stamp to create a project. I made two cards using stamps, dies, and papers from the Love Me Love My Pets Grab & Go Box. I have had this Grab & Go Box for several years and have made plenty of cards and I still have stamps I've never used and plenty of patterned papers and cardstock left. I used a lot of my scraps too! I'm so happy to be able to play with this amazing set!

Last week I was inspired by our Stamp Anniething guest designer, Ebony, who had a Facebook live tutorial. She used her Spectrum Noir alcohol markers and Tri-blends to color her stamped image. I started out using the Spectrum Noir line (original markers, Illustrators, and Tri-blends) and then transitioned to Copic markers when a friend of mine gave me her 200+ markers. I used both sets for awhile, but did not find it feasible to buy refill inks for both sets of markers and decided I would stick with the Copics. 

Through Ebony's FB Live, I found out that there is a big community that still use Spectrum Noirs, especially the Tri-blends. So I decided to break those out and color one card using the Spectrum Noirs and another card using the Copics. Listed below are the colors I used for both cards.

Card 1: Spectrum Noir

Skin: Tri-blend Coral (CR6 only), Tri-blend Fair Skin
Cheeks: Tri-blend Coral (CR3 only)
Tongue: Tri-blend Coral (CR6, CR3)
Hair: Tri-blend Gold Brown (GB5, GB3, GB1)
Pants: Tri-blend True Blue (TB4, TB3, TB2)
Shirt: Tri-blend Dark Red (DR4, DR3, DR1)
Shoes: Illustrators IG9, BG4, IG2
Ferret: Illustrators IG9, BG4, IG2


Card 2: Copic

Skin: E04, E11, E21,E00, E000
Cheeks: R20
Tongue: R22, R20
Hair: E59, E57, E55, E53
Pants: B97, B95, B93, B91
Shirt: E37,E35, E32
Shoes: N7, N4, N1
Ferret: N7, N4,N1


I used a lot of the scraps of patterned papers and sold cardstock to make these A2 cards. Since the papers are from the same paper pack, they all coordinated and made this a very easy card to put together. 

This Love Me Love My Pets Grab and Go Box is still available at the Stamp Anniething webstore. Grab one today!


Thank you for visiting and have a creative day! 


Wednesday, March 22, 2023

Scrappy Boy Stamps Sneak Peek: Goth Girl

It's sneak peek time at Scrappy Boy Stamps! Today's card features stamps from the "Goth Girl" stamp set and the "Goth Girl Window" stamp, which was inspired by the popular supernatural comedy horror TV show.  This stamp set comes with 8 images and many sentiment quotes from the TV show. This card also consists of patterned papers from the The Goth Girl paper pack.

This new release will be available in the Scrappy Boy Stamps webstore on Friday, March 24, 2023.


Scrappy Boy Stamps products used:
  • Goth Girl stamps and coordinating outline dies
  • Goth Girl Window stamp
  • Goth Girl Paper Pack

I stamped and colored all images using Copic markers in the following colors:


Girl 1
Skin: E04, E11, E21, E00, E000
Cheeks: E95
Black: N7, N4, N3, N1
Blue: B39, B37, B34, B21


Girl 2
Skin: E04, E11, E21, E00, E000
Cheeks: R20
Hair: 100, C7, C5, C3
White: T3, T1, 0
Black: 100, T9, T7, T5, T3


Hand: E11, E21, E00, E000


I colored the Goth Girl Window stamp using Spectrum Noir Aqua Tints.

The purple background was created using Distress Inks in Dusty Concord and Black soot, then splattered with plum, white, and black acrylic paint. I used a notched corner die from Gina Marie Designs to cut the mat.

I used papers from The Goth Girl paper pack to mat the card base. 


Thank you for stopping by. I hope you love this stamp set as much as I do! Have a wonderful and creative day!


Friday, February 25, 2022

Stamp Anniething: Family is Everything!

Stamp Anniething has done it again! They have released an amazing stamp set (bundle) called Family is Everything! which was inspired by my favorite family from Columbia. A total of six adorable character stamps, the magic door, some flowers, mice, a fabulous paper pack designed by Annie of Stamp Anniething, a stencil, and sentiments in both English and Spanish! 


This was a pre-order bundle and is currently sold out, but if you’d like to be notified when more are in stock, use the email feature.


This was a pre-order bundle, so for the design team, we were given the digital stamps and papers only; therefore I don't have any cards made with the stencil. The stencil will be used in a future card! Listed below are the markers and colors I used to make each card. 

Card 1: You Are Amazing
Copic Markers Used:
Skin: E17, E13, E11, E21, E00
Cheeks: R20
Mouth: R22, R20
Hair: T9, T7, T5, T3
Pink: RV66, RV55, RV52
Gold: E23, Y38, YR21
Black: T7, T5, T3
Door: E18, E19, E15, E13, E11
Side panels: YR23, Y19, Y15

Additional products used: 
Quilted Elegance Stencil
Chipboard (for the floor)
Jelly dots

Card 2: Nothing is Stronger than Family
Spectrum Noir Illustrators Used:
Skin: EB4, EB1, RB2, RB1, FS8
Cheeks and Tongue: PP4, PP2
Hair: Black, EB7, EB4, EB2
Purple: LV3, LV2, LV1
Pink: PP6, PP5, PP4
White: IG6, IG2, Blender

Additional products used:
Shaker Basics Set 1 (circle die)
Annie's Alphabet

Card 3: Happy Birthday (Girl with Glasses)
Copic Markers Used:
Skin: E15, E13, E11, E21
Tongue: R22, R20
Cheeks: RV11
Hair: E49, E47, E44, E43
Glasses: YG09, YG06, YG03
Skirt: B05, B04, B01, B00 (Layer 1); B16, B14, B12 (Layer 2): B26, B24, B23, B21 (Layer 3)
White: C5, C3, C00
Gray: C7, C5, C3

Additional products used:
Card mat dies
Jelly dots

Card 4: I Think You Are Perfect (Man)
Copic Markers Used:
Skin: E09, E15, E97, E02, E01
Cheeks: R22
Tongue: R22, R20
Hair: E49, E47, E44, E43, E41
Green: G99, G94, G82, G40
Brown: E59, E57, E55
Mice: E44, E43, E41

Additional products used:
Card mat dies
Geo Triangles Stencil
Shaker Basics Set 1 (Circle die)


Card 5: I Think You Are Perfect (Girl)
Skin: E15, E13, E11, E21
Cheeks: RV11
Tongue: R22, R20
Hair: E29, E27, E25, E23, E21
Purple: V15, V12, V01
Black: C7, C5, C3

Additional products used:
Card mat dies
Jelly dots

Card 6: Happy Birthday (Girl with hair bow)
Spectrum Noir Markers Used:
Skin: EB7, EB4, EB2, EB1, TN3
Cheeks: PP5
Tongue: PP4, PP2
Hair: Black, IG9, IG6, BG4, BG2
Red: DR5, DR3, DR1
Yellow/Gold: GY3, GY2, LY1

Additional products used:
Card mat dies
Banner die
Jelly dots

Thank you for stopping by! Hope you enjoyed this new release. So fun to make cards and other projects with this bundle. Have a creative day! 

Wednesday, January 5, 2022

Stamp Anniething Sneak Peek Day 1: Emma - You Bet Your Giraffe

Welcome to Day 1 of Stamp Anniething's January Sneak Peeks! This month's theme is "Let's Get Wild." Today's A2 shaker card features the cutest stamp called Emma - You Bet Your Giraffe, the coordinating outline die, leaves from the Foliage Card Mat, and the Let's Get Wild paper pack. The new release will be available Friday, January 7, 2022, beginning at 9:00 am PST/12:00 pm EST. 


Other supplies used from Stamp Anniething are:
-Shaker Basics Set #1
-Banner Dies
-Card Mat Dies
-Leaf Crossings Sprinkles
-The Perfect Blend Sprinkles
-Itty Bitty Beads

I colored the stamp using Spectrum Noir Illustrator markers.  Colors used:
Skin: AP3, FS8, FS7, FS9, FS6
Cheeks: FS4
Tongue: PP4, PP2
Yellow/tan: GB4, GY2, FS9
Brown: EB4, EB2, EB1, MB1
Pink: PP4, PP2, PP1
Green: DG4, DG3, DG2, CG1


Thank you for stopping by and I hope you return tomorrow for Day 2 of Stamp Anniething's Sneak Peeks! Have a wonderful day! 


Wednesday, November 3, 2021

Stamp Anniething Day 1 Sneak Peek: Balle Balle Wedding Day

Welcome to Day 1 of Stamp Anniething’s sneak peeks! This month’s theme is “Bollywood.” Bollywood is the Indian Hindi language film industry of Mumbai, formerly called Bombay. The word Bollywood is a term formed by Bombay and Hollywood. For more information on Bollywood, check out wikipedia as it can explain it better than I can. I am using the beautiful stamp named Taani-Balle Balle. The words Balle Balle translates to Hooray or Hurrah.  It is a phrase that is used in many Punjabi songs to express a feeling of happiness.


I first stamped Taani, cut her out with the coordinating outline die, and colored her using Spectrum Noir Illustrator markers. 


Spectrum Noir Illustrator markers used:
Skin: GB7, GB5, GB3, GB1
Cheeks and Tongue: PP2, PP1
Hair: IG9, IG6, IG2
Turquoise: BT9, BT7, BT5, BT2
Gold: GY3, GY2, GY1
Red: DR4, DR3, DR1


I made a 6x6 square card and used the new Flower Stencil with The Crafter’s Workshop Stencil Butter in turquoise and stenciled it on Stamp Anniething Glitter Paradise cardstock in Lemon Squeeze. I cut out a circle using the circle die from Shaker Basics Set 1 to place behind Taani. I used the Love (Script) Word Die and cut it out with Glitter Paradise cardstock in Mermaid Blue to add to the sentiment on front of the card. 


Please come back tomorrow for Day 2 of sneak peeks for another adorable Bollywood stamp! Thank you for visiting and have a great week! 

Wednesday, October 6, 2021

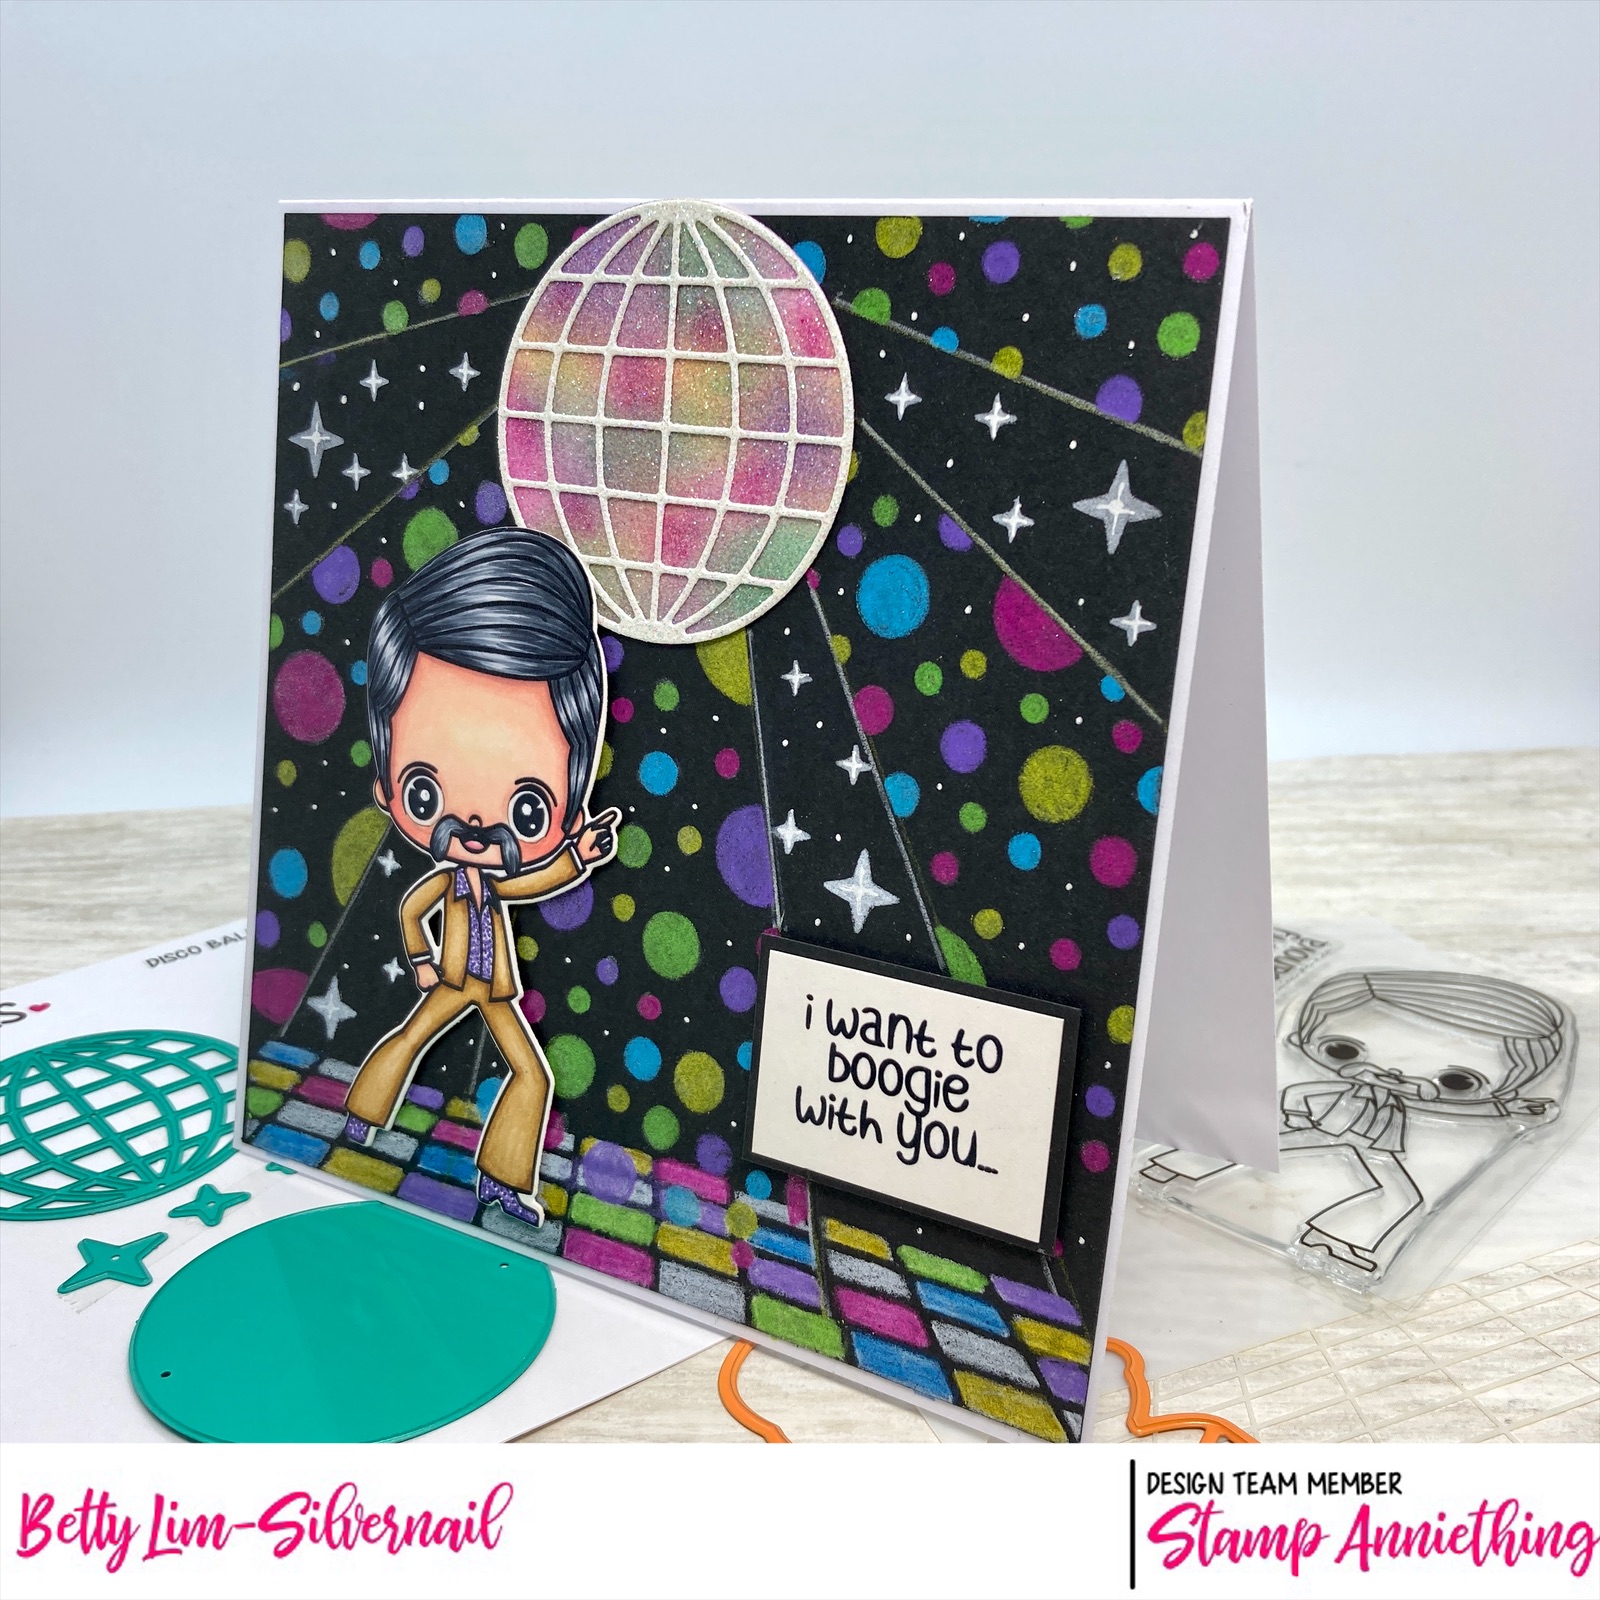
Stamp Anniething Sneak Peek Day 1: Gary - You''re My Casanova

Who remembers the 70’s? I sure do! It was disco time! Those were the good old days. I still love the music from the 70’s, especially the disco songs. This month’s sneak peeks from Stamp Anniething is all about disco! Today’s card features the groovy “Gary - You're My Casanova” and he's on the dance floor boogie-ing to the disco music! I am loving the stamps, the dies, and the stencil in this new release. Links to all the new release products will be available on Friday, October 8.

I made a 6x6 square card using the Disco Ball Die, the Disco Stencil, and used the coordinating  outline die to cut out Gary. An additional stencil I used to make the circles is the Bubble stencil.  

I used Spectrum Noir Illustrator markers to color Gary.


Spectrum Noir Markers used
Skin: AP3, FS8, FS7, FS6,FS9
Cheeks: FS4
Tongue: PP4, PP2
Pants and Jacket: GB7, GB5, GB3, GB1
Shirt and shoes: LV3, LV2, LV1 plus Arteza glitter pen in purple and white gel pen
Eyes: White gel pen for the highlights 

The disco ball is cut out of white glitter cardstock then ink blended using Stamp Anniething's Hybrid Inks in Aspen Gold, Parakeet, Heather, and Shocking Pink using blending brushes. I used black cardstock for the background. I drew lines with yellow and white colored pencils for the light rays then used the Bubble Stencil to add the circles.

I used Prismacolor pencils to create the dance floor using the Disco Stencil and the circles on the rays of light. The Prismacolor Pencils used are PC1008, PC916, PC994, PC919, PC913, PC938.  I used the Disco Stencil, a white prismacolor pencil, and a white gel pen to add the white sparkly lights.

I adhered the disco ball flat on the cardstock and used double-sided foam tape for Gary. 

To finish the card, I stamped the sentiment, trimmed it to size, and added a black mat. I used double-sided foam tape to adhere it to the card. I trimmed the card front leaving a 1/8" white border around the card. 

 Thank you for visiting today and make sure you come back tomorrow for Day 2 of sneak peeks! Have a crafty day! 


Thursday, August 5, 2021

Stamp Anniething Day 2 Sneak Peek: Tommy-You're My Hero

Welcome to Day 2 of August Sneak Peeks where the theme is "Imagine." Today's shaker card features the adorable stamp, Tommy-You're My Hero and sentiment, the stamp's coordinating outline die, the Imagine Word Die, and the Pinwheel Stencil. 

Other products used to create this shaker card, are the new Card Mat Dies, glitter cardstock from the Awakening Glitter Pack, Sequins-Purple Enchantment, Acetate, Chipboard, and white gel pen.


I first stamped Tommy and used the coordinating outline die to cut him out. I used Spectrum Noir Illustrator markers to color this stamp. 


Specturm Noir Illustrators Used
Skin: TN8, TN5, TN2, FS6, FS9
Cheeks: FS4
Tongue: PP4, FS4
Hair: TN7, EB1, GB2
Silver: BGR4, BGR3, BGR1
Brown (Box): TN8, TN5, TN3, TN1
Blue: TB5, TB3, TB2, TB1
Horse: EB4, EB2, RB2, RB1

To make the shaker element of this card, I used the Card Mat Dies. Specifically, I used the Scalloped Stitch Mat and the Stitched Rounded Rectangle Mat to cut out 5 layers of chipboard and 1 glitter cardstock. I used the Scalloped Stitch Mat to cut the acetate. 

I used Oxide Inks in Stormy Sky and Black Soot and the Pinwheel Stencil to create the back of the shaker. I stenciled on a 4.25"W x 5.5" piece of white cardstock then cut it with the Scalloped Stitch Mat. 

I adhered the acetate to the glitter cardstock frame using Double Sided Tear Away Tape. You can use liquid glue, but I find that I always end up smearing the glue on the acetate and it's just about impossible to clean it.  However, I adhered all the layers of the chipboard together with Stamp Anniething Glue. After adding the shaker bits/sequins, I again used the Tear-Away Tape to enclose the shaker. 


I cut the word Imagine using the glitter cardstock. The background outline is cut out of white cardstock and I inked the edges with Stormy Sky Oxide Ink. I adhered it to the card front using the Tear-Away Tape. I stamped and trimmed the sentiment, then inked the edges with the Oxide ink and adhered it to the card front again with Tear-Away Tape. I add a couple of glitter enamel dots from my stash. 

For the A2 top folding card base, I cut the corners using the Corner Edgers Die then adhered the card front with liquid glue. The card is finished! 


Thank you for stopping by and please come back for Day 3 of Sneak Peeks! I have another cute and fun card to make. Have a creative and crafty week!