The double-sided ornament is made from chipboard, stamped, and sealed with Glossy Accents so they will last for many many years. They make great stocking stuffers and gifts. Plus they are fun to make! I hope you will give them a try.
SIDE 1 SIDE 2
Supplies:
- Blank Page Muse Stamps: Background Grunge Stamp Sheet by Pam Bray and Small Butterfly by Pam Bray
- Chipboard - either 30pt or 22pt
- Ornament die or circle die, minimum size 3". I used Lawn Fawn's Stitched Circle Tags Dies
- Black solvent ink, such as Staz-On
- Acrylic stamping block
- Washi tape
- White gesso
- Washi tape - this is for texture. Use any pattern.
- Distress ink or Distress Oxide: Squeezed Lemonade, Spiced Marmalade, Peacock Feathers, Seedless Preserves, Black Soot
- Distress ink applicator
- Distress Collage Medium or Mod Podge (matte or glossy)
- Strong white glue
- Glossy Accents or Diamond Glaze
- Paint brush
- Black 1/4" wide ribbon - approximately 9"
- Optional items: Charms
Instructions:
- Using an ornament or circle die, cut 2 die cuts with chipboard
- Using a paint brush, apply a thin layer of Gesso on one side of each of the die cuts. You will only need to do one side since we will be gluing these two pieces together. Let dry completely.
- Adhere the washi tape in various areas
- Apply another thin coat of Gesso and let it dry
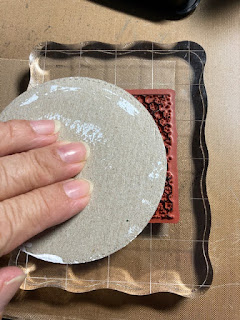
- Using the black ink pad and background stamps, stamp a few of the background images. When stamping chipboard, I find it easier to place the chipboard on top of the larger stamps and rub it.
- Apply another thin coat of Gesso, making sure you can still see the stamps through the Gesso. Let it dry.
- Now stamp your focal stamps. Design your ornament how you like it! Let the ink dry.
- Apply the colorful distress inks in various places. Apply the Black Soot in on the edges of the ornament.
- Using a paint brush, apply a coat of the Distress Collage Medium or Mod Podge. Let it dry.
- Using a paint brush, apply a generous coat of Glossy Accents. Add the charm while it is still wet. Add a little extra Glossy Accents to make sure the charm is secure. Let it dry. NOTE: If you have charms that have the ring on top, break it off with two jewelry pliers. Hold the charm with one pliers and twist off the ring with the other pliers.
- Using strong white glue, adhere the two back sides together to form the ornament.
- Insert a charm in the ribbon and tie the ribbon onto the ornament. If you used a circle die, you will need to punch a hole and thread your ribbon through. Your masterpiece is done!
I hope you give this ornament a try. Check out the Blank Page Muse Art Rubber Stamps store for a large collection of amazing red rubber stamps, stencils, paper and more!
I had so much fun making these ornaments that I just had to make a steampunk Santa ornament with the same background stamps I used above, along with two stamps from the Steampunk'd Christmas Holiday set.
Thank you for stopping by and I hope you are enjoying the ornament blog hop!


Simply lovely.
ReplyDelete