Showing posts with label Valentines. Show all posts

Wednesday, February 1, 2023

Paper Nest Dolls: Love Struck Lulu - Happy Valentine's Day

In just two weeks is Valentine's Day! A quick and fun way of making cards is using digital stamps from Paper Nest Dolls. I made this Valentine's Day card using the adorable the stamp called Lovestruck Lulu. This stamp comes in both digital and red rubber. I used the digital version so that I can get the stamp the same day I order it and make it the size I needed for this card. 


I printed the stamp at 3-1/4" tall and colored it with Copic markers in the following colors:

Skin: E04, E11, E21, E00, E000
Cheeks: E93
Hair: Y28, YR23,YR21, Y21
Pink: V95, RV95, RV93, RV91
Green: YG95,YG93, E81
Silver/Gray: C5, C3, C1


The supplies I used to make this card are:
  • A6 white card base
  • "I Love Love" patterned paper from Scrappy Boy Stamps
  • "Burlesque" patterned paper from Scrappy Boy Stamps
  • Cut & Emboss Heirloom Frames from Stampin' Up
  • Sentiment from The Stamps of Life
  • Heart die cuts from The Stamps of Life Heart Button Dies
  • Pink and white baker's twine

The pink mat underneath the patterned paper and the sentiment are white cardstock with the edges colored with RV93 to match the colored stamp. I could not find colored cardstock to match. 


Thank you for stopping by today and I hope you create some quick and fun Valentines Day cards with this Paper Nest Dolls Lovestruck Lulu stamp! Have a creative week!


Wednesday, February 9, 2022

Paper Nest Dolls: Love Potion Amara | Happy Valentine's Day

It's not too late to make a few Valentine's cards! I made this card using a digital stamp called Love Potion Amara from the Love Potion stamp set from Paper Nest Dolls. So cute and simple to print and color! Add this to digital printable papers and you can make this card in no time! 


I first printed the image at 3-3/4" tall and colored it with Copic markers. I then used an oval stitched die to cut it out. I used Distress Ink in Black Soot to ink the edges.


Copic Markers Used:
Skin: E13, E11, E21, E00, E000
Cheeks: R20
Hair: E39, YR24, YR23, YR20
White: C5, C3, C1, 0
Blue Green: BG13, BG11, BG10
Pink: RV14, RV13, RV11
Blue (glass): B01, BG000
Goggles (glass): B00

I used free digital pattered paper that I found on Freepik. It was Designed by macrovector / Freepik. I imported the image to Microsoft Publisher and added the Happy Valentine's Day sentiment. I printed it 6" x 6" then trimmed it down to 5.5" x 5.5" I added a black cardstock mat behind it, leaving an 1/8" border. Then I placed it on the 6" x 6" card base. 


I added a strip of black cardstock at the bottom of the card where I used an older Martha Stewart border punch to create the edge. I adhered Love Potion Amara onto the card using double-sided adhesive foam tape. To finish the card, I added a few enamel dots. 


Thank you for stopping by. I hope you give this a try! Have a wonderful and creative day. 


Tuesday, January 25, 2022

Conie Fong Art & Design: Lulu & Lonny Bundle of Love

It's time to get those Valentines cards made since Valentine's Day is just about a two weeks away. Today's card features Conie Fong Art & Design's digital stamp set called Lulu and Lonny Bundle of Love. This set comes with 4 images and 1 sentiment. This set is perfect for Valentine's Day, birthday, anniversary, and more! 


I printed the digital stamps on watercolor paper using my laser printer. I went out of my comfort zone of using alcohol markers and colored these stamps with Distress inks. I wanted a more pastel look for my pigs and sometimes it's hard to do that with the alcohol markers I have. 


Distress Ink colors used:
  • Pigs: Tattered Rose, Hickory Smoke
  • Hearts: Worn Lipstick, Dusty Concord
  • Bucket: Peeled Paint
Supplies for the card:
  • Watercolor paper - slimline size
  • Lace edge slimline die by Gina Marie Designs

This is a very simple one layer card to make. I hope you give it a try! Thank you for visiting and have a wonderful and crafty day!


Monday, January 17, 2022

Stamp Anniething: My First MemoryDex Card! Iguana Kiss You!

Today is my Design Team Day where I get to use stamps and products of choice. I made my very first MemoryDex card for my brand new MemoryDex holder! I received the holder from my Stamp Anniething Secret Santa for Christmas. What is a MemoryDex you ask? It's like a Rolodex, but bigger. A standard Rolodex card is 4"W x 2-1/4"H and the MemoryDex card is 4"W x 4"H. Instead of putting names and addresses on the card, you decorate it like a greeting card and then display it in the holder. 


The stamp I used is from the Love Me Love My Pets Grab and Go Box. It doesn't have a name to the stamp, but it is marked, "Pets 2." Since Valentine's Day is approaching, I made a Valentine's MemoryDex card to display.

I first stamped the image, colored it with Copic markers, then cut it out using the coordinating outline die. 

Copic Colors Used:
Skin: E04, E11, E21, E00, E000
Cheeks: R21
Tongue: R21, R20
Hair: E49, E47, E44, E43, E41
Blue: B99, B95, B93, B91
Red: R59, R37, R24, R22
Green: YG17, YG07, YG05, YG03
Black: T9, W6

Stamp Anniething Products Used:
-Love Me Love My Pets - Paw Print Heart Edger Die
-Love My Pets Paper Pack
-Love is in the Air Paper Pack
-Edger Dies
-Enamel Dots

I cut a piece of patterned paper 4" x 4-1/4" then used the Edger Dies to create the holes on the bottom and the tab on the top. I used the Paw Print Heart Edger Die to cut out a decorative border using red cardstock that is available in the Grab and Go Box. I also used this die to cut out hearts from different patterned paper and inlaid the hearts. Then I used other patterned papers to decorate the card. I stamped and trimmed the sentiment and added it to the tab. To finish the card, I added a few enamel dots.
I really enjoyed making this MemoryDex card. I'll be making more in the future to add to my holder. Thank you for stopping by and have a creative day! 


Sunday, January 16, 2022

Paper Nest Dolls & Cheri's Digital Art Collaboration Stamp: Best Friends Forever

Yesterday we celebrated Paper Nest Dolls' 9th Birthday and for reaching 6000+ members in their Facebook Inspiration Group. One of the give-aways was a digital stamp created by Paper Nest Dolls in collaboration with Cheri's Digital Art called Celebration. What a cute and fun stamp that you can use for many occasions by creating your own sentiment. I added the sentiment, Best Friends Forever for my BFF! Perfect for a Galentine's Day card. 

Happy Birthday and Congratulations to Paper Nest Dolls (link to FB inspiration group) for reaching two milestones and to Cheri's Digital Art (link to FB inspiration group) for starting her new digital stamp business!


I printed this digital stamp at 3-1/2 inches tall to fit on a A2 size card. I wanted to make a clean and simple card so I designed it in Microsoft Publisher then printed it on a laser printer and it was ready to color with my Copic markers.

Copic Markers Used:
Doll #1
Skin: E13, E11, E21, E00, E000
Cheeks: R21
Eyes: B02, B01, B00
Hair: E49, E47, E44, E43, E41
Glasses: BG000
Purple: V17,V15, V12

Doll #2
Skin: E04, E11, E21, E00, E000
Hair: E18, E08, YR18, YR14
Blue: B06, B04, B02, B00
White: C5, C3, C00, 0

Heart/Pink: R85, RV34, R83, V01

Ground/Gray: T5, T3

After coloring the image, I trimmed it and adhered a black cardstock mat under it then adhered it to the top-folding A2 card base. To finish the card, I added highlights to the heart with a white gel pen. 


I hope you give this cute card a try! Thank you for stopping by and have a creative day! 


Tuesday, January 11, 2022

Conie Fong Art & Design: Gnome with Balloons Bundle

It's the perfect time to get those Valentine's Day cards started! I love making my cards using digital stamps that are cute and easy to color, just like this new release by Conie Fong Art & Design called Gnome with Heart Balloon Without Grass from the Gnome With Balloons Bundle. This bundle comes with many different images, another one with a round balloon, and options with or without grass, plus several sentiments! This set has 4 character images and 5 sentiments and it's on sale for only $3!!


I wanted to make a slimline card and wanted the gnome to be floating in some clouds so I designed the card in Microsoft Publisher. I then printed it and colored the gnome with Copic markers and accented it with a white gel pen.


Copic Markers Used:
Skin: E11, E21, E00
Gray: T5, T3, T1
Red: R39, R35, R32, R30

After coloring the gnome, I used a white gel pen to add hearts and dots to the balloon and hat. I also added dots to his outfit.


I used masking paper to cover the gnome and then used a clouds stencil and Distress Oxide inks in Spun Sugar to create the background and the card was done. Fast and simple! I hope you give this card a try!


Thank you for stopping by and have a creative day! 


Sunday, January 9, 2022

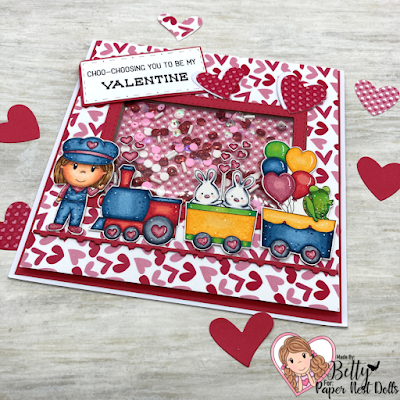
Paper Nest Dolls: Choo-Choosing You to be my Valentine Shaker Card

Besides Christmas cards, my favorite cards to make are Valentine's Day cards. It's because I love the colors of red and pink and I love hearts! Today's card is using Paper Nest Dolls' newest release called Love Train. It's a set with 8 adorable images! This set comes in digital and in red rubber. I used the digital set so that I can make it the size I want for this 6x6 square card. 


I printed the images and colored them with Copic markers. I then fussy cut each one out, even the little hearts! 


Copic markers used:

Conductor
Skin: E04, E11, E21, E00, E000
Cheeks: R20
Hair: E37, E35, E33, E31
Blue: B97, B95, B93, B91
Pink: R85, R83, RV11

Engine
Red: R37, R35, R32
Blue: B97, B95, B93, B91
Pink: R85, R83, RV11
Black: C7, C5, C3, C1

Rabbits
White: C5, C3, C1, 0
Green: G09, YG06, YG03
Yellow: Y38, Y35, Y32
Pink: R85, R83, RV11
Black: C7, C5, C3, C1

Frog with Balloons
Green: G09, YG06, YG03
Brown: E35, E31
Yellow: Y38, Y35, Y32
Pink: R85, R83, RV11
Black: C7, C5, C3, C1


Supplies used to make the card:
  • Patterned paper from Stamp Anniething
  • Shaker sequins from Hobby Lobby
  • Shaker sprinkles from Stamp Anniething
  • Shaker dies from Stamp Anniething
  • Heart dies from Cricut Cuttlebug
  • Train track from Local King Rubber Stamp
  • Sentiment is created on my computer and printed, then cut using a die from C.C. Designs

Thank you for stopping by and I hope you have a wonderful and crafty day! 


Monday, December 20, 2021

Stamp Anniething: Hey Valentine You Drive Me Wild!

Now that I am finished with my Christmas cards, it's time to start making some Valentines cards. For my design team day at Stamp Anniething, where I get to use stamps and products of choice, I made this Valentine's card using the adorable stamp called, William-You Drive Me Wild! I wanted to show that there are many stamps that aren't particularly Valentine's stamps, but you can still use them for Valentine's theme projects. 


Additional products used are: 

I first stamped the image on white cardstock, colored it with Copic markers, then cut it out using the coordinating outline die.


Copic Markers Used:
Skin: E04, E11, E21, E00, E000
Cheeks: R20
Tongue: R22, R20
Hair: E29, E25, E23, E21
Red: R39, R37, R35, R32
White: T5, T3, T1, 0
Silver/Gray: T5, 53, T1

To create the scene for this slimline card, I first cut out all the die pieces. I cut out two sets of the racing flags, and flipped one so that I can cross them on my card. I used a stitched hill die from my stash to cut out the race track out of black cardstock. Since the die is only 6" long, I cut out two pieces and attached them. I used a white gel pen to create the line on the track.

I created the "Hey Valentine" sentiment on my computer and printed it on white cardstock. I then stamped the "you drive me wild!" sentiment and cut out both sentiments using one of the banner dies. 


I then used one sheet of the 6x6 patterned paper and 1-1/2" strips to place behind the race track. Since the paper is only 6x6, I cut out two pieces per side and attached them. I trimmed off the excess to to leave about 1/8" border showing on the card base. 

To finish the card, I die cut a red and white heart from an old Cricuit Cuttlebug die. I hope you give this card a try! It's so fun to make Valentine's cards!


Thank you for stopping by today! Have a great holiday and have fun crafting!


Monday, January 25, 2021

Rachelle Anne Miller: Owl Be Your Friend Valentine's Day Card

Owls are symbols of wisdom, knowledge, protection, change, and transformation.  Owls are very common where I live (Northern California). Behind my house is a nursing facility where there are many palm and redwood trees. The owls like to nest in these trees so I hear and see them quite often. The baby owls are quite cute, just like these two from Rachelle Anne Miller's digital stamp called Owl Be Your Friend. Aren't they just adorable and perfect for a Valentine's Day card?

There is still time to enter the monthly challenge over at the Rachelle Anne Miller Digital Stamps fan page. All entries must be submitted by January 28. Join us and you may win a free stamp! Click here for all the details: Monthly Challenge.


The digital stamp is colored with Copic markers (colors listed below). I printed the sentiment from my computer. I used pattern papers from Crate Paper. I've had them in my stash for quite awhile.


Copic Markers Used:
Owl-Dark Brown: E37, E35, E34, E31
Owl-Light Brown: E42, E41, E40
Branch: E47, E44, E43
Leaves: YG97, YG17, YG13
Pink: RV14, RV13, RV11


I used a circle die from Stamp Anniething to cut out the owls and used the frame die to cut the white glitter paper for the circle frame. I used heart dies from Cricut and branch dies from Gina Marie Designs to embellish the card. I added a few pink enamel dots to finish the card.

Thank you for stopping by and I hope you give this card a try! It doesn't have to be just for Valentine's Day. This is a versatile stamp and can be used for many occasions. Have a wonderful day! 


Wednesday, January 20, 2021

Conie Fong Art & Design: Happy Valentine's Day Slimline Card

Most of my friends and family know that I love the color red. In the Chinese culture, red symbolizes luck, happiness, and joy. Red is the color I love for Valentine's Day cards. Today I am sharing a card made with Conie Fong's cute digital stamp, Bella Sending You Smiles.  


I colored her dress, tulips, and balloon in red using Copic markers (colors listed below). After I colored her, I fussy cut her out leaving a small white border. I stamped "Crazy 4 U" onto the balloon. This stamp is from Stamp Anniething.


Copic markers used:
Red: R59, R39, R24, R35, R22, R20, R30
Green: G28, YG67, YG63, YG03, YG11, RV42
White: T5, T3, T1, Blender
Bear's Cheeks: E93

The size of this slimline card is 3-1/4"W x 7-3/4"H. I used slimline rectangle dies and slimline scallop frame die from Stamp Anniething. I used gold cardstock for my mat and paint splattered it with black, red, and white acrylic paints. I cut out some red and white hearts for embellishments. I used MS-Word to type the sentiment and printed it on cardstock then cut it out using my paper trimmer. I added a red mat under the sentiment.

Bella and the sentiment are adhered to the card using foam squares. The rest of the elements are glued down flat.

This stamp is versatile and can be used for many occasions. All you have to do is change the sentiments. Fun and easy card to make. 


Thank you for stopping by and I hope you give this card a try. Have a wonderful day!


Sunday, January 17, 2021

Paper Nest Dolls: Raccoon Smooch

Valentine's Day cards are my favorite cards to make. I love using hearts and red is my favorite color. I am using one of my favorite stamps from Paper Nest Dolls called Raccoon Smooch. This stamp comes in a set of three stamps in red rubber or you can buy this particular one in digital format. 


I used Copic markers to color this stamp. So easy to color since it's only two color blends, gray and red! Colors are listed below.


Copic markers used:
Gray: W6, W5, W4, W3, W1, Blender
White: W3, W1, Blender
Red: RV17, RV14, RV13, RV11

This is a 6" x 6" card. I matted this card with patterned paper that I've had in my stash for years. I used heart dies and cut out a few different size hearts, a bow die, and a paper doily. No bow die? Just use ribbon. I typed up the sentiment, Hugs & Kisses, using MS-Word and printed it out. 


A fun, quick, and easy card to make and mass produce and the stamp makes it the cutest Valentine's Day card! Thank you for stopping by today. Have a great day! ~Betty~

Sunday, January 10, 2021

Conie Fong Art and Design: Mini Valentines Cards

Now that Christmas is over, it's time to start on your Valentine's cards! I've come up with some mini size cards, but they are still large enough to meet the minimum size requirements of the United States Post Office (USPS). The envelope size is 5"W x 4"H and the minimum for USPS is 5"W x 3-1/2"H. 

I used three of Conie Fong's adorable bears to make these cards. They can be found in her Etsy shop: 1) Sweetheart Bella with Love, 2) Bella with Rose, and 3) Sunflower Bella.

I wanted to experiment with three water color pens to see how they would come out using Bristol paper. I used: 1) Arteza Real Brush Pens for Sweetheart Bella with Love; 2) Spectrum Noir Aqua Tints for Bella with Rose; and 3) Zig Clean Color Real Brush Pens for Sunflower Bella.

It was really hard to decide which pens I liked the best since they were all so similar.  I have the 60 pack of the Zigs, 48 pack of Artezas (gift from my son), and 3 packs of 3 (9 markers) of Spectrum Noirs (a prize I won). The Zig pens have a much smaller brush tip, so it's nice for the small details, but the Artezas and Spectrum Noirs are great for the larger areas. It was a fun experiment and I think all the bears came out great!


Now for the sizes of these mini cards. These cards are 3"W x 4-1/4"H. First cut the card base 3"W x 8-1/2" and score at 4-1/4" and fold in half (top folding card). 

Next, using patterned paper, cut one at 3"W x 4-1/4"H.

Optional:  I used the rectangle die from Stamp Anniething's Shaker Basics Set 1 to cut out the frame for the card. You can also cut strips of paper to make the frame or use washi tape.

Use dies or punches to cut out various sizes of hearts using patterned and plain papers. Use a small sentiment to add to a heart. My hearts are from the set made by Cricut called Stars and Hearts.

Adhere all the pieces as you wish. I used foam squares for the bears and the heart with the sentiment. 


I hope you give this card a try. It's fast and easy to mass produce! Thank you for visiting today and have a wonderful week.