Sunday, June 23, 2024

Scrappy Boy Stamps: June 2024 New Release

Have you had a chance to check out Scrappy Boy Stamps' June 2024 new release? Fabulous stamps, stencils, dies, and papers to add to your collection. Last week I shared five projects and today I have three more to share from the following stamp sets: 
  • The French Chef 
  • Cute Kids Pirates 
  • Once Upon a Time Series: Never Grow Up
Cute and fun stamps for making cards, scrapbooks, mini-albums, tags, bookmarks, party favors and more! 

Project 1: The French Chef - Bon Appetit


This unique stamp set was inspired by one of America's favorite TV French cooking personalities. She was featured in a TV series that explored her life during her cooking show. An awesome set for your collection. The coordinating paper pack is just beautiful! 

Scrappy Boy Stamps products used:
  • The French Chef stamps and outline dies
  • The French Chef paper pack
  • Retro TV Die
  • Memory Dex Essentials (Heart Dies)


Supplies used:
  • A6 white card base
  • Sage green cardstock for mat
  • Light gray cardstock for Retro TV Die
  • Silver glitter cardstock for parts of Retro TV Die

Copic markers used:
  • Skin: E04, E11, E21, E00, E000
  • Cheeks: R20
  • Lips: R29, R24
  • Hair: E59, E57, E55, E53
  • Green: BG99, BG96, BG93 BG90
  • Yellow: Y17, Y15
  • Brown (turkey): E35, E33, E31,E30
  • Silver (platter): N5, N3, N1
  • Table: E47, E44, E42


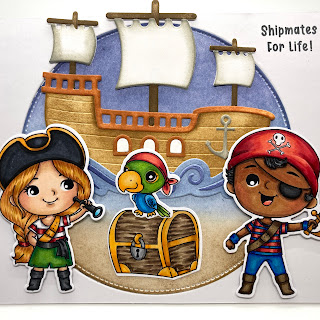
Project 2: Cute Kids Pirate - Shipmates for Life


I am having lots of fun with the Cute Kids Pirates stamp set! I love that it has both boys and girls pirates. The Cute Kids Pirates coordinates so well with the previously released Pirates Ship die.

Scrappy Boy Stamps products used:
  • Cute Kids Pirates stamps and dies
  • I Love Pirates paper pack
  • Pirate Ship Die
  • Stitched Circles Die

Supplies used:
  • A6 white card base
  • White cardstock mat
  • White Bristol or watercolor paper for background
  • Distress Inks:
    • Wood parts of ship: Brushed Corduroy, Rusty Hinge, Walnut Stain
    • Ship sails and anchor: Pumice Stone
    • Sky and waves: Stormy Sky and Sapphire
    • Sand: Vintage Photo

Copic markers used:

Girl
  • Skin: E04, E11, E21, E00
  • Cheeks: R20
  • Hair: E99, E97, YR23, YR21
  • Black: 100, C7, C5
  • Green: G17, YG17, YG13,YG03
  • White: N3, N1,0
  • Yellow: E23, Y38, YR21
  • Blue: B00, B01
Boy
  • Skin: E59, E25, E33, E13
  • Tongue: R22, R20
  • Cheeks: E95
  • Hair: 100, N7,N5, N3
  • Blue: B18, B16, B14
  • Red: R39, R37, R35, R32
  • Yellow: E23, Y38, YR21
  • Brown: E47, E44, E43
  • Sword: N5, N3, N1
Parrot
  • Yellow: Y38, Y35, Y32
  • Red: R37, R35, R32
  • Blue: B16, B14, B12
  • Green: YG17, YG13, YG03
Treasure Chest
  • Gold: E31, Y38, Y35, Y32
  • Red: R37, R35, R32
  • Blue: B16, B14, B12
  • Green: YG17, YG13, YG03

Project 3: Never Grow up - Hope your birthday is off the Hook


This card is using stamps from the Never Grow Up stamp set, which was inspired by the fictional boy who can fly and never grow up. I used the coordinating Neverland Paper Pack and the Torn Stitched Tags to create this masculine birthday card.

Scrappy Boy Stamps products used:
  • Never Grow Up stamps and outline dies
  • Neverland Paper Pack
  • Torn Stitched Tags dies

Supplies used:
  • A6 white card base
  • Blue cardstock for mat, tag, sentiment
  • White cardstock scrap for sentiment
  • 1/4" blue satin ribbon


Copic markers used:

Alligator
  • Green: YG17, YG13, YG11, YG03
  • Light green: E84, YG93, E81
  • Black: N7, N5, N3
  • Pink (Tongue): R22, R20
  • White: N1, 0
Hook
  • Skin: E04, E11, E21, E00
  • Cheeks and tongue: E93
  • Hair: N9, N5, N3
  • White: N3, N1, 0
  • Purple: BV08, BV04, BV02
  • Gold/yellow: Y38, Y35, Y32
  • Light yellow: Y19, Y15, Y13
  • Red: R56, RV34, RV32
  • Brown: E37, E35, E33
  • Silver: N3, N1
  • Feather: V95, V93, V91
Smee
  • Skin: E04, E11, E21, E00, E000
  • Cheeks and tongue: E93
  • Glasses: B91
  • Hair: N3, N1
  • Red: R29, R24, R22
  • Shirt: gray-N5, N3, N1; blue-B97, B95, B93
  • Shorts: B97, B95, B93, B91
  • White: N3, N1, 0
  • Bottle: B91, B0000
  • Tray: B97, B95, B93, B91
  • Red: R24, R22,R21
  • Pink: R22, R21

Such a fun and fabulous new release! I hope you give these projects a try!
Thank you for stopping by. Have a creative day!


Saturday, June 22, 2024

Stamp Anniething: Happy 4th of July Inspiration Card

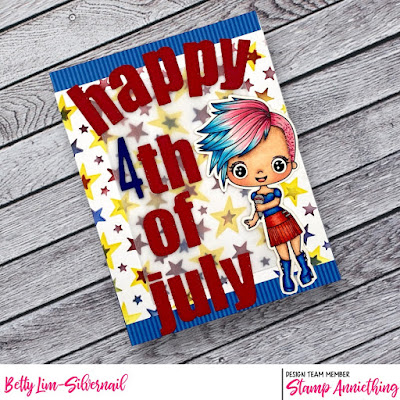
It's time to get ready for the 4th of July (Independence Day) here in the USA. I don't make a lot of cards to send, but I do make a few to decorate my house. Today's card features the beautiful stamp, Jett - You Make My Heart Sing from Stamp Anniething. She's kicking off the 4th of July celebration by rocking out some songs!


Stamp Anniething products used:
  • Jett - You Make My Heart Sing stamp and outline die
  • When Stars Align stencil from August 2023 Stencil Club
  • Annie's Alphabet
  • Shaker Basic Set #1 (rectangle die)
  • Hybrid Inks in Aspen Gold, Celestial, Crimson
  • Stripes and Dots paper pack (retired)
Supplies used:
  • A2 white card base
  • A2 White cardstock for stenciling
  • Red cardstock 
  • Blue cardstock (small scrap)
  • Number 4 die (I used Sizzix Thinlets Alphanumeric Lowercase dies)
  • Transparent vellum
  • Red and silver gel pens for microphone and buckles


Copic markers used:
  • Skin: E04, E11, E21, E00, E000
  • Hair: RV17, RV14, RV13, RV11, B06, B04, B02, B00
  • Blue: B28, B24, B21
  • Red: R46, R24, R21

This is a fun and easy card to put together.  
  1. Trim two pieces of patterned paper at 4.25" x 1" and adhere to the top and bottom of the card base.
  2. Stencil the stars onto the white cardstock with hybrid inks (in the order listed above). Trim 1/2" from the top and bottom and adhere to the card base.
  3. Using the rectangle die from Shaker Basic Set #1, die cut the vellum then adhere to the card front with double-sided tape or a tape runner (don't use liquid glue). I put the tape only on the corners of the vellum so it wouldn't show.
  4. Adhere the Jett stamp onto the card as shown.
  5. Die cut the "Happy 4th of July" sentiment and adhere to the card as shown.

Thank you for stopping by. Wishing you a very Happy 4th of July!

Wednesday, June 19, 2024

Scrappy Boy Stamps: Sneak Peeks June 2024 #2

This is blog post #2 of the June 2024 Scrappy Boy Stamps sneak peeks. If you haven't seen post #1, here is the link: POST #1. I am sharing two projects in this post using two of the new dies: 1) Mouse Ears Mini Album Die and 2) 3D Box Card Die.

I will have more to share in the next few weeks. There is so much being released this month, so make sure you are a member of the Scrappy Boy Stamps Inspiration Group to see all projects created by the amazing design team! This month's new release will be available Friday, June 21, 2024.

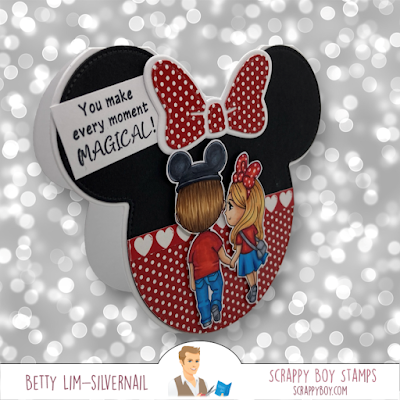
Project 1: Mouse Ears Card


I made a top folding card using the Mouse Ears Mini Album Die. It is so quick and easy to make using black cardstock and patterned paper. I just made a basic card and added a colored stamp. 


Scrappy Boy Stamps products used:
  • Mouse Ears Mini Album Die
  • Cute Girls Dating Digital Stamp
  • I Love Games Paper Pack
  • I Y'am What I Y'am Paper Pack
  • Sentiment from Briar Rose stamp set
Supplies used:
  • White cardstock
  • Black cardstock

Copic markers used:

Boy
  • Skin: E04, E11, E21, E00
  • Cheeks: E93
  • Hair: E59, E57, E55, E53
  • Black Mouse Ears: C9, C7, C5, C3
  • Red: R39, R46, R24
  • Blue: B16 B14, B12
  • Gray: C5, C3, C1
Girl
  • Skin: E04, E11, E21, E00
  • Cheeks: E93
  • Hair: E99, E97, YR21, Y21
  • Red: R39, R46, R24
  • Blue: B16 B14, B12
  • Gray: C5, C3, C1

Project 2: 3D Box Card


Scrappy Boy Stamps products used:
  • 3D Box Card die
  • Cute Kids Pirates stamps and outline dies
  • I Love Pirates Paper Pack
  • Waves from the Pirate Ship die
Supplies used:
  • White cardstock
  • Distress Inks in Stormy Sky and Chipped Sapphire for the waves
Copic markers used:

Pirate
  • Skin: E04, E11, E21, E00
  • Cheeks: R20
  • Hair: E99, Y38, YR21
  • Yellow: Y38, Y35, Y32
  • Black: N9, N7, N5, N3
  • Red: R37, R35, R32
  • Blue (Telescope): B01, B00
  • Blue (Pants): B97, B95, B93, B91
Treasure Chest
  • Gold: E31, Y38, Y35, Y32
  • Red: R37, R35, R32
  • Blue: B16, B14, B12
  • Green: YG17, YG13, YG03
Map
  • Tan: E53, E51, E50
  • Red: R35
  • Blue: B16
  • Yellow: YR23
  • Red: R35
  • Gray: N5
  • Green: YG13
Palm Tree
  • Brown: E59, E57, E55, E53
  • Dark Green (bushes): G28, G46, G24, G21
  • Purple: V28, V25, V22
  • Light Green (palms): G28, G17, G24, G21
Parrot
  • Yellow: Y38, Y35, Y32
  • Red: R37, R35, R32
  • Blue: B16, B14, B12
  • Green: YG17, YG13, YG03

These two dies were easy to put together. Easy to mass produce if you need to make several at the same time. Give it a try! 

Thank you for visiting. Have a creative day! 

Scrappy Boy Stamps: June 2024 Sneak Peeks #1

Welcome to the June 2024 Scrappy Boy Stamps sneak peeks! I have so much to share today so I'll be splitting my shares into two blog posts. I will share the 3 card projects here and 2 die builder projects in Post #2. 

I will have more to share in the next few weeks. There is so much being released this month, so make sure you are a member of the Scrappy Boy Stamps Inspiration Group to see all projects created by the amazing design team! This month's new release will be available Friday, June 21, 2024. Here's a list of the new release:
  • The French Chef 
    • 6x8 Stamp & Outline Dies
    • 6x6 & 4x9 paper packs
    • Background Stencil
    • Colored Die Cut Pieces
  • Cute Kids Pirates 
    • 6x8 Stamp Set & Outline Dies
    • I Love Pirate Ships Layered Background Stencils
    • I Love Pirates 6x6 Paper Pack
    • Colored Die Cut Pieces
  • Once Upon a Time Series: Neverland & Never Grow Up
    • Neverland 6x8 Stamp & Outline Dies
    • Never Grow Up 6x8 Stamp & Outline Dies
    • Scene Builder Stencil
    • 6x6 paper pack
    • Colored die cut pieces
  • Dies
    • 3d Box Card
    • Mouse Ears Mini Album
    • Gift Card Add On (Mouse ears and hands)
    • Vintage Camera Mini Album
Project 1: The French Chef


This stamp set was inspired by one of America's favorite TV French cooking personalities. This French chef was featured in a comedy drama TV series that explored her life during her decade-long cooking show. Scrappy Boy Stamps' new release is based on this TV show and it's the only stamp set around! A fun, cute, and unique set for your collection. 

Scrappy Boy Stamps products used:
  • The French Chef stamps and outline dies
  • The French Chef Background Stencil
  • The French Chef 6x6 Paper Pack
  • Stitched Circle Dies
Supplies used:
  • Distress Inks in Bundled Sage and Faded Jeans for stenciling
  • 6x6 white card base
  • Blue cardstock mat
  • White cardstock scrap for sentiment

Copic markers used:

Woman 1
  • Skin: E04, E11, E21, E00, E000
  • Cheeks: R20
  • Lips: R29
  • Hair: E99, E97, YR23, Y11
  • Coat: BG99, BG96, BG93, BG90
  • Purse, Shoes & Belt: N7, N5, N3
  • Shirt, Gloves: N3, N1, 0
  • Purse items: Brown E57, E55, E51; Green G07, G03
Woman 2
  • Skin: E27, E25, E23, E13
  • Lips: R29, R24
  • Cheeks: R32
  • Hair: C9, C7, C5, C3
  • Dress: R22, R32, R21, R20
  • Earrings: R32
  • Clipboard: E35, E33, E31, N3
  • Watch: B91, N3
  • Pen: E37
  • Shoes: R22, R21
Man
  • Skin: E04, E11, E21, E00, E000
  • Cheeks: E93
  • Glasses: B00
  • Hair: E57, E55, E51
  • Shirt: E35, E33, E31
  • Suit: E37, E35, E33, E31
  • Vest & Tie: E44, E42
  • Shoes & Camera: N5, N3, N1
Fish
  • Platter: N5, N3, N1
  • Fish: YR27, YR23, YR21, YR31
Cookbook
  • White: N3, N1, 0
  • Blue: B97, B93, B91

Project 2: Cute Kids Pirates


I love this new Cute Kids Pirates stamp set since it has both girls and boys pirates! I used the coordinated pirate ship layering stencil set to create this easy background. The Cute Kids Pirates could also be coordinated with the previously released A Pirate's Life papers, stencil, and Pirates Ship die.

Scrappy Boy Products used:
  • Cute Kids Pirates stamps and dies
  • 6x8 Stamp Set & Outline Dies
  • I Love Pirate Ships Layered Background Stencils
  • Stitched oval die

Other supplies used:
  • A6 white card base
  • Black cardstock mat
  • White cardstock for stencil
  • Black and white cardstock scrap for sentiment
  • Translucent vellum

Copic markers used:

Boy
  • Skin: E25, E23, E13, E11
  • Cheeks and tongue: R22, R20
  • Hair: N7, N5, N3
  • Yellow: Y38, Y35, Y32
  • Black: W9, W7, W5, W3
  • Green: G17, YG17, YG13, YG03
  • Brown: E47, E44, E43
  • Map: YR27,YR23, YR21
  • White: N3, N1
Girl
  • Skin: E04, E11, E21, E00
  • Cheeks and tongue: R20
  • Hair: E59, E57, E55, E53
  • Blue: B18, B16, B14, B00
  • Gray: N5, N3, N1
  • Brown: E47, E44, E43, E42
  • Gold: E23, Y38, YR21
  • White: N1, 0
Palm Tree
  • Brown: E59, E57, E55, E53
  • Dark Green (bushes): G28, G46, G24, G21
  • Purple: V28, V25, V22
  • Light Green (palms): G28, G17, G24, G21
Treasure Chest
  • Gold: E31, Y38, Y35, Y32
  • Red: R37, R35, R32
  • Blue: B16, B14, B12
  • Green: YG17, YG13, YG03
Map
  • Tan: E53, E51, E50
  • Red: R35
  • Blue: B16
  • Yellow: YR23
  • Red: R35
  • Gray: N5
  • Green: YG13


Project 3: Neverland and Never Grow Up


There are two stamp sets that were inspired by the fictional boy who can fly and never grow up: 1) Neverland and 2) Never Grow Up. One of my favorite childhood stories has come alive with these awesome stamp sets! So fun to create some amazing projects. 

Scrappy Boy Stamps supplies used:
  • Neverland 6x8 Stamp & Outline Dies
  • Never Grow Up 6x8 Stamp & Outline Dies
  • Neverland Scene Builder Stencil

Supplies used:
  • 6x6 white card base
  • 6x6 black cardstock mat
  • 5.5x5.5 white Bristol cardstock or watercolor paper
  • Black cardstock scrap for sentiment
  • Distress Inks in Salty Ocean, Faded Jeans, Chipped Sapphire, Stormy Sky, Black Soot for ink smooshing background (Black Soot also for inking in the building of the stencil)
  • Watermark ink pad
  • White embossing powder (for stars from the stencil) and sentiment

Copic markers used:

Flying boy
  • Skin: E04, E11, E21, E00
  • Cheeks: R20
  • Tongue: R20
  • Hair: E37, E08, YR18, YR14
  • Light Green: YG17,YG13,YG11, YG03
  • Dark Green: G17, G14, G12
  • Red (Feather): R27, R24, R22
  • Brown: E37, E35, E33
Fairy
  • Skin: E04, E11, E21, E00
  • Cheeks: R20
  • Lips: R29
  • Hair: YR27,YR23, Y11
  • Blue: BG02, BG01, BG000
  • Green: YG17,YG13, YG03
Bear
  • Brown: E55, E53, E51
  • Blue: B16, B12
  • Pink: R83
Baby Boy
  • Skin: E04, E11, E21, E00
  • Cheeks: R20
  • Hair: YR24, YR23, Y21
  • Pink: R85, R83, R81
  • Blue: B16, B14, B12
Girl
  • Skin: E04, E11, E21, E00
  • Cheeks: R20
  • Hair: E59, E57, E53
  • Lips: R29, R22
  • Blue: B16, B14, B12
  • Pink: R85, R83, R81
Boy
  • Skin: E04, E11, E21, E00
  • Cheeks: R20
  • Hair: E57, E55, E53
  • Blue: B16, B14, B12
  • White: C3, C1, 0
  • Black: C7, C5, C3
  • Brown: E55, E53, E51

I hope you enjoyed these projects and give them a try! I will have lots more inspiration to share in the next few weeks, so please come back often.


Thank you for stopping by. Have a creative day!


Friday, June 14, 2024

Stamp Anniething Sneak Peek Day 3: Vegas Wedding Card

Welcome to Day 3 and the final day of Stamp Anniething's sneak peeks! I have one more Vegas-themed card to share. Many people choose Las Vegas to get married since it's a quick and easy process that requires minimal paperwork, no waiting period, and no need for blood tests. Plus there are many places to hold the celebration. Today's card is perfect for a Vegas wedding. It features the beautiful Jay and Maya Congratulations stamp, Vegas baby word die, and cut outs using the Poker Chip Stencil

I also used the previously released Balcony Builder die to set the scene. For the background, I embossed the cardstock using a stencil from the December 2022 Stencil Club. 

Stamp Anniething products used:
  • Jay and Maya Congratulations stamp and outline die
  • Vegas baby word die
  • Poker Chip Stencil
  • Balcony Builder die
  • Stencil from December 2022 Stencil Club (or use any floral stencil of choice)
  • Sentiment Strips
Supplies used:
  • 6 x 6 white card base
  • 5-3/4 x 5-3/4 lavender cardstock mat
  • 5-1/2 x 5-1/2 white cardstock for embossed background
  • 6 x 5 white cardstock for Balcony Builder die
  • Black cardstock, lavender glitter cardstock, white glitter cardstock scraps for word die
  • Distress inks for Poker Chip Stencil in Blueprint Sketch, Barn Door, Lucky Clover
  • White pigment ink (I used Stampin' Up Whisper White)
  • 3/4" circle punch to punch out poker chips

Copic markers used:

Jay
  • Skin: E04, E11, E21, E00, E000
  • Cheeks: E93
  • Tongue: R22, R20
  • Hair: E59, E57, E55, E53
  • White: N1, 0
  • Black: N9, N7, N5, N3
Maya
  • Skin: E04, E11, E00, E50
  • Cheeks: R20
  • Tongue: R22, R20
  • Hair: YR23,Y26, YR31
  • Purple: BV25, BV34, V93, V91
Bouquet of flowers
  • Purple: VB25, BV34, V93, V91
  • Green: YG17, YG03
  • Red: R29, R24, R32

Instructions:
  1. Using a die cutting machine, emboss the 5-1/2 x 5-1/2 white cardstock using any floral stencil you may have. Adhere to the lavender cardstock mat.
  2. Using the 6 x 5 white cardstock, cut out the balcony using the Balcony Builder die. Adhere to the stenciled background, leaving the bottom center unglued so the Jay and May stamp can be inserted.
  3. Using the black, lavender glitter, and white glitter cardstock, cut out the Vegas baby word die. Place onto the card, but don't adhere just yet.
  4. Create the poker chips by using Distress inks and the Poker Chip Stencil. Cut them out using a 3/4" circle punch.
  5. Arrange the poker chips and word die as shown then adhere to the card.
  6. Adhere the bouquet of flowers as shown.
  7. Using a Sentiment Strip die cut, stamp the sentiment, trim and adhere to the card as shown.


I hope you all love this new release as much as I do! All products from the sneak peeks are now available at the Stamp Anniething webstore

Thanks for stopping by. Have a creative day!

Thursday, June 13, 2024

Stamp Anniething Sneak Peek Day 2: What Happens in Vegas...

Welcome to Day 2 of Stamp Anniething's June 2024 sneak peeks where the theme is all about Las Vegas! More commonly known as just Vegas, it's a city full of nightife, entertainment, food, and gambling! I've been there many times and each time I go, there's something new to see and experience. One of my favorite things to do in Vegas is to play the slot machines so I was so excited when Stamp Anniething came out with this Slot Machine Builder Die! Vegas is well-known for big-name entertainers with glitzy beautiful clothes and big hair, just like this gorgeous stamp, Betsy - What Happens in Vegas. Such a fun set for all you Vegas fans!

Stamp Anniething products used:
  • Betsy - What Happens in Vegas stamp and outline die
  • Slot Machine Builder Die
  • Basket Weave Stencil
  • Sentiment Strips
Supplies used:
  • A6 white card base (6-1/4"W x 4-1/2")
  • Black Cardstock for mat (6-1/4"W x 4-1/2")
  • Bristol or watercolor cardstock to create ink smooshed background (6"W s 4-1/4"H)
  • Bristol or watercolor cardstock to create stenciled panel (4-3/8"W x 3-5/8")
  • Scrap cardstock in Gray, White, Black
  • Scrap glitter cardstock in Turquoise, White, Lime Green, Red
  • The Crafter's Workshop Stencil Butter in Turquoise
  • Distress Ink in Peacock Feathers

Copic markers used:
  • Skin: E23, E13, E11, E21
  • Cheeks: RV20
  • Tongue: R22,R20
  • Lips: R29
  • Hair: E18, E08, YR18, YR14
  • Clothes & earrings: BG49, BG45, BG23 +White gel pen
  • Shoes: N7, N5, N3

Instructions:
  1. Create the ink-smooshed background with the Bristol or watercolor cardstock and Distress Ink in Peacock Feathers. Adhere to the black cardstock mat.
  2. Create the stenciled panel using the Basket Weave Stencil and Stencil Butter. Make sure the Stencil Butter is completely dried then adhere to the ink-smooshed background. I waited a couple of hours.
  3. Cut out the Slot Machine Builder Die and assemble. Adhere to the stenciled panel.
  4. Stamp and trim the sentiment. Adhere to the stenciled panel.
  5. Adhere the Betsy image with double-sided foam tape to look as she is sitting on the sentiment strip.
  6. Adhere the finished card front onto the card base.


Thank you for stopping by! Please come back for Day 3 of sneak peeks! Have a creative day.


Wednesday, June 12, 2024

Stamp Anniething Sneak Peek Day 1: Vegas Baby!

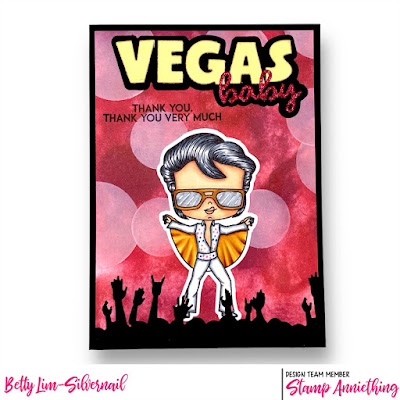
Welcome to Day 1 of Stamp Anniething's June 2024 sneak peeks! This month's theme is all about Las Vegas, often called just Vegas. Today's card features one of the biggest music stars, the King of Rock and Roll, the handsome Elvis! This card showcases the Elvis - Thank You, Thank You Very Much stamp and the Vegas baby bold word die. I used the Concert Stage Builder Die from a prior release to create the scene. Fabulous stamp for all you Elvis fans like me!

Stamp Anniething products used:
  • Elvis - Thank You, Thank You Very Much Stamp and Outline Die
  • Vegas Baby Word Die
  • Concert Stage Builder Die
  • Multi-layered Circles Stencil from February 2024 Stencil Club
  • Hybrid Inks in Chili Peppers, Crimson, Merlot
  • Awakening Glitter Paper Pack (retired)
Supplies used:
  • A6 white card base (4-1/2"W x 6-1/4")
  • Black Cardstock for mat (4-1/2"W x 6-1/4")
  • Black cardstock scrap for Concert Stage Builder Die
  • White cardstock to create bokeh background (4-1/4"W x 6"H)
  • Stampin' Up White Pigment Ink (use any white pigment ink)


Copic markers used:
  • Skin: E04, E11, E21, E00, E000
  • Cheeks: E93
  • Hair: 100, C7, C5, C3
  • Lips: 395, E93
  • Glasses: E23, Y38, YR21, C3,C1
  • Gold Cape: YR27, YR24, YR23, YR21
  • White clothes & shoes: C5, C3, C1
    • Dots on clothes: Arteza Glitter Gel Pens in red, blue, yellow

Instructions:
  1. Apply the three shades of Hybrid Inks (listed above) using a blending brush making sure that it's a little lighter towards the bottom. 
  2. Use the white pigment ink and solid circles stencil from the Multi-layered Circles Stencil to ink up circles. I used a heat gun to quickly dry the pigment ink.
  3. Cut out the Vegas Baby word die and adhere to the top of the card front
  4. Cut out the "hands" from the Concert Stage Builder and adhere to the bottom of the card front.
  5. Stamp the sentiment directly onto the card front.
  6. Adhere the card front onto a black cardstock mat then adhere to the card base.

If you, your family, or your friends are Elvis fans, this stamp is a must-have for your collection! So perfect for birthdays, thank yous, celebrations, and more. 

Thank you for stopping by. Have a creative and crafty day!


Tuesday, June 11, 2024

La-La Land Crafts: Kit of the Month - Not Morning Cats

I can't get enough of these grumpy cats from the June 2024 Kit of the Month (KOTM). I'm sharing a 6x6 card using the (Not) Morning Cats stamps, along with the egg and jam dies from the kit. A fun and humorous card to send a friend!

This is a perfect kit to make cards, scrapbook pages, party decor, and more! Check out the La-La Land Kit of the Month subscription options to see which one fits you!

Make sure you join the Facebook Group KOTM by La-La Land Crafts to see all the design team's amazing projects this month!

Additional products:


Copic markers and Prismacolor pencils used:


Cat 1:
Fur: E37, E35, E33, E31
Eyes: YG13
Toast: E15, E13, E11

Cat 2:
Gray fur: N5, N3, N1, 0
Brown fur: E35, E34, E31
White fur: C1, 0
Eyes: E31
Mug: Y38, Y35, Y32

Cat 3:
Fur: W6, W4, W3, W1, W0
Eyes: B01

Jelly Jar:
Jar: BG000, BG0000
Jelly: RV34, RV63, RV32
Topper: B95, B93, B91
Twine: E37, E35, E34 + Prismacolor PC946

Egg:
Brown: E34, E31
Yellow: Y15, Y13, Y11


Distress inks for each circle background:

1. Stormy Sky & Bundled Sage
2. Mustard Seed & Shaded Lilac
3. Worn Lipstick & Broken China


Thank you for stopping by! I have another card to share today, so make sure you check out my More June 2024 Kit of the Month Inspiration! blog post. Have a creative day!