Tuesday, September 29, 2020

Paper Nest Dolls - Emma With Squirrel

Even though it's Fall here in the USA, it's still close to 100 degrees here in Sacramento, California. Fall weather is just around the corner. When I walk in the park, I see the squirrels gathering up all the acorns to store for the winter. It looks like Emma has a pet squirrel and is helping it collect some acorns! Isn't this just too cute? Emma with Squirrel from Paper Nest Dolls is a digital stamp, which means you can make the image as big or as small as you like. 

I colored this stamp with Copic markers. The colors are listed below.


Copic colors used:
Hair: E44, E43, E42, E41
Skin: E04, E11, E21, E00, E000
Cheeks: R20
Dress (Aqua): BG05, BG02, BG01, BG000
Dress (Gray): W5, W3, W1, W0
Wagon (Brown): E44, E43, E42
Wagon (Silver/Gray): T3, T2, T1
Wagon Tires: T7, T5, T3
Squirrel: E18, E09, E11
Acorn: E37, E25, E55
Pumpkins: YR07, YR04, YR02, E15, E13, E11

Thank you for visiting and have a wonderful day! If you have any questions or comments, please leave them below.
Saturday, September 26, 2020

Blank Page Muse - Steampunk Sunflower Card and Tag

Yay, Fall is here! It's my favorite time of the year where it's warm in the afternoons and cold in the evenings. I love seeing the leaves change colors and all the fall flowers bloom. Just yesterday I saw some beautiful and very tall sunflowers growing in front of a house. I had to stop and admire them. Those sunflowers gave me the inspiration to make this steampunk sunflower card and tag using two of the sunflowers in the Blank Page Muse Fall Collection 2. I love this collection of Fall stamps.


For details on how to make this card and tag, head on over to the Blank Page Muse Blog:  https://blog.blankpagemuse.com/2020/09/steampunk-sunflower-card-tag.html

You still have time to enter the Blank Page Muse monthly challenge. This month's theme is "Steampunk" and it's open to everyone until October 5. You can make a card, tag, journal page, scrapbook page, artist trading card and anything you want! There are a lot of Steampunk inspiration there. Prizes are awarded!


Thank you for stopping by and enjoy the Fall season! If you have any questions or comments, please leave them below. 


Wednesday, September 23, 2020

Conie Fong Art & Design - Priscilla

Halloween 2020 will be a lot different this year. There probably won't be a lot of trick-or-treating. What I like most about Halloween is handing out candy and seeing all the cute costumes, just like this little girl Priscilla in Conie Fong Art and Design's digital stamp. This darling little witch is perfect for your Halloween cards or blown up as a coloring page so you can hang it up for Halloween. That is what I plan to do with mine.

I printed Priscilla 6 inches tall and colored her with Copic markers. Colors are listed below.


Copic markers used:
Hair: E39, YR24, YR23, YR20
Skin: E04, E11, E21, E00, E000
Cheeks: R20
Orange: YR18, YR16, YR14, YR01
Purple: V17, V15, V12
Gray: C5, C3, C1
Brown (Broom): E37, E35, E31
Yellow (Broom): YR27, YR24, YR21
Black: T9, T7, T5, T3

I hope you have a great week and thank you for stopping by!


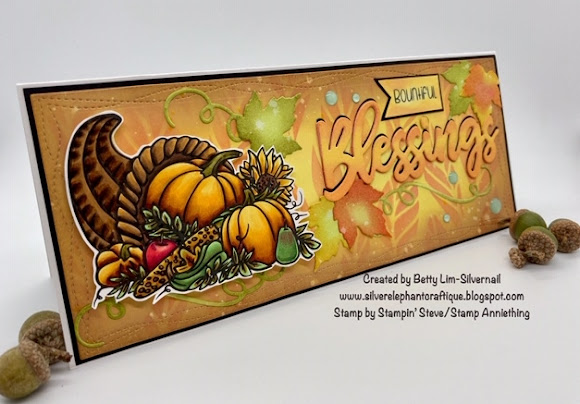
Stamp Anniething/Stampin' Steve - Bountiful Blessings

This past Monday over at the Stamp Anniething's Stampers Facebook Group, DT Stephen Kropf held a Color Along and Card Making Facebook Live tutorial. Using the stamp he designed, Bountiful Blessings, he colored the stamp, created a background with a stencil and some ink blending. He then added a large word die and finished the card with heat embossing a sentiment and added a few jelly dots and gold thread to create a gorgeous slimline card. 

Watching Stephen gave me the inspiration to make this card, which uses the techniques he demonstrated. I didn't have all the colors and supplies Stephen had so I substituted with what I had.


Supplies:
  • Stampin' Steve Bountiful Blessings stamp
  • Stamp Anniething Pumpkin Shaker Add-on or any leaves and vines die
  • Stamp Anniething Blessings Word Die or any large word die
  • White cardstock for the base
  • Black cardstock for the mat and shadow for the Blessings word die
  • Bristol paper or watercolor paper for the front panel and die cuts
  • Water bowl, fan paint brush or toothbrush and paper towel
  • Distress Ink applicator (I used Ranger Mini Blending Tool)
  • Distress/Distress oxide inks (colors listed below)
  • Copic markers or color medium of choice (Copic colors listed below)
  • Enamel dots, optional. You can use whatever embellishments you have.
  • Basic card making kit: Paper trimmer, scissors, adhesive, foam dots/squares/strips/roll, stamping platform or acrylic block, black ink pad.
Distress or Distress oxide ink colors:
  • Front panel: Squeezed Lemonade, Brushed Corduroy
  • Leaves stencil: Wild Honey
  • Leaves and vines die cuts: Twisted Citron, Peeled Paint, Wild Honey, Worn Lipstick
  • Blessing word die: Squeeze Lemonade, Wild Honey
Copic colors used:
  • Pumpkin: E18, E19, YR27, YR24, Y17; Stem: YG97, YG95, E89
  • Cornucopia: E49, E59, E57, E55
  • Pear: G29, YG67, YG63, YG13, R29; Stem: E55
  • Apple: R59, R37, R35, R32; Stem: E55
  • Gourd: G29, YG67, YG63, YG13
  • Indian corn: Y11, Y15, YR23, E55, E57, YR27
  • Corn husk: YG11, YG63, YG67
  • Sunflower: Y17, Y15, Y13, Center: E49, E47, E25
  • Maple leaf: Y11, Y17, Y15, R32
  • Leaves: YG13, YG67, YG63, YR23
Instructions:
  1. Stamp and color the Bountiful Blessings stamp. Fussy cut the stamp.
  2. There is no standard measurement for a slimline card. I cut my front panel with a slimline die, so I cut the base card .25" larger. If you don't have any slimline dies, cut your base card 8.5" x 7" and fold in half to make a 8.5" x 3.5" card. Cut the black mat 1/8" smaller on all sides and the front panel, using Bristol or watercolor paper, 1/4" smaller on all sides.
  3. Die cut the leaves, vines, and the word Blessings with Bristol paper.
  4. Die cut the word Blessing with black cardstock. This will be the shadow.
  5. Ink the front panel with Distress or Oxide ink in Squeezed Lemonade. Cover the entire panel.
  6. Stencil the leaves die on the front panel with Wild Honey.
  7. Ink the edges of the panel with Brushed Corduroy.
  8. Using the fan paint brush, splatter some drops onto the panel. Wait a few seconds then blot with a paper towel.
  9. Ink the vines with Twisted citron and Peeled Paint. Keep the center lighter than the ends of the vines.
  10. Ink the leaves with Twisted Citron, Peeled Paint, Wild Honey, Worn Lipstick, keeping the centers light and edges darker. 
  11. Using the fan paint brush, splatter some drops onto the leaves and vines. Wait a few seconds then blot with a paper towel.
  12. In the word Blessings with Squeezed Lemonade and Wild Honey, keeping the center lighter.
  13. Stamp your sentiment on Bristol paper and ink with Squeezed Lemonade and Wild Honey. Cut a fishtail tag. Then cut one slightly bigger using black cardstock and glue together.
  14. Arrange all the pieces onto your panel. All pieces are glued flat except for the cornucopia. Use adhesive foam to pop it up. 
  15. Add your embellishments and you are done!


Thank you for stopping by! If you have any questions or comments, please post them below.


Tuesday, September 22, 2020

Rachelle Anne Miller Creative Studios - Fall Fun!

Happy first day of Fall! We're heading into my favorite time of year where it's cooler at night. It still pretty warm (hot) here in the Sacramento area during the day, but that will soon change. The majority of the trees here don't change colors until late October and early November. Sacramento used to be known as The City of Trees until 2017, when it was changed to America's Farm-to-Fork Capital, so we have our own beautiful changing of the color displays here on the West Coast. No need to go to Vermont or Maine to see colorful fall foliage! 

Just like this little boy in Rachelle Anne Miller's digital stamp, Fall Fun, I love raking leaves. When I was a kid, my siblings and I would compete to see who could make the biggest leaf pile. I think this was a way my parents ensured the leaves were raked!

Today, I am sharing a clean and simple (CAS) card following the theme of this month's challenge of "using pattern paper." Head on over the the Rachelle Anne Miller Digital Stamps Facebook Group for all the details. You can win some awesome stamps! 


How to make this card:

Supplies:
  • Rachelle Anne Miller Digital Stamp, Fall Fun
  • Cardstock
  • Pattern Paper
  • Coloring medium (I used Copic markers, colors listed below)
  • White gel pen
  • Pumpkin die cuts (optional)
  • Enamel dots (optional)
  • Basic card making kit: Paper trimmer, scissors, adhesive, foam dots/squares/strips/roll, printer to print your digital stamp.
Copic markers used:
  • Skin: E04, E11, E21, E00, E000
  • Cheeks: R20
  • Hair: E13, E11, E53, E50
  • Orange: R22, R12, R00
  • Green: YG45, G21, G40
  • Yellow: Y38, Y32, Y11
  • Blue: B95, B93, B91
  • Gray: C5, C3, C1
  • White: C3, C1, Blender
  • Brown (rake): E37, E35, E31
  • Brown (hedgehog): E41, E41, E35, E31
Instructions:
  1. Print the digital stamp on white cardstock (if water-coloring, use watercolor paper). Resize the image to the size of card you are making. My card is A6 size, so I made sure the front panel is 5" x 3.75". Make sure to leave enough space if you plan on using a die to cut out the panel.
  2. Color the digital stamp. Add a few white dots with a gel pen for accents. 
  3. Cut the pattern paper.
  4. Cut a piece of white cardstock to mat behind your front panel to add dimension.
  5. Optional items/Embellishments: Add a couple of pumpkins and enamel dots to your card. You can also add, leaves, glitter, sequins, or whatever you like!
Thank you for stopping by. Enjoy your first day of Fall! If you have any questions or comments, please leave them below.


Monday, September 21, 2020

Stamp Anniething: Annie - Feline Spooky

It's finally starting to feel like Fall here in Northern California with cooler temperatures. I am finally getting in the mood to make holiday cards, especially ones for Halloween! I made this cute shaker card with a stamp and dies I got from the Stamp Anniething deluxe monthly club subscription. This stamp is called Annie- Feline Spooky. It is currently out of stock, but will be back in the store soon. I love their deluxe monthly club subscription, because it comes with three stamps and their coordinating outline dies, a word die, a builder die, a stencil, and an embellishment. I will be making a couple more cards with this set this week.

I want to thank Mindy Beverly, awesome DT for Stamp Anniething for her inspirational FB Live. She used this stamp and die to make a Memory Dex card. I don't have a Memory Dex holder so I made this card instead. If you want to see Mindy's video, join the Stamp Anniething FB Group so you can access her video.


Supplies: 
  • Stamp Anniething Annie - Feline Spooky Stamp and coordinating outline die.
  • Stamp Anniething Pumpkin Shaker Add On
  • Stamp Anniething Shaker Basics - Set 1
  • 6" x 12" white cardstock (base card) folded in half to make a 6" x 6" card
  • 5.75"x 5.75" white Bristol paper (or watercolor paper)
  • Distress Inks or Distress Oxide Inks: Seedless Preserves, Black Soot, Spiced Marmalade, Candied Apple, Scattered Straw, Brushed Corduroy, Twisted Citron, Peeled Paint
  • Distress Ink applicator (I used Ranger Mini Blending Tool)
  • Coloring medium of choice (I used Copic markers. Colors listed below)
  • White gel pen
  • Clear acetate
  • Shaker bits (Many to choose from at Stamp Anniething)
  • Water bowl, fan paint brush or toothbrush and paper towel
  • Basic card making kit: Paper trimmer, scissors, adhesive, foam dots/squares/strips/roll, stamping platform or acrylic block, black ink pad.

Instructions:
  1. Stamp and Color: Stamp your image onto white cardstock. I used Hammermill 80 lb Cover cardstock when I use Copic markers. Color your image, add some white dots with a gel pen to accent the image, then cut it out using the coordinating die or fussy cut.
  2. Die cut and Color: Die cut the pumpkin, vines, leaves, and stem using Bristol paper. Don't use regular cardstock since it will warp when you spritz the water. Using the Shake Basics circle, cut the acetate. If you don't have this die, you can use the pumpkin as a template and cut out a circle. Put this aside for now. Tip: I keep it an envelope until I need it. 
  3. Distress ink in the following colors. Use the darker colors on the edges of your die cuts:  Pumpkin: Spiced Marmalade, Scattered Straw, Candied Apple (keep the middle of the pumpkin light with light coats of Spiced Marmalade and Scattered Straw and the top and bottom dark with Spiced Marmalade and Candied Apple; Vines and Leaves: Twisted Citron, Peeled Paint; Stem: Brushed Corduroy. For the back piece of the pumpkin, use light coats of Scattered Straw and Spice Marmalade. 
  4. Make the shaker: Using liquid glue, adhere the acetate to the front panel of the pumpkin. You can use double sided foam tape to create the space for the shaker bits or you can do what I did and use the front panel die of the pumpkin and cut out a piece using craft foam. I wanted each section of the pumpkin to have different shaker bits. I don't like using adhesive foam since the shaker bits tend to stick to the sides. I used liquid glue to adhere the foam. Add your shaker bits and then add the back piece to close your shaker. Let the glue dry before shaking it.
  5. Make the sentiment: The Annie stamp comes with a sentiment that says Feline Spooky. However, I wanted a Happy Halloween sentiment so I created one in Silhouette Studio and cut it out on black cardstock on my Cameo. You can add any sentiment you want on the pumpkin.
  6. Cut the base card: Cut out a 6" x 12" cardstock and score at 6" and fold in half.
  7. Cut and ink the background: Cut out a 5.75" x 5.75" piece of Bristol 100 lb paper and ink it with Seedless Preserves and Black Soot Distress inks to make the background paper. After inking, use a fan paint brush dipped in water to spritz water onto the Distress Ink. Wait 10 seconds then use a paper towel to blot up the water to make the stars.
  8. Assemble the card: All pieces are adhered flat onto the background paper except for the Annie image where I used foam squares to pop it up.
The card is finished! I hope you this inspires you to make this card or any Halloween card. 


Copics used:

Skin: E04, E11, E21, E00, E000
Cheeks: R20
Orange: E04, YR07, YR04, R02
Yellow: Y17, Y06, Y00
Black: T9, T7, T5, T3, T1
Pink: RV04, RV02, RV000
Yellow: Y17, Y06, Y00

Thank you for visiting on this last day of summer (in the USA). If you have any questions, please put them in the comments below.


Friday, September 18, 2020

Blank Page Muse - Halloween Steampunk

Happy Friday Everyone! I am so excited and honored to join the design team of Blank Page Muse Art Rubber Stamps! They are a red rubber stamp company that presses their stamps when they are ordered and uses no frills packaging to save you costs. They come unmounted, but you can order them with a Cling Cushion (cling foam). However, you really don't need to get the cling foam, just follow my instructions in my description on the Blank Page Muse Blog on how use these stamps with a stamp positioner. They have some very unique stamps, such as vintage, grunge, steampunk, fantasy, and whimsical, to name a few. Check out their store for all their stamps: BPM

Blank Page Muse has monthly challenges and for this month, the theme is "Steampunk." I hope this Halloween Steampunk card inspires you to enter the contest to win a prize! 

For this card, I used the pumpkin from the Fall Collection #2 set by Pam Bray Designs.  Details on how to make this card is on the Blank Page Muse Blog.


Wednesday, September 16, 2020

Conie Fong Art & Design - Dancing Emily

I sure do miss all the school plays, musicals, concerts, and talent shows that have been canceled due to the COVID-19 pandemic. Although I don't have school-aged children any longer, we enjoy going to our friends children's events. I recall going to a grade school talent show where this little girl performed the ribbon dance, just like this cute little girl in Conie Fong's digital stamp, Dancing Emily. Dancing Emily comes with and without a hat, images facing right and left, and a sentiment (5 images). It comes in both JPG and PNG formats.

I used the PNG version so that I can layer it onto a background. I created this background using my Silhouette Studio software and placed Dancing Emily over it You can use any pre-made background and layer the image over it using software such as Microsoft Word and Publisher.  Print it out and color Dancing Emily (I used Copic markers/colors listed below). Use a white gel pen to add dots to her hat, dress, and shoes. Cut it with a slimline die or paper trimmer. Currently there is no standard measurement for a slimline size card, but a popular size is 8.5" x 3.5". 

Mat the image on black cardstock and adhere it to the base card. Print out the sentiment and punch it out using an oval punch. Punch two more ovals, one with black cardstock and one in dark orange. Glue the black on top of the orange oval, then glue the sentiment on top. Adhere it to the card using foam squares.  

Accessorize it by adding a twine bow, charm, and flower-shaped rhinestones. Add some sparkle by using clear Wink of Stella.

Thank you for visiting and have a crafty day!


Copics used:
Hair: E13, E11, E53, E50
Skin: E04, E11, E21, E00, E000
Orange: YR18, YR16, YR14, YR01
Brown (stick/wand): E15, E13, E11
Green: G24, G82, G40
White/gray: C3, C1, Blender


Saturday, September 12, 2020

Paper Nest Dolls - Alien Avery

In 10 days, the official start of Fall begins here in the USA, which means 5 weeks until Halloween. This also means, it's time to start making the Halloween and Fall cards, if you haven't started yet. With this COVID-19 pandemic, there probably won't be a lot of Halloween parties, so how about surprising your family and friends with some cute cards? The card I made with the adorable Paper Nest Dolls' Alien Avery makes the perfect Halloween card. Check out the cute slippers she is wearing! I used the digital version of this stamp and a red rubber stamp will be available soon in the Paper Nest Dolls store.

To make this card, I imported the digital image into Silhouette Studio software and did a print and cut of the stamp and colored it with Copic markers. You can also just print the digital stamp and fussy cut it too.  

I found a cute spaceship with the alien and Take me to Your Candy cut file from the Silhouette Store and cut it out of cardstock using my Cameo. 

For the squiggle mat that is behind Alien Avery, I sprayed Distress Spray Stains and Perfect Pearls Mists onto watercolor paper. I let it dry and used the Stamp Anniething Squiggle Mat Die to cut out the mat. I used my Cuttlebug to cut the die.

I used the Greetings word die from Stamp Anniething and cut it out of cardstock. I used Distress Ink to ink the edges of the both of the sentiments. 

I used patterned paper from FreePik.

Thank you for stopping by and I hope I inspired you to start your Halloween and Fall cards.


Copics Used:
Hair: E39, YR27, YR24, Y32
Skin: G85, G82, G21, G40, G0000
Yellow: Y38, Y35, Y32
Purple: V17, V15, V12
Gray: C7, C5, C3, C1

Distress Inks Used:
Brushed Corduroy

Distress Spray Stains Used:
Abandoned Coral
Chipped Sapphire

Perfect Pearls Mists Used:
Bronze


Wednesday, September 9, 2020

Stamp Anniething - Sophia-Viva La Vida

I made this card for my best friend Silvia who celebrates Dia de los Muertos, The Day of the Dead. It is a Mexican holiday that I didn't know much about until I watched the Pixar-Disney film, "Coco." Dia de los Muertos is a holiday where families welcome back the souls of their ancestors for a short celebration that include music, food, and drink. Silvia sets up an altar in her home with pictures of her family that have passed and decorates it with bright and beautiful sugar skulls and festive decorations. I hope she'll add this card to the altar! This year, Dia de los Muertos begins on October 31 and ends on November 2.

For this 6 x 6 card, I used the Sophia-Viva La Vida stamp from Stamp Anniething and colored it with Copic markers. I cut out three skulls using the Stamp Anniething Mini Skulls Outline die and drew the flowers on the skull to make them look like sugar skulls and colored them with Copic markers. I cut out a doily using a die from Gina Marie and added some Distress Ink. I found the cute sugar skull patterned paper from Freepik. The Viva la Vida (Long Live Life) sentiment comes with the stamp. I cut it using a Stamp Anniething banner die and added Distress Ink. I added an eyelet and attached ribbon and a charm from my stash. Copic and Distress Ink colors are listed below.

Thank you for stopping by! 


Copic markers used:

Hair: C9, C7, C5, C3, B02
Face: C3, C1
Skin: E15, E13, E11, E00
Pink: RV17, RV55, RV52
Blue Green: BF57, BG13, BG11
Violet: V17, V15, V12
Yellow: Y35, Y02

Distress Ink used:

Old Paper

Sunday, September 6, 2020

Conie Fong Art & Design - Peony Flower

I love pink peonies. Such a delicate flower that represents romance, happiness, and good fortune. Today I share this card made with Conie Fong's beautiful new release Peony Flower digital stamp. This stamp comes in both PNG and JPEG formats and comes in a bundle with four flower images and one birthday sentiment. This stamp is currently on sale for only $2 for a limited time, so get your stamp today. Conie is also having a Labor Day Sale so it's a great time to stock up (see announcement below). Here is the link to her Etsy Store.

I used my Silhouette Studio software to create the black border on the card. To do this, I created a rectangle that is 5.25" wide and 3.75" tall. Then I offset this rectangle at 0.09 and did a fill with the color black. I layered the peony stamps on top. Make sure when you print this on your printer, you leave plenty of room so when you cut it with your paper trimmer, you leave a 1/4 inch border. I layered this on top of the pink cardstock. The base cardstock is 6.25"x 9.25" (fold in half). This card will fit in an A6 envelope.

It's fun working with digital stamps. If you don't have Silhouette Studio, you can also use Microsoft Word or Publisher to layer your stamps.

Thank you for stopping by and have a great Labor Day weekend!


Copic markers used:

Pink: RV95, R83, R81, RV91
Yellow: YR23, YR21, YR20
Green: YG17, YG25, YG13, YG21


Friday, September 4, 2020

Paper Nest Dolls - Indian Princess

It's starting to feel like fall here in Northern California. The mornings and evenings are cool, but still warm during the day. The air is still a little smoky with the fires we are still having in the area, but safe enough for me to go on my morning walk.  Did you know that today is National Lazy Mom's Day? It's the day moms get to take a break and do something fun, such as coloring and making cards! So, today I am sharing a card using the cute Paper Nest Dolls' Indian Princess. This stamp is available in a red rubber stamp and a digital stamp. Isn't she adorable carrying her little pet raccoon? 

I colored this stamp with Copic markers then fussy cut her out. I print out a bunch of various sentiments and use banner dies and cut them out so I have them in my stash when I need them. I used a die to cut out the feathers. Copic colors and supplies are listed below.


Copic markers used:

Hair: C9, C7, C5, C3
Skin: E04, E13, E11, E01, E00
Cheeks: R20
Dress: (Dark brown) E47, E37, E35, (Light brown) E15, E13, E11
Necklace: (Tourquoise) BG05, (Brown) BG01

Supplies used:

Cardstock, twine, and charm from my stash
Patterned Paper from Freepik


Wednesday, September 2, 2020

Rachelle Anne Miller Creative Studios - Snow Globe

I have always enjoyed snow globes and had those small ones growing up. I still have a couple that are only displayed during Christmas. One is pretty big like the one this little girl is holding in Rachelle Anne Miller's digital stamp, Snow Globe. This stamp can be used as a winter, holiday, Christmas, birthday, or without a sentiment as a note card. I used Copic markers to color this adorable stamp. Details are below.

Join us in Rachelle Anne Miller's Monthly Facebook Challenge! This month's challenge is Use Pattern Paper. All you have to do is add some pattern paper to your project. Here's the link to the challenge with all the details:  Challenge

Rachelle also has a line of art prints and greeting cards. All so adorable. Please check it out.

Thank you for stopping by!


Copics used:

Hair E13, E11, E53, E50
Skin: E04, E11, E21, E00, E000
Cheeks: R20
Snowglobe (Gray): C5, C3, C1
Snowglobe (Blue): B00, B000, B0000
Snowman: C3, C1, Blender
Red: R29, R85
Purple: BV02, BV00, BV000, BV0000
Brown (Shoes & Cat): E15, E13, E11
Green: G82, G24

Supplies used:

Fiskars Snowflake Punch
Patterned Paper: The Paper Studio-A Very Merry Christmas
Sentiment die: Banner Dies from Stamp Anniething
Twine, rhinestones, cardstock & charms from my stash
Wink of Stella