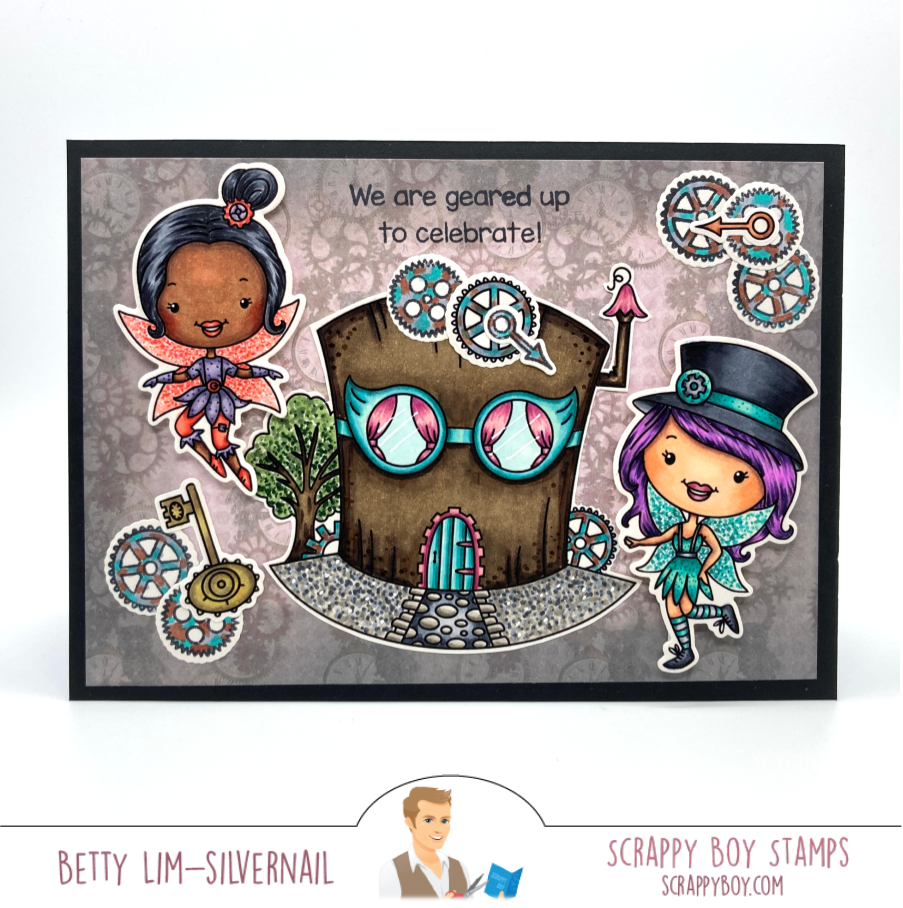
Today I am kicking off Scrappy Boy Stamps’ June 2022 new release sneak peeks with two slimline cards! The first card is a birthday card using stamps from the two new Steampunk Fairies stamp sets: 1) Steampunk Fairies and 2) Tinkering Around. The background of this card was created using the new Steampunk Clock and Gear Stencil. Both stamp sets come with 4 adorable fairies and 4 steampunk accessories and a bunch of sentiments! The Fairy Hat House is available only as a digital stamp so that you can make it as big or small as you like.
The second slimline card is a card for all your crafty friends. I used stamps from the Cute Girls - Crafting stamp set. This stamp set includes 5 cute crafty girls and a bunch of sentiments.
Card 1: Gearing Up for Your Birthday
I first stamped all the images, colored them with Copic markers, then cut them out using the coordinating outline dies.
Copic markers used:
Fairy 1:
Skin: E23, E13, E11, E21, E00
Cheeks: E95
Lips: R35, R43
Hair: E13, E34, E11, YR20
Aqua: BG07, BG05, BG02, BG01, BG000
Fairy 2:
Skin: E13, E11, E21, E00
Cheeks: E93
Lips: R85, R83, R81
Hair: B14, 100, C7, C5
Blue: B39, B18, B14
Red: R59, R85, R83, R81
Gray/Silver: C5, C3
Fairy 3:
Skin: E27, E25, E23, E13
Cheeks: R83
Lips: R85, R81
Hair: R35, C9, C5, C3
Red: R37, R35, R43
Black: C9, C7, C5
Fairy 4:
Skin: E13, E11, E21, E00, E000
Cheeks: E95
Hair: E18, E98, YR18, YR14
Lips: RV23, RV02, RV00
Turquoise: BG07, BG05, BG02, BG01
Pink: RV23, RV02, RV00
Wings: RV14, RV23, RV02
Fairy Hat House:
Brown: E49, E47, E44, E43
Aqua: BG18, BG15, BG53, BG11
Pink: R39, R85, R83, R81
Green: G28, G85, G24, G82
To create the background, I used the Steampunk Clock and Gear Stencil and inked it with Distress Inks in Antique Linen, Salvaged Patina, Barn Door, and Black Soot. I then used the gears and arrow stamp and black ink and randomly stamped them onto the background. I used the Wonky Stitched Slimline Die to trim the background and adhered onto a slimline card base.
I then stamped the sentiment onto the background using a stamp platform. I adhered all the stamps onto the background with liquid glue, except for the two fairies closest to the house. I used double-sided adhesive foam tape to pop them up.
Card 2: Crafting is my Jam!
First I stamped the images, colored them with Copic markers, then cut them out using the coordinated outline dies.
Copic markers used:
Girl 1:
Skin: E15, E11, E21, E00, E000
Cheeks: R20
Tongue: R22, R20
Hair: V04, C9, C7, C5
Orange: YR18, YR16, YR15
Gray: W6, W4, W2
White: C5, C3, C1
Pink: RV34, RV52, RV11, RV00
Girl 2:
Skin: E27, E25, E23, E13
Cheeks: R83
Tongue: R85, R83
Hair: 100, C7, R56, R29
Blue: B99, B97, B95, B93
Red: R59, R56, RV34
Black: C9, C7, C5
Green: YG09, YG06, YG01
To create the background, I did ink smooshing with Distressed Inks in Spiced Marmalade, Blueprint Sketch, Seedless Preserves, and Mowed Lawn. I used the Slimline Stitched Scalloped Edge Die to trim the background and mounted it onto a white slimline card base.
I cut out two circles and inked them with Distress Inks. The first one I used Spun Sugar and Picked Raspberry. The second one I only used Mowed Lawn; making sure the edges were darker.
The JOY and hearts stamps and dies are from Simon Says Stamp. After stamping and die cutting the JOY word, I also cut one out of craft foam to give it some dimension. I then stamped the sentiment and also added it to craft foam.
I adhered everything to the background using liquid glue except for the cute girls. I used double-side adhesive foam tape to pop them up.
Both slimline cards were so fun to make! I hope you give them a try. Thank you for stopping by today. Have a very creative week!