Friday, May 28, 2021

Scrappy Boy Stamps: Sneak Peek! Summer with my Gnomies

It's sneak peek week for Scrappy Boy Stamps! Today I am showcasing the amazing and adorable Summer with my Gnomies stamp set that will be released on Saturday, June 5. This gnome stamp set has all the stamps to make a complete beach scene. It comes with two gnomes, a mushroom sand castle, a seagull, sea turtles, several sentiments, and more! There are coordinating outline dies too! This set is fabulous for many occasions by adding a sentiment of choice.


For this slimline card,  I stamped the images and colored them with Copic markers. I ended fussy cutting the images since the dies were not available yet. No worries, the dies will be available, along with the stamp set, on release day, Saturday, June 5, 2021. 


Copic markers used:
Male Gnome
Skin: E04, E11, E21, E00, E000
Hair: T7, T5, T3, T1
Blue: B97, B95, B93
Turtle: YG67, YG63, YG13, YG11
Pail: R29, R24, R21
Sign & Pier: E39, E37, E35, E34
Seagulls: Y38, Y35, T3, T2, T0
Rope: E55, E51, E50
Sand Castle & Dots on Sand: E47, E44, E43, E41
Flag & Crab: R29, R24, R21
Starfish: YR27, Y38, Y35, Y32
Shell: W8, W1, Blender
Bottle: B16, B12, T3, T1, Blender

The beach, ocean, and sky background was inked with distress inks and oxide inks (you can use either type of ink) on white cardstock. I used the Beach Stencil Builder by Stamp Anniething to create the background. After inking the sand,  I used Copic markers to add some texture (colors listed above). I then cut this out using a wacky stitch slimline die. 


Distress Inks and Distress Oxides used:
Sand: Pumice Stone, Brushed Corduroy, Walnut Stain
Ocean: Peacock Feathers, Salty Ocean, Chipped Sapphire
Sky: Squeezed Lemonade, Wild Honey

Next, I stamped the sentiment, trimmed it to size, and inked it with Oxide Ink in Squeezed Lemonade. I glued all the images down with liquid glue except for the two gnomes where I used adhesive foam squares to pop them up.


The stamp set and dies will be available for purchase beginning on Saturday, June 5 at the Scrappy Boy Stamps store. It's an amazing set to color and play with to create cards, scrapbook pages, art journals, and more! 

Thank you for stopping by and have a creative day! 

Tuesday, May 25, 2021

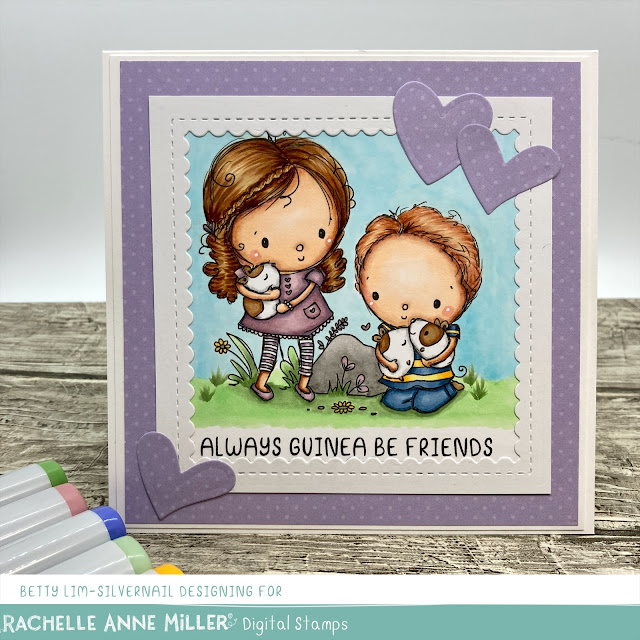
Rachelle Anne Miller Creative Studios: Guinea Friends

It’s been a fun year being on Rachelle Anne Miller Creative Studios’ inaugural design team designing and creating cards with her digital stamps. I want to thank Rachelle for giving me the opportunity to be part of the team. It has been a wonderful experience and it kept me quite busy during the COVID pandemic with the lock-down our state experienced. I am stepping down from this team to free up some time to work on some home projects. 

I have one last Rachelle Anne Miller card to post today. I am using the adorable stamp called Guinea Friends. This stamp was inspired by Rachelle’s children as they have pet guinea pigs just like the ones on this card. 


I made a clean and simple card to showcase the adorable stamp. I printed and colored the stamp using Copic markers to make this 5” x 5” card. 


Copic Markers Used

Girl
Skin: E04, E11, E21, E00, E000
Hair: E37, E35, E34, E31
Shirt: B63, RV95, RV93, RV91, T3, T1, 0

Boy
Skin: E13, E11, E21, E00, E000
Hair: E13, E11, E53
Shirt: B97, B95, B93, Y17, Y13, Y11

Guinea Pigs
Brown: E34, E33, E31
White: T2, T1, 0

Rock: W4, W2, W0
Flowers: B63, RV93, Y17, G24
Grass: G24, G21, YG11
Background: B000, B0000


Thank you for visiting today. Have a very creative week!


Sunday, May 23, 2021

Paper Nest Dolls: Lulu with Sundae Birthday Card

It's finally ice cream weather here and I love ice cream sundaes with caramel and whipped cream. We have a local ice cream shop that makes their own ice cream and has the best caramel topping and real whipped cream. It looks just like the one on my card! This stamp is called Lulu with Sundae by Paper Nest Dolls. This stamp comes in red rubber or in digital. It's a perfect stamp for birthdays, celebrations, get well, friendship, and note cards. 


I like digital stamps so that I can resize them to the size I like and then just print it on cardstock and am ready to color.  I colored the stamp using Copic markers. 


Copic markers used:
Hair: T9, T7, T5, T3
Skin: E04, E11, E21, E00, E000
Cheeks: R20, R30
Red: R29, R35, R22, R21
Black: T7, T5, T3
Gray: T5, T3, T1

Ice cream sundae: 
Brown: E17, E13, E33, E21
Yellow: YR24, Y32, Y21
White: T3, T2, T1, Blender
Blue (glass): B01, B00, B000
Arteza gel glitter pens in pink and aqua for the sprinkles

I used a circle die to cut a circle out of gold cardstock and a circle frame die out of red cardstock to use as a backdrop for the Lulu stamp. I cut out patterned paper and black cardstock to add layers to the card. 

I used an old Stampin' Up cupcake punch to make the ice cream on the ice cream cone. For the cone, I used a small circle punch then cut it into a shape of a cone. I used white cardstock for all the pieces, then colored everything using Copic markers. 

For the sentiment, I used a stamp from Whimsy Stamps. 


I hope you give this card a try. The stamp is fun to color and it makes the cutest card. Thank you for stopping by and I hope you have a creative week! 


Friday, May 21, 2021

Stamp Anniething: The Socialites Bundle is Here!!

Stamp Anniething has released the most amazing set of stamps inspired by the drama series, Bridgerton! This stamp bundle has five characters: The Duke, the Duchess, the Queen, the King, and the gossip columnist, Penelope. This set comes with lots of accessories stamps, sentiments, and coordinating outline dies. There is also a Lace Builder die included. What an amazing bundle! This Socialites bundle is specially priced through May 23, 2021, so get it today. 

*Note: This bundle sold out after a few hours after it was released. There are more coming in 10-12 days and will be sold at the special/release price. 

I made three cards using all five of the character stamps. Due to time constraints, I have only listed the Copic marker, Castle Art colored pencils, and Arteza gel pen colors used for each card.

Card #1: Duchess and Duke (Slimline Card)


Copic markers, Castle Art pencils, Arteza gel pens used:

Duchess
Hair: E29, E37, E35, E34, E31
Skin: E15, E11, E21, E01, E00
Cheeks: R20
Tongue: R22, R20
Dress: BG05, BG02, BG01, BG000 +white gel pen for flowers
Crown: R39, R37, R32, E25, Y38, Y21
Necklace: Arteza Metallic Gel Pens - Silver & Black

Duke
Hair: T9, T7, T5, T3, T1
Skin: E25, E35, E33, E31
Tongue: R22, R20
Pants: T9, T7, T3, T1
Jacket: W8, W6, W4, W3, W1 + Castle Arts 071, 066, 065
Shirt: T2, T1, 0 + Arteza Metallic Silver

Card #2: The Queen & King (6 x 6 Card)


Copic markers and Arteza gel pens used:

Queen
Hair: C3, W3, W1, E41
Skin: E25, E35, E33, E31
Cheeks: R22, R20
Tongue: R22, R20
Purple: V17, V15, V12, V000
Pink: R85, R83, R81
White (gloves): T3, T1, T0

King
Hair: T5, T3, T2, T1
Skin: E04, E11, E21, E01, E00
Cheeks: R20
Tongue: R22, R20
Red: R39, R37, R24, R32
Black: T9, T7, T3, T1
Crown: Gold E25, Y38, Y21; Red R39, R37, R24, R32

Dog
Fur: E35, E34, E33, E31, W4, W3, W1
Nose & Tongue: R12
Collar: R14, R12 + Arteza silver gel pen

Chair
Red: R59, R56, R37, R35, R32
Brown: E49, E47, E44, E43


Card #3: The Gossip Columnist - Penelope (Step Card)


Copic markers and Arteza gel pens used:

Hair: E18, E08, YR18, YR14
Skin: E04, E11, E21, E00, E000
Cheeks: R20, R30
Tongue: R22, R20
Dress: YR18, YR16, YR14, YR12, YR00 + Arteza Gold gel pen
Earrings and Necklace: Arteza silver gel pen
Society Today: E34, E51, E50


Thank you for visiting! Head on over to the Stamp Anniething store to get your Socialites Bundle before they run out. It's the best bundle ever! Have a very creative week!

Blank Page Muse Art Rubber Stamps: Fantasy Mermaid with Bokeh Background

It's been awhile since I've done the Bokeh technique for a card background. I thought it would be perfect for the sea background for this cute and whimsical mermaid called Fantasy Mermaid from Blank Page Muse. When I saw this stamp, I knew I had to color her with vibrant colors since she looks like a young and sassy mermaid! Since this is a fairly large stamp, I made a slimline card to make it look like she's swimming in the sea.


Supplies:
  • Blank Page Muse Stamp: Fantasy Mermaid designed by Rick St Dennis
  • Black stamp pad
  • Stamping block or stamp positioner
  • White cardstock 3-1/2"W x 5"H to stamp image
  • Coloring medium of choice. I used Castle Arts Colored Pencils. Colors are listed below
  • White cardstock for card base: 6-1/2"W x 7-3/4"H, score at 3-1/4" and fold in half
  • Watercolor paper: 3-1/4"W x 7-3/4"H
  • Watercolor pens or paints in bright pink, purple, aquamarine, and blue. I used Spectrum Noir AquaTints but you can use any bright watercolors.
  • Paint brush and water bowl
  • White pigment ink. I used Stampin' Up Whisper White refill ink.
  • Make up or craft sponge
  • Paint pallet or craft mat
  • Circle punches in various sizes
  • White cardstock to punch circles to use as a stencil. Size of paper will depend on how many circles you want to punch.
  • Heat gun
  • White Glitter paper: 3-1/2"W x 8"H
  • Slimline frame die. I used the Scallop Frame die from Stamp Anniething
  • Distress ink in Peacock Feathers and ink blending tool
  • Mermaid sentiment of choice. I created and printed one using my computer.
  • Sequins for embellishments. Also can use enamel dots, jelly dots, or rhinestones.
Instructions:
  • Stamp image on white cardstock and color with your favorite medium. I used Castle Arts colored pencils.
  • Fussy cut the stamp and set aside
  • Bokeh background technique time! Protect your work surface by working on a craft mat
    • For this technique, use four bright watercolors in pink, purple, aquamarine and blue. 
    • First wet the watercolor paper with clean water
    • Apply a generous amount of aquamarine watercolor onto the paper and use a very wet brush to spread it. Dry this first layer with a heat gun.
    • Next apply a generous amount of pink and again, use a very wet brush to spread it. Dry with heat gun. Repeat with the purple watercolor then the blue until color/design covers the entire paper. Dry completely before moving to the next step.
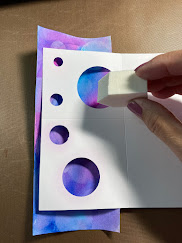
    • Create a circle stencil by punching cardstock with various size punches. 
    • Put a drop or two of pigment ink onto a paint palette. 
    • Use a make-up or craft sponge and lightly sponge circles onto the watercolored paper. Make sure some circles overlap. Dry completely.
  • Die cut the slimline frame using the white glitter paper
  • Adhere the Bokeh/watercolor paper to the card base then adhere the frame.
  • Stamp or print a mermaid sentiment of choice, trim to size, and distress the edges using Distress ink in Peacock Feathers. Adhere it to a white glitter cardstock mat. 
  • Adhere the mermaid and sentiment to the card front.
  • Adhere the sequins or other embellishments.

Other embellishments, such as ribbon, buttons, and washi tape can also be added to this card. Use whatever you have in your stash.


Thank you for visiting and I hope you give the Bokeh technique and this card a try. I'm going to make more of these backgrounds for future cards. 


Wednesday, May 19, 2021

Conie Fong Art & Design: Hello Sweet Friend

I sure am enjoying the Spring-like weather this week. It's been chilly in the mornings and evenings, but warm during the day. Lots of beautiful butterflies during this time of year in my yard too. Yesterday, I saw one that was yellow and gray, just like the one on my card. This cute stamp from Conie Fong Art and Design is called, Hello Little Friend. This stamp is perfect for any occasion. 

Don't forget to enter into our monthly Facebook challenges to win some free digital stamps or a guest designer spot! Head on over to the Conie Fong Art & Design fan page to check it out.


I printed the stamp and colored it with Copic markers. Then I fussy cut it out.


Next, I cut out an A2 card base out of white cardstock to make a side folding landscape card. I cut out a red polka dotted piece of cardstock for the mat and adhered it to the card base. 

I cut out a piece of water color paper and used Distress Oxide in Stormy Sky and Tumbled glass and used a cloud stencil to make the cloud background. I used a rectangular die to cut a mat using white cardstock. I adhered the colored stamp onto the cloud background and then adhered this to the white mat and then to the red polka dot mat.

I printed the sentiment on my printer, then used my paper trimmer to cut it out and added a red polka dot mat behind it. I used a foam square to adhere it to the card front. To finish the card, I added three enamel dots. 

Thank you for visiting! Have a creative week!

Monday, May 17, 2021

Stamp Anniething: Maggie - Steampunk Birthday Card

Some of my favorite things to use when making card backgrounds are distress spray stains, distress inks, and hybrid inks when achieving a steampunk look. It's fun to get messy and the results are amazing. Stamp Anniething has the perfect stamp called Maggie-Steampunk for a birthday card I made for my steampunk-loving friend! 

For this card, I stamped and colored Maggie using Copic markers. I then fussy cut her out. 


Copic Markers Used:
Hair: T9, T7, T5, T2
Skin: E04, E11, E21, E00, E000
Red: R59, R37, R24, R32
Gray: C9, C5, C3, C1

Next, I did some ink smooshing using Distress Inks in Peacock Feathers, Walnut Stain, and Black Soot. I let that dry then I found a train schedule stamp in my stash and used Stamp Anniething Hybrid Ink in Obsidian and randomly stamped it all over. Then I used Stamp Anniething Hybrid Ink in Obsidian and Moon Rock and ink blended over the stamped images concentrating mainly on the outside edges. I then used Distress Spray Stain in Brushed Pewter and splattered it on top.

I cut out many different sizes of gears from a die that a friend had given me and used distressed inked them in Peacock Feathers, Walnut Stain, and Black Soot. Then I sprayed Distress Stains in Brushed Pewter on top. I glued them in place with liquid glue. I also found some clock hands in my stash and glued three of them onto the gears. 


I printed the sentiment on my computer then used my paper trimmer to cut it to size. I used a circle punch to cut off the corners. I cut a mat to fit the sentiment and distressed in both pieces with Walnut Stain and Black Soot.

I placed the card front onto a mat that I inked the edges with the hybrid ink in obsidian. Then I placed this on top of another mat I inked the edges with in walnut stain and black soot. Then I glued it on top of the Stamp Anniething Slim Line Card Base.


I hope you give this fun card a try! So much fun playing with inks and coloring Maggie-Steampunk. Thank you for visiting today and have a creative week!

Saturday, May 15, 2021

Scrappy Boy Stamps: New Release! Music Bundle

Scrappy Boy Stamps (Sean) has done it again, but this time he did it BIG! He came out with three AMAZING stamp sets inspired by The Sound of Music! There are three sets: 1) Climb Every Mountain; 2) Can't Stop Singing; and 3) Fill My Heart. You can buy (pre-order) each set individually or all three sets in a bundle. If you get the two larger sets, the smaller set is free! Coordinating outline dies are also available for those that hate to fussy cut. ALL STAMPS ARE PRE-ORDER so be the first to get these fabulous sets. This link will take you to the Scrappy Boy Stamps store to pre-order and to check out all the other stamps that are available. 


For this card, I used Copic markers to color the character (Maria) and mountain stamps.


Copic Markers Used:
Maria
Skin: E04, E11, E21, E00, E000
Hair: E29, E25, E13, E21
Dress & Shoes: E18, E15, E13, E11, E55, E53, E51
Tree stump: E47, E44, E43, E41
Guitar: Y13, E55, E53, E51

Mountains
BV23, B41, W2, BV31

The grass is colored with Distress inks in Mowed Lawn and Lucky Clover. I stamped the Do Re Me Fa So La Ti Do and music notes before applying the distress ink. I used a Spectrum Noir clear sparkle pen to add sparkle to the music notes and snow mountain tops. I used a little bit of Distress Oxide in Tumbled Glass for the sky. 


I only used one stamp out of all the many stamps from this new release. Check out all the stamps in this set!! The entire family is available, along with multiple versions of Maria and tons of sentiments! This stamp set can be used for any card occasion, scrapbooking, and making treat bags/boxes/decorations!! Check them all out at the Scrappy Boy Stamps store for details. 

1) Climb Every Mountain                 2)  Can't Stop Singing                            3) Fill My Heart
  

Thank you for stopping by and have a creative week! 

Friday, May 14, 2021

Scrappy Boy Stamps: Dance and Twirl, Birthday Girl

I am so obsessed with Scrappy Boy Stamps' Pretty Little Things stamp set. This stamp set is inspired by The Nutcracker Ballet, which happens to be my favorite ballet. I wanted to make a winter scene birthday card since I have several friends with birthdays in November and December. This adorable stamp is perfect winter birthday cards! Scrappy Boy Stamps is a new line of stamps so please check out all their stamps, including Pretty Little Things. The Pretty Little Things and coordinated outline dies bundle are currently on sale!


This clean and simple (CAS) A2 size card is easy to make. I first stamped the little girl and die cut her out with the coordinating outline die. Then I colored her with Copic markers and used Arteza glitter pens for her dress. The dress is very glittery, but unfortunately it doesn't photograph well. 


Copic Markers and Arteza Glitter Pens used:
Skin: E15, E13, E11, E21 E01
Hair: E37, E35, E34, E31
Purple: V17, V15, V12
White: T3, T1, T0

Dress: Arteza Glitter Pens: Purple, Pink, Silver

Next, I used a winter scene die from Gina Marie Designs and cut it out of white cardstock. I used patterned paper that look like snow to put behind the winter scene. I used a Stamp Anniething pumpkin vine die and cut two "swirls" out of silver glitter cardstock. I stamped the sentiments and matted it with the same silver glitter cardstock. After adhering the swirls, sentiment, and the little girl to the card front, I die cut a rectangle scallop mat out of white cardstock. I adhered the card front to the scallop mat, then adhered it to the card base and the card was finished in no time!


I hope you give this card a try. It so easy and so fun to make and this stamp set is not just for Christmas, but for any occasion! Thank you for visiting and have a creative week!


Tuesday, May 11, 2021

Rachelle Anne Miller Creative Studios New Release: Treasure Island

It's sneak peek week for Rachelle Anne Miller Creative Studios' new release! There are four new digital stamps being released on May 13th and I am showcasing one of them. My card features the cutest stamp called Treasure Island. I just love how cute this stamp is! I made this card without a sentiment so it can be used for any fun and happy occasion!


Head on over to Instagram @rachelleannemillerart for your chance to win all 4 of the new release stamps! 


With digital stamps, you can size it however large or small you like. I made an A2 size card, so the stamp is approximately 3-1/4"W x 4-1/2"H. I colored the stamp with Copic markers and used Castle Arts colored pencils for accents.


Copic markers and Castle Arts colored pencils used:
Boy 
Skin: E13, E11, E11, E21, E00, E000
Hair: E13, E11, E53, E50
Red: R37, R35, R32
Pirate Hat: W5, W3, W2, W0 + Castle Arts colored pencil 071

Girl
Skin: E04, E11, E21, E00, E000
Hair: E37, E35, E34, E31
Red: R37, R35, R32
White: T3, T2, T1

Palm Trees
Green: G24, G21, YG11 + Castle Arts colored pencil 062
Brown: E35, E34, E31

Crab, Parrot and Books
Yellow/Gold: E25, Y38, Y21
Green: G24, G21, YG11
Red: R37, R35, R32
Parrot’s Legs: Castle Arts colored pencil 070

Treasure Chest: T5, T3, T2, T1, E35, E34, E31

Sand: E35, E34, E33, E31

Pearls: White gel pen

Sky: B00, B000


I used A2 rectangle nesting dies to cut the card front and mats and adhered them with liquid glue. To finish the card, I added a few enamel dots.


Such a fun and cute stamp to color! Check out all the new releases from Rachelle Anne Miller Creative Studios. They will all be available in the store tomorrow! Thank you for visiting and have a creative week! 


Sunday, May 9, 2021

Conie Fong Art & Design: Corey Mouse - Happy Mother's Day

Happy Mother's Day to all the moms! I hope you enjoy your special day! I made this Mother's Day card for my mom using Conie Fong Art & Design's adorable digital stamp named Corey Mouse. I just love this little mouse holding these Cosmos flowers. This stamp is versatile and can be used for any occasion. This stamp set also comes with a girl stamp named Maisy Mouse. You can get the bundle here

Don't forget to enter into our monthly Facebook challenges to win some free digital stamps or a guest designer spot! Head on over to the Conie Fong Art & Design fan page to check it out.

To make this card, I first printed the digital stamp on white cardstock and colored it with Copic markers. I also printed the sentiment on the white cardstock at this time.


Copic markers used:

Orange: YR09, YR07, RY04, YR02
Green: YG17, YG13, YG11
Brown: E37, E35, E34, E31, E00 (tummy only)
Pink (ears & nose): RV02, RV00, RV000
Cheeks: RV32, white gel pen
Ground: T2, T1

Next I cut orange cardstock to mat to fit my A6 card base and patterned paper to put on top of the orange cardstock. I made sure I cut orange cardstock mats for my card front and the sentiment. 

To finish the card, I die cut two of each butterfly to add to the card front. I layered each butterfly for a 3D effect. 


Thank you for visiting and I wish you all a creative week!