Saturday, November 28, 2020

Paper Nest Dolls - Letters to North Pole

If you are still working on your last minute Christmas cards, you aren't the only one! Every year I say I'm going to start them early, but I don't get them started until November. The card I'm sharing today is simple and all I had to do was color this digital image from Paper Nest Dolls called, Letters to North Pole, and add some color for the sky and snow. This stamp also come in red rubber.


I used a frame die to cut the mat for my card front, added a few enamel dots. Then I printed a sentiment, cut it out, and I was done. Easy peasy! Give it a try, it's a fun stamp to color.

Supplies:
  • Paper Nest Dolls Stamp: Letters to North Pole Digital or red rubber.
  • White cardstock cut to 8-1/2"Wx5", scored at 4-1/2" and folded in half for base card
  • White cardstock to print digital or rubber stamp image and sentiment
  • Purple cardstock: Cut with 4"W x 5-1/4"H frame die or trim paper to 4"W x 5-1/4"H and to mat sentiment (depends on your sentiment and size)
  • Coloring medium of choice. I used Spectrum Noir Illustrators.
  • Purple enamel dots or rhinestones
  • Your favorite adhesive
Spectrum Noir Illustrators used:

  • Skin: AP3, FS8, FS7, FS6, FS9
  • Cheeks: FS4
  • Hair: MB3, TN3, TN2, TN1
  • Purple: PV4, PV3, PV1 (Pink Violet Tri-blend)
  • White: IG6, IG2, Blender
  • Gray: IG9, IG6, IG2
  • Brown: TN8, EB7, TN7, EB1
  • Turquoise: GT1, GT2, GT3 (Turquoise Tri-blend)
  • Orange: OR1, OR2, B01
  • Snow: VB1, HB, Blender
  • Sky: TB1, IB1, Blender


Instructions:
  • Print or stamp your image and color
  • Cut the image to fit the purple mat/cardstock and adhere
  • Print or stamp your sentiment, mat with purple cardstock, and adhere to card front.
  • Adhere card front to the base card.
  • Add your enamel dots or rhinestones.

Thank you for visiting and I hope you have a great week. Please leave any questions or comments below. 


Friday, November 20, 2020

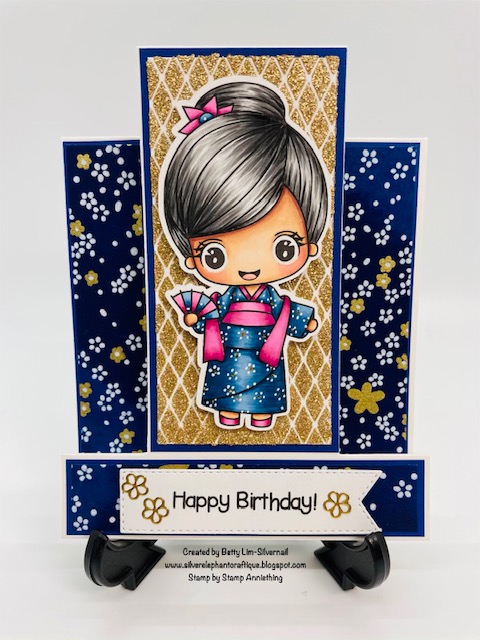
Happy Birthday Card using Stamp Anniething's Eloise & Texture Paste

On my bucket list is to visit Japan some day. I love the Japanese culture and even though Japan is very modern today, kimonos are still worn at many weddings and formal events. How cute is Eloise from Stamp Anniething in her beautiful kimono! She is my favorite stamp from Stamp Anniething and I wanted to showcase her by putting her on a step card. 


This step card is fun to make and not hard to do. Just be careful when cutting and scoring using the template I have provided. I made the gold background using a stencil and texture paste mixed with gold glitter. The pretty patterned paper is washi paper. Give this card a try! Fun one and it did take a little time to make, but it was worth the results. 

Supplies: 
  • Stamp Anniething Stamp - Eloise-Arigato
  • Stamp Anniething Stencil - Diamond Ball Crosshatch
  • Stamp Anniething Banner Die
  • Ranger Texture Paste - Transparent Gloss
  • Fine gold glitter
  • Palette knife to spread texture paste
  • White cardstock cut to 4-1/4"W x 11" H. This is your A2 size base card.
  • White cardstock cut to 2"W x 4-1/4" H for the gold stenciled background
  • White cardstock cut to 3-1/2"W x 1-1/2"H for the sentiment
  • Blue cardstock cut to 2-1/8"W x 4-1/2"H for the mat behind Eloise
  • Blue cardstock cut to 1"W x 4 3/8" H for the mat on the sides
  • Blue cardstock cut to 4-1/8"W x 7/8"H for the mat on the bottom
  • Washi paper (you can substitute with patterned paper) cut to 7/8"W x 4-1/4"H for the sides
  • Washi paper cut to 3/4"W x 4"H for the bottom
  • Bone folder
  • Paper trimmer
  • Gold flower stickers from Starform (you can substitute with stamps)
  • Coloring medium of choice - I used Copic markers
  • White gel pen
  • Gold Stickles/glitter glue
  • Your favorite adhesive (for the washi paper, use double sided tape or tape runner, not liquid glue)
  • Sentiment stamp - Eloise came with the sentiment Arigato (Thank You), but I used a Happy Birthday sentiment.
Copic markers used:
  • Skin: E04, E11, E21, E00, E000
  • Cheeks & Tongue: R32, R30
  • Hair: T7, T5, T3, T1
  • Blue: B99, B97, B95, B91
  • Pink: RV66, RV34, RV02, RV52
Instructions:
  • Color the stamp and fussy cut. Us the white gel pen and gold Stickles to add flowers onto her kimono. 
  • Create a sentiment of choice using any stamp. Cut it out using the Stamp Anniething a banner die. The set comes in many shapes. Use one you like.
  • For the base card, use a paper trimmer (or craft knife) and cut slits as shown below:
  • Score as shown below:

Using a bone folder, crease and fold on score lines so the card stands up as shown:


  • To create the gold textured background, mix approximately 1 teaspoon of glitter into 1 tablespoon of texture paste. I work on a teflon craft sheet, but you can use wax paper or any non-porous surface for this. Place the stencil over the 2"W x 4-1/4" H white cardstock and tape it down on the work surface. Make sure the stencil doesn't move. Using a palette knife, gently apply the texture paste evenly. Carefully lift off the stencil. If there is any texture paste left over, get another piece of cardstock and stencil again and save this for a future card. Let this dry completely. I used a heat gun to speed up the process.
  • Adhere all the mats and washi or patterned paper as shown below. If you are using washi paper, use double sided tape and not liquid glue. Liquid glue will make the washi paper wrinkle and buckle. 
  • Add the gold flower stickers to the sentiment then adhere the sentiment to the card.

Thank you for stopping by today. This stamp is so cute, I have used it for many other cards. I hope you give this card a try! If you have any questions or comments, please leave them below.


Wednesday, November 18, 2020

Conie Fong Art & Design - Poinsettia Happy Holidays Mini-slimline Card

I love poinsettias, especially red ones. When I went to Kona, Hawaii, poinsettias grew on big shrubs. It was so beautiful to see. It seems like they like the warm weather in Kona. This could be why the ones I get don't survive the cold winter weather where I live. Today I am sharing a mini-slimline card made with Conie Fong's digital poinsettia stamps. I used two of the three stamp designs from the Poinsettia Accessory Bundle. This bundle includes both the jpg and png formats.

Don't forget to enter in our monthly challenges over at the Conie Fong Art & Desing Facebook Group to win some digital stamps! 


I love this new mini-slimline size. The card measures 3-1/4"W x 6"H. These cards fit into a 6-1/2" envelope that you can buy anywhere. In the picture below, I placed the mini-slimline over a regular slimline size so that you can see the size difference. 


Supplies:
  • Digital stamps: Conie Fong Poinsettia Accessory Bundle
  • White cardstock for base card: 6-1/2"W x 6", scored at 3-1/4", folded in half. 
  • Black cardstock for mat: 3" x 5-3/4"
  • White cardstock for card front: 2-7/8" x 5-5/8"
  • Lattice die (digital or metal die). You can also use washi tape or black cardstock to create a lattice background.
  • Happy Holidays sentiment - Create one digitally or use a stamp.
  • Your favorite adhesive
  • Paper trimmer
  • Coloring medium of choice. I used Copic markers.
  • Enamel dots or rhinestones for embellishing.
Copic markers used:
  • Red: R89, R59, R46, R24
  • Yellow: Y17, YR23, YR21
  • Green: G28, G07, G24
Instructions:

I created this entire card front digitally using my Silhouette Studio software. After creating it in Studio, I printed it and colored the poinsettias and trimmed it to size as indicated in the supplies list. If you do not have software to create this digitally, you can still make this card by using these following instructions.
  • Create the lattice background using thin black washi tape, black cardstock strips or a lattice die.
  • Create the sentiment using Microsoft Word or stamp and cut it to fit the card.
  • Print, color, and cut the poinsettias and adhere to the lattice. 
  • Adhere mat to the base card and then adhere the card front.
  • Adhere the enamel dots or rhinestones.

Thank you for stopping by and I hope you give this card a try. If you have any questions or comments, please leave them below. 


Monday, November 16, 2020

Rachelle Anne Miller Creative Studios - Snowman Hug

It doesn't snow where I live in Northern California, but I am less than two hours away from the snowy mountains. It's been a long time since I've gone to the snow to build a snowman. I just remember it was too cold to build one as big as this one on my card! How cute is this little girl hugging this big fluffy snowman? This cute digital stamp is from Rachelle Anne Miller Creative Studios and it's called Snowman Hug. This stamp can be used for all the winter holidays, birthdays, or an all occasion card. 


I colored this card with my new Castle Art colored pencils. My son got me the 120 pencil set in August for my birthday and this is the only second time I've used them. The pencils are very creamy and easy to blend. This is a quick card to color and the rest of the card are die cuts. Give it a try!

Supplies:
  • Rachelle Anne Miller Creative Studios Snowman Hug Digital Stamp - print size is 3-1/4" x 3-1/4".
  • White cardstock cut 6" x 6" for the base card.
  • Patterned paper cut to 5-3/4" x 5-3/4" (Use any color coordinating paper. I used the heart pattern from The Paper Studio, Darling Deerest paper pad from Hobby Lobby).
  • Solid aquamarine/green paper cut to 4" x 4" (I used a frame die).
  • Solid pink/raspberry paper cut to 4-1/8" x 4-1/8".
  • 4 Christmas tree die cuts 2-1/2" trees cut from white cardstock.
  • Large sentiment (I used my Silhouette Cameo to cut out the sentiment. You can use a die or stamp of choice).
  • Pearl or rhinestone embellishments.
  • Paper trimmer.
  • Your favorite adhesive.
  • Coloring medium of choice (I used Castle Arts colored pencils. Colors are listed below).
Castle Arts Colored Pencils Used (I used Gamsol & a blending stump):
  • Pink/raspberry: 025, 086, 031
  • Aquamarine/green: 052, 102, 106
  • Blue: 048
  • Background: 03, 048

Instructions:
  • Print and color your digital stamp.
  • Layer and adhere the card together as shown below.
  • Add the embellishments.

Thank you for stopping by! I hope you give this card a try. It's such a cute stamp!


Saturday, November 14, 2020

Paper Nest Dolls - Amara with Donut

Pumpkin spice is one of those flavors I love in baked goods, but not so much in drinks. My favorite is pumpkin spice cake donuts. I wish I can find a donut as big as Amara! Isn't she just adorable with that donut almost as big as her hair?! This stamp is available from Paper Nest Dolls in red rubber and in digital formats. This stamp is versatile and can be used for many occasions, such as birthday, thank you, friendship, etc.


I made this A2 card using the digital format (digi stamp) and colored it using Spectrum Noir Illustrator markers. This is a fun and easy card to make. Give it a try!


Supplies:
  • Paper Nest Dolls Stamp -  red rubber or digital.
  • White card stock cut to A2 size (4-1/4” x 5-1/2”) for base card
  • White card stock to stamp or print stamp image
  • Orange card stock cut to 4-1/8" x 5-3/8"
  • Pumpkin or fall patterned paper cut to 4" x 5-1/4"
  • Green pattern paper for accent cut to 2-1/4" x 3-3/4"
  • Doily die - if you don’t have a doily die, use a circle die with a scalloped edge
  • Sentiment - I created mine on my computer using Microsoft Word, printed, and cut it with a stitched rectangle die. Alternative is to use a stamp and cut it with a paper trimmer.
  • Pumpkin die cuts or digital stamps (two) -I used my Silhouette to cut out a digital stamp.
  • Paper trimmer or rectangle nesting dies
  • Your favorite adhesive
  • Adhesive foam dots or foam squares
  • Your favorite coloring medium - I used Spectrum Noir Illustrators
Spectrum Noir markers used:
  • Hair: MB2, TN3, TN2, TN1
  • Skin: AP3, FS8, FS7, FS6, FS9
  • Cheeks: FS4
  • Donut: TN7, TN5, TN3
  • Frosting: OR3, OR1, B01, LY1
  • Green: GT3, GT2, GT1, CR1, CR3, CR6
  • Shadow: IG6, IG2
  • Pumpkins: GB4, OR1, B03, B01
  • Pumpkin stem: GB4, EB4, TN1
Instructions:
  • Stamp or print image on white card stock 
  • Color the stamp 
  • Cut out the image using a paper trimmer or rectangle die
  • Adhere the layers of papers as shown on the card below. Be sure to use foam dots or squares for the sentiment and the top pumpkin.


 Thank you for stopping by. Have a wonderful pumpkin spice season! If you have any questions or comments, please leave them below.


Friday, November 13, 2020

Blank Page Muse - Classic Poinsettia Card

I love red poinsettias, but can never make them live past Christmas. When I saw the humongous poinsettia bushes in Kona, Hawaii, I was convinced that they like warmer weather. I'm sharing today the beautiful poinsettia and sentiment stamps from Blank Page Muse Art Rubber Stamps called Classic Christmas Stamp Set by Pam Bray Designs

I'll be showing you how to make your own beautiful patterned paper with some scraps and washi tape then showcasing your card with the beautiful colored poinsettia stamp. I hope this inspires you to try making your own card and entering it in our monthly challenge, "Holiday Play."

All the supplies and instructions are listed below to make this A2 size card.

Supplies:

  • Blank Page Muse Stamp:  Classic Christmas Stamp Set
  • White cardstock - Cut to the following sizes:
    • 8-1/2" x 5-1/2" to stamp the poinsettias  twice
    • A2 size for the base (8-1/2" x 5-1/2"), fold in half
    • 4" x 5-1/4" for the mat (card front)
    • 4" x 4" for the frame (Cut 2) 
    • 3" x 2" for the sentiment
  • Black cardstock strips - Cut to ½” x 7” (Cut 3)
  • Black cardstock strips - Cut to 1/2" x 5” (Cut 4)
  • 3mm wide gold washi tape 
  • Nested square dies - 3" x 3" and next smaller size (approx. 2-1/2" x 2-1/2")
  • Black stamp pad
  • Stamp positioner or stamping block
  • Scissors
  • Paper trimmer
  • Your favorite adhesive
  • Your favorite coloring medium (I used Copic markers. Colors listed below)
  • Clear glitter pen (I used Spectrum Noir Sparkle pen)
  • White gel pen
Copic markers used:

Red: R39, R46, R43, R30
Green: G28, G05, YG03

Instructions:
  • Stamp two of the poinsettias, color, and fussy cut. Set aside.
  • To make the background paper, using the 4" x 5-1/4" mat, lay out the black cardstock strips 1/4 inch apart. Start in the middle and work your way to the outside corners. Adhere to the card front.

  • Turn your cardstock to the back and use scissors to trim off the excess black strips.
  • Adhere the gold washi tape in between each black stripe making sure that you have an overhang of 1/4" to fold to the back. 
  • Using the 4" square white cardstock, cut out a 3" square with the die.
  • Using the other 4" square white cardstock, nest the 3" and 2-1/2" dies to cut out a frame.
  •  Add gold washi tape around the frame. Adhere the frame to the 3" mat then adhere onto the card front.
  • Adhere the poinsettias.
  • Adhere the card front onto the base cardstock.
  • Stamp the sentiment on white cardstock and trim to size. Use black cardstock to mat the sentiment and adhere to the card front.

  • Using a glitter pen, add some glitter to the centers and tips of the poinsettias.
  • Using a white gel pen, add some accent dots to the poinsettias.

I hope you give this card a try. It's a great way to use up your scrap cardstock and it's easy and fun! Thank you for stopping by! ~Betty~

Wednesday, November 11, 2020

Blank Page Muse - Day of the Dead Sugar Skulls Candle

Dia de los Muertos, or the Day of the Dead, is a Mexican religious holiday that is celebrated November 1 and 2. Sugar skulls are decorated in bright colors and used as an offering celebrating the deceased. The sugar skulls have become popular in the art world and have become a favorite design, not just for celebrating the Day of the Dead, but also for wall art, decorative items, and even tattoos. Today, I am sharing a candle I made using several of the stamps from Blank Page Muse Art Rubber Stamps called the Day of the Dead Sugar Skulls Marigold Flowers Sacred Heart Art Rubber Stamps designed by Donna Gray.

Try making one and join us in November's Blank Page Muse monthly challenge. The theme is "Easy Holiday Play." 


These candles are easy to make and you don't need very many supplies. They don't cost much to make and they are great gifts for any occasion. Let's get started!

Supplies:
Instructions:
  • Stamp the small sugar skull, sacred heart, and roses (stamp 2) with a black ink pad on tissue paper (I stamped 4 roses, but only used 2).
  • Stamp the hearts (stamp 2) with a red ink pad on tissue paper.
  • Color the stamps with bright colored markers. Color them any color you like.

  • Cut out the stamps leaving a small border. For the heart stamp, cut off the dots (or you can leave them).
  • Using a tape runner, add a dab of tape onto the back of the tissue then adhere to the candle. Work with one large stamp or 2 small stamps at a time! 
  • Wrap a piece of wax paper around the candle, pulling it taut. Make sure there are no air bubbles.


  • Using a heat gun or hair dryer, apply heat over the stamp. When the stamp becomes shiny, it is adhered. Do not over heat or the candle will melt.
  • Unwrap the wax paper and repeat applying one or two stamps at a time using a new piece of wax paper.


  • For gift giving, wrap in cellophane and tie with a ribbon.


I hope you enjoyed this tutorial and give this a try. Visit Blank Page Muse Art Rubber Stamps for more stamps you can use to make candles. If you have any questions or comments, please leave them below. Thank you for visiting!


Sunday, November 8, 2020

Guest Designing for Copic for ALLE!

What an honor to be asked to be a guest designer this month for Copic for ALLE! This new Facebook Group was formed this summer by three women who love to color. They wanted a group where other colorists can share their love of coloring and their works of art to inspire others. This is a challenge group where the theme is a color of the month. You can use any medium, such as alcohol markers, colored pencils, watercolors, etc. For November, the color is blue. I am sharing this A2 size card I made using several digital stamps from a bundle called Coffee & Love from Graciellie Designs


I colored this card using Copic alcohol markers (colors listed below) . In this stamp bundle, the digital patterned paper was included. All you need to do is place all the stamps where you want them and print on cardstock! So easy to do. I just love digital stamps and papers. Give it a try!


Copic colors used:
Blue: B07, B05, B02, B00
Green: YG67, YG17, YG11
Pink: RV002, RV10, RV00, RV000, T1
Brown: E37, E35, E34


Thank you for visiting! If you have any questions or comments, please leave them below. Have a great day!


Saturday, November 7, 2020

Blank Page Muse - Have a Wonderful Christmas full of Love!!!

It's time to finish up (or start) making your Christmas cards. I like to make a few cards that are classic and traditional.  The card I'm sharing today is fun and easy to make. It's stamping, coloring, and a little masking. I used several stamps from Blank Page Muse Art Rubber Stamps called Classic Christmas Stamp Set by Pam Bray Designs. All the supplies and instructions are listed below to make this A2 size card.


Supplies:

  • Blank Page Muse Stamp:  Classic Christmas Stamp Set
  • White cardstock - Cut to A2 size for the base (8-1/2" x 5-1/2"), fold in half
  • Brown cardstock - Cut to 4-1/8" x 5-3/8" for the mat
  • White cardstock - Cut to 4" x 5-1/4" to stamp image
  • White cardstock - Cut to 2" x 1-1/8" to stamp sentiment
  • Brown cardstock - Cut to 2-1/8" x 1-1/4" to mat sentiment
  • Masking tape (I used Eclipse Art Masking Tape)
  • Black ink pad
  • White gel pen
  • Favorite coloring medium (I used Copic markers. Colors listed below)
  • Favorite adhesive
  • Adhesive foam squares or dots
  • Paper trimmer
  • Corner punch
  • Stamp positioner or stamping block (I used a stamp positioner)
  • Optional items: Snowflake embellishment
Copic Markers Used:
  • Deer: E18, E15, E13, E11, E00
  • Wreath and pine needles: G28, G94, G07, YG03
  • Fence and pine cones: E47, E44, E43, E42
  • Snow: BV31, C1, B000, 0
  • Holly berries: R29
  • Sky: B000, B0000
Instructions:
  • Stamp the deer onto the masking tape and fussy cut close to the edge. You don't need to cut above the wreath on the left side. You will need to mask the deer so that when you stamp the fence, it will appear behind the deer.
  • Stamp the deer onto the 4" x 5-1/4" cardstock.
  • Place the mask over the stamped deer
  • Position the fence stamp so that it lines up with the hooves of the deer and stamp the image.
  • Peel off the mask.
  • Stamp the pine cones at the top of the page.


  • The image is ready to color. Start by coloring the deer. 
  • Color the wreath. After coloring the wreath, add holly berries. If you are using alcohol markers or water-based markers, use a white gel pen to make the holly berries. Let it dry, then use a red marker to color over the white gel pen to make the berries. If you are using colored pencils, use a white pencil to make the berries first, then use the red pencil.


  • Color the snow. Don't forget the snow on the fence.
  • Color the fence
  • Color the sky. Make sure the sky is colored BEFORE you color the pine cones and branches.
  • Color the pine cones then the pine needles.

  • Stamp the sentiment onto the 2" x 1-1/8" white cardstock. 
  • Using the corner punch, punch the corners that are diagonal from each other. Do the same with the 2-1/8" x 1-1/4" brown card stock. Adhere the sentiment onto the brown cardstock.
  • Use foam squares or dots and adhere the sentiment to the card front.
  • Adhere the card front to the 4-1/8" x 5-3/8" brown cardstock.
  • Adhere the card onto the white base card.
  • Optional: Add a snowflake embellishment or any embellishments you wish.


Thursday, November 5, 2020

Rachelle Anne Miller Creative Studios - Happy Thanksgiving

It's hard to believe that Thanksgiving here in the USA is only three weeks away! It's finally starting to feel like fall here with the trees starting to change colors. I love this time of the year. Today I am sharing a 6" x 6" Happy Thanksgiving card that you can make for a friend or family member or save as a decoration for your home. I used the beautiful Rachelle Anne Miller's Thanksgiving digital stamp. 

I hope this card inspires you to enter Rachelle Anne Miller's Digital Stamps Facebook Group's monthly challenge. The challenge is Anything Goes but if you do the Optional Twist you get a BONUS entry for your chance to win 2 digital stamps to the store! This month's twist is "Give Thanks," this can be a Thanksgiving Theme, Thank You Card, or just Gratitude to a Friend or Family member.


I colored this stamp with my Spectrum Noir Illustrator markers (colors listed below) and made a clean and simple card. With digital stamps, you can make it any size you like. I made mine 6x6 so that I can use it as a decoration for my home. After coloring the image, mat it with diagonal striped paper with fall colors and your card is done! It's a quick and easy card.

Spectrum Noir Illustrator markers used:

Cornucopia: EB1, MB3, MB1, FS9, EB7, EB4, EB2
Orange: EB1, B03, B01, LY1
Light brown/tan: EB1, MB2, FS9
Purple: DP3, DP1, PP1
Green: CG3, DG2, CG1, LY1
Dark Orange (carrots): EB1, B03, OR1, B01
Yellow: GY2, CG1, LY1
Red: PP6, PP4, PP2
Blue: VB3, VB1, TB1, BT1


Thank you for stopping by and hope you enjoy the fall season! If you have any questions or comments, please leave them below.


Monday, November 2, 2020

Conie Fong Art & Design - Christmas Gnomes Holiday Card

I have always loved the look of the traditional red and green colors for Christmas, but have discovered I also like pink, blue, and yellow! This color seems more fitting for the countries that celebrate Christmas when it's summer. I am sharing this adorable Christmas card using Conie Fong's new release, Christmas Gnomes. This set of digital stamps come in PNG and in JPG formats. All of Conie Fong's stamps are currently 25% off until November 15. It's a great time to stock up!


I made this slimline card using a template/die I created using Silhouette Studio. I used my Cameo to cut it out. I also created the Ho Ho Ho in Silhouette as well. You can use slimline metal dies or paper trimmer & circle punch to create the card front panel if you don't have a Cameo. For the Ho Ho Ho, you can use any sentiment stamp or die.

Supplies:
  • Conie Fong Christmas Gnomes -Links above for PNG and JPG formats
  • Your favorite coloring medium (I used Copic markers. Colors listed below)
  • White cardstock cut to 7"W x 8-1/2" H, scored and folded in half for the slimline base card.
  • Blue cardstock cut to 3-1/4"W x 8-1/4"H with cut out 2" circles (see substitute above).
  • White watercolor paper cut to 2-3/4" square. Cut 3.
  • Distress inks: Mermaid Lagoon, Faded Jeans
  • Ink blending tool
  • Water spritzer/spray bottle
  • Paper towel
  • Your favorite adhesive
  • Three white Christmas tree die cuts that are 2-1/2" H. (I used a die a friend gave me as a gift)
  • Double sided adhesive foam squares, dots, or tape
  • Small multi-colored rhinestones 
Copic markers used:
  • Skin: E04, E11, E21, E00, E000
  • Cheeks: R32, R30
  • Hair: T5, T3, T1
  • Blue: B06, B04, B02, B00
  • Pink:RV66, RV55, RV52
  • Yellow: Y38, Y35, Y32
Instructions:
  • Print, color and cut out the Christmas gnomes.
  • Using the water color paper, add the distress ink starting with Mermaid Lagoon at the top. Blend Faded Jeans on the bottom. Spritz water onto the ink, wait 10 seconds, then blot with a clean paper towel. Let dry.

  • Adhere to the back of the slimline panel front so it shows through the circles.
  • Adhere the Christmas tree dies to the center of each circle.

  • Using double sided adhesive foam squares, dots, or tape, adhere the gnomes onto the panel.

  • Adhere the Ho Ho Ho sentiment. 
  • Adhere the panel onto the white base card.
  • Adhere the rhinestones onto the Christmas trees.

Thank you for stopping by and I hope you give this card a try. If you have any questions or comments, please leave them below.