Thursday, April 29, 2021

Scrappy Boy Stamps: 3D Believe in the Magic of Christmas!

I am having so much fun with Scrappy Boy Stamps' newest stamp set called Pretty Little Things. I could not resist making another Christmas card, but this time I made a 3D step card that can also be used as a Christmas display. Inspired by The Nutcracker, this stamp set is not just for Christmas, and it comes with coordinating outline dies so you won't have to do any fussy cutting!

Please join the Scrappy Boy Stamps Inspiration Facebook Group for more ideas and inspiration! 


First I stamped all the images, cut them out with the coordinating outline die, and colored them with Copic markers. I then stamped and trimmed the sentiment and added a mat out of black cardstock. 


Copic Markers Used:

Ballerina 
Skin: E04, E11, E21, E00, E000
Cheeks: R20, White gel pen
Hair: E39, YR27, YR24, Y32
Pink: RV55, RV63, RV52
White: T3 T0, 0

Soldier 1
Skin: E04, E11, E21, E00, E000
Cheeks: R20, White gel pen
Hair: T9, T5, T3, T1
Red: R59, R37, R24, R32
Blue: B16, B14, B12
White: T3, T0, 0
Brown: E74, E71, E70
Gold: E25, Y38, Y21
Black: C9, C7, C5, C3

Soldier 2
Skin: E04, E13, E11, E21, E00
Cheeks: R20, White gel pen
Hair: E59, E25, E33, E31
Red: R59, R37, R24, R32
Blue: B16, B14, B12
White: T3, T0, 0
Brown: E74, E71, E70
Gold: E25, Y38, Y21
Black: C9, C7, C5, C3

Train
Red: R59, R37, R24, R32
Blue: B16, B14, B12
Yellow: Y17, Y15, Y11
Green: G07, G05, G02
Windows: B000, BV000

Bears
Bear 1: E74, E71, E70
Bear 2: E35, E33, E31

Rocking Horse
Brown: E74, E71, E70
Mane: E39, YR27, YR24
Red: R37, R24, R32

Nutcracker:
Red: R37, R24, R32
Blue: B16, B14, B12
Black: C7, C5, C3

To make this 3D step card, cut out the card base at 12"W x 5-1/4"H and score at 1-1/4", 2-1/2', 4-1/4", 6", and 9".  Fold the card so that it forms a zig zag with the largest panel in the back, which will be the stand.

Then I cut out a 5-1/4" square cardstock panel. I adhered patterned paper to this square panel. Then I decorated this square panel as follows (make sure you decorate the panel before you add to the card base!).
  • Decorate each step with a snow hill using white glitter cardstock. I used a hill die from Gina Marie Designs. This is for all 3 step/panels of the card.
  • The Christmas tree is cut using an Ellentina Cutting Die out of green cardstock and the snow is white glitter cardstock. The tree is decorated with rhinestones from my stash. The star is a die from Gina Marie Designs (from the same set as the hill). Adhere the tree to the square panel using double sided foam tape.
  • The swirls on the card is actually the pumpkin vines from a pumpkin shaker die set from Stamp Anniething. The snowflakes are from Hobby Lobby.

To finish the card, I adhered all the colored stamps and sentiment with a combination of glue dots and liquid glue.  I added pre-made poinsettia flowers to the front with glue dots and the card is finished. 


I hope you give this card a try! This stamp set is just fabulous and fun to play with! Thank you for visiting and have a crafty week! 


Tuesday, April 27, 2021

Conie Fong Art & Design: Angel Prayers - Hold on Tight to Your Dreams

We all need some encouragement from time to time, especially during tough times. California is still in the midst of the COVID pandemic; however, things are heading in the right direction. A lot of people had to put their dreams of travel, business, and education on hold. This is the perfect digital stamp from Conie Fong Art & Design, called Angel Prayers Without Flower, to make cards to send to friends and family that have had to put their dreams on hold. This stamp also comes with the angel with flowers around her feet and is available in both JPG and PNG formats.

Don't forget to enter into our monthly Facebook challenges to win some free digital stamps or a guest design spot! Head on over to the Conie Fong Art & Design fan page to check it out.


I first printed the stamp to fit on an A2 size card and colored it using Copic markers.


Copic markers used:
Hair: E59, E25, E33, E31
Skin: E04, E11, E21, E00, E000
Cheeks R20
Blue: B28, B24, B23
Purple: V17, V15, V12
Wings: B01, B00, B000, BV000

Then I printed the stamp again on masking paper so I can mask it to ink blend the cloud background. I used the Cloud Stencil Builder from Stamp Anniething and Distress Oxide inks in Spun Sugar and Tumbled Glass.

I cut out a scalloped mat using a Gina Marie Designs die, trimmed the card front to fit, and adhered it. Then I adhered it to the card base that I trimmed to 3-1/2"W x 9-3/4"H and folded it in half to make it a top folding card. 

I used a sentiment from Tim Holtz's Small Talk sticker pack. I added a few enamel dots from Gina Marie Designs to complete the card.


Thank you for visiting and I hope you give this card a try. Fun to color and it's a cute stamp you can use for many occasions. Have a fun and creative week! 

Sunday, April 25, 2021

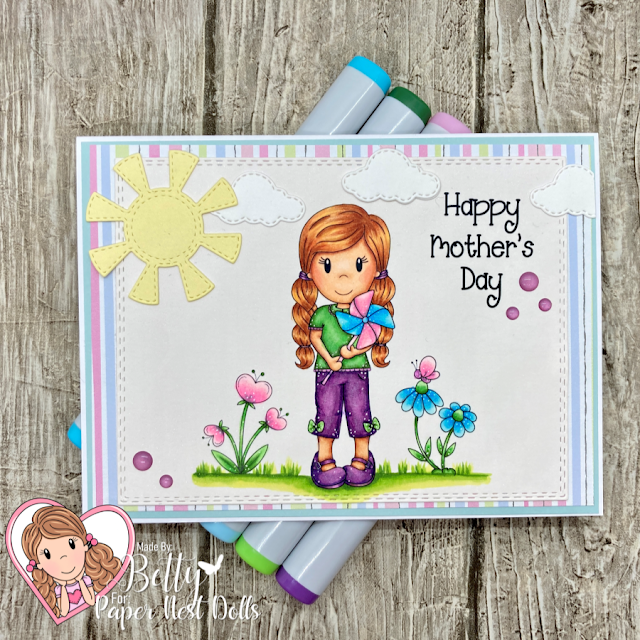
Paper Nest Dolls: Emma with Pinwheel - Happy Mother's Day Card

Mother's Day is just a couple of weeks away. I am lucky that my 88 year old mom is still with us to celebrate this special day.  It's time to make Mother's Day cards and today I'm sharing one I made with the newly released digital stamp called Emma with Pinwheel from Paper Nest Dolls. I also added some flowers from the Fairy Set to create this simple, but cute A6 size card. 


For this card, I used digital images to create the card front along with sun and cloud die cuts. First I imported the Emma with Pinwheel and the flowers from the Fairy Set into my Silhouette Studio software and sized the images for an A6 size top-folding card. I then created the Happy Mother's Day sentiment and placed it where I wanted it. I then printed it and used a retangular die from Gina Marie Designs to cut it. I colored the images using Copic markers.


Copic Markers Used:
Hair: E15, E34, E11, YR20
Skin: E04, E11, E21, E00, E000
Cheeks: R20, R30
Green (shirt): YG17, GY13, YG11, T3
Purple: V17, V15, V12
Blue: B02, B00, B000
Pink: RV02, RV00, RV000, T1
Green (grass): YG67, YG25, YG23, YG21


Next I die cut the sun using light yellow cardstock and clouds using white cardstock. For the cloud in the middle, I glued two together to add dimension and cut part of the cloud on the right. 

I used light blue cardstock and patterned paper from my stash for the mats and adhered the card front, sun, and clouds. To finish the card, I added a few enamel dots from Gina Marie Designs. 


Thank you for visiting and have a creative week!


Wednesday, April 21, 2021

Rachelle Anne Miller Creative Studios: Happy Bird-Day!

You can never have too many cute birthday cards in your stash. I try to make some that are age appropriate so I like to have some that are cute and whimsical for younger people. The card I'm sharing today is an adorable digital stamp from Rachelle Anne Miller Creative Studios called Birthday Bird. These digital stamps come with the normal black lines and now comes in gray lines for a no-line coloring technique. This is my very first no-line coloring card! It's a little harder to color, but I like the results. 

Don't forget to enter our monthly challenge to win some digital stamps! 


First I imported the digital stamp into my Silhouette Studio software. I also imported the flag banner. This was a colored clip art. I sized the images to fit onto an A2 size card then printed it out. I used a double stitch rectangular die from Gina Marie Designs to cut it out. I used Copic markers to color the digital stamp.

Copic Colors used:

Blue (Bird, Ribbon, Bow): BG05, BG02, BG01, BG000
Coral (Bird, Mouse ear & nose, hearts): R22, R21, R20, R01
Yellow (Present): Y38, Y35, Y11
Gray (Mouse): W6, W4, W2, W0
Brown (Bear): E33, E53, E51

Next I used a Molotow masking liquid pen to mask the bird and mouse feet so that I can add some grass. I used a grass stencil from Stamp Anniething and used Oxide Inks in Mowed Lawn and Lucky Clover to ink the grass. To finish the card, I cut an A2 size scalloped edge panel and a black cardstock mat for the card front. I adhered this onto a card base that is 1/4" smaller all the way around so that the scalloped edges stick out. I adhered all the layers with liquid glue.


Thank you for visiting and I hope you liked my first no-line card project! Have a very creative week!

Monday, April 19, 2021

Stamp Anniething: Jameela...ooh la la!

Stamp Anniething's April stamps are special as the three new chibi dolls represent the company's commitment to diversity and inclusion. Today I am sharing a card I made with the beautiful Jameela - Friends Listen stamp. This stamp can be used for many occasions. I kept this card generic so that I can use it as a birthday, friendship, celebration, or hello card.


Stamp Anniething supplies to make this card:
To make this A2 size card, first stamp Jameela and cut it out using the coordinating outline die. Color the stamp with your favorite coloring medium. I used Copic markers.


Copic markers used:
Skin: E04, E13, E11, E21, E00, E000
Tongue: R22, R20
Cheeks: R20, R30
Eyes: E35, E33, E31
Blue: B02, B01, B00, B000, T77
Pink: RV02, RV00, RV000, T1
Gray (Purse & Shoes): T5, T3, T2, T1

To make the background, I did the ink smooshing technique using Distress Spray Stains in Brushed Pewter, Tarnished Brass, Broken China, and Abandoned Coral. I then ink smooshed another piece of cardstock using the same spray colors except Abandoned Coral and used this piece to cut the Eiffel Tower & ooh la la word die. I used black cardstock for the outline for the word die and to mat the card front.

I used the circle Shaker Basics Die to cut the inner circle out of black cardstock and then used a embossing folder. Then I cut the outer circle frame out of gold cardstock. 


Thank you for visiting! Have a very creative week!

Saturday, April 17, 2021

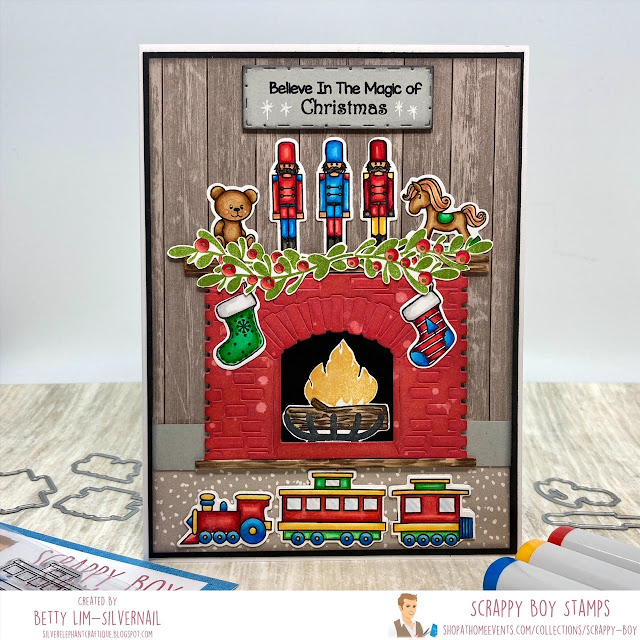
Scrappy Boy Stamps New Release: Believe in the Magic of Christmas

I am determined not to wait until two weeks before Christmas to make my cards this year! I am so thrilled that Scrappy Boy Stamps came out with a new release that featured a set that can be used for Christmas cards, or not, called Pretty Little Things. Inspired by The Nutcracker, this stamp set is not just for Christmas. Check out my April 15th blog post for a non-Christmas card using stamps from this set. 


For this card, I used the nutcracker, teddy bear, rocking horse, and train set from the stamp set. These stamps come with coordinating outline dies. The stamps and dies also come in a bundle

I first stamped the teddy bear, rocking horse, train set, and three nutcrackers and cut them out using their coordinating outline die. Then I colored them with Copic markers.

Copic Markers Used:
Teddy Bear: E35, E33, E31
Rocking Horse: E35, E33, E31, G07, G05, G02
Train set: (Red) R59, R37, R24, R32; (Blue) B16, B14, B12; (Yellow) Y17, Y15, Y11; (Green) G07, G05, G02; Windows B000, BV000

I wanted to create a cozy scene with a fireplace, so I used a fireplace die from Hero Arts and a garland stamp from Michael's. In order to get all the pieces to fit, I created an A6 size card (4-1/2" x 6-1/4"). I die cut the fireplace and ink blended it with Distress Ink in Fired Brick. I stamped the fire using Distress Ink in Wild Honey. I stamped the grate, log and stockings using Momento Tuxedo Black so that I can color them using Copic markers (same shades of browns, reds, and blues used above). I cut out a piece of black cardstock for the backing of the fireplace.

I stamped the garland using a Stamp Anniething Hybrid Ink pad in Willow Bough. I colored the berries using Copic markers (red shades listed above).


I stamped the sentiment on gray cardstock and cut it with a stitched rectangle die and inked the edges with Distress Ink in Black Soot.


I used patterned paper from Echo Park 6x6 pad called Christmas Delivery to create the wall, a strip of gray cardstock for the floor board, and another patterned paper from Echo Park for the carpet. 

I adhered the fireplace and sentiment using double sided foam tape and everything else is adhered using liquid glue.  


Scrappy Boy Stamps is a new stamp company and this is their second set. Please check out the store for their first set. Have a great day and a crafty week! 


Friday, April 16, 2021

Blank Page Muse Art Rubber Stamps: Art Journal - Nature's Art

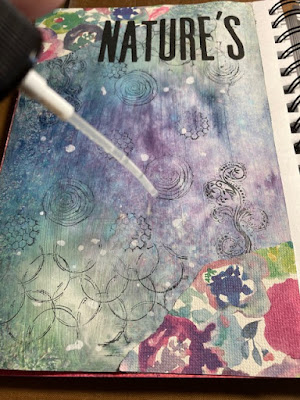
My favorite season of the year is Spring. I love how the trees are bare one week then full of leaves the next, the smell of fresh cut grass, and the sound of birds chirping. My husband and I walk every morning and it's been a delight to see all the different flowers blooming everywhere. This inspired me to create my art journal pages called Nature's Art using stamps from Blank Page Muse Art Rubber Stamps (please see supplies list below for list).

This is the perfect project to make for the BPM monthly challenge for a chance to win a prize! The theme for April is "nature." Here is the link to the challenge: CHALLENGE.


Supplies:
  • Blank Page Muse Art Rubber Stamps: 
  • Stamping block
  • Washi tape, wax paper, Press and Seal (to protect coils, margins, and other pages)
  • White gesso
  • Paint brush
  • Distress Spray inks: Bundled Sage, Salty Ocean, Chipped Sapphire, Seedless Preserves, and Picket Fence
  • Water spray bottle
  • Heat gun (optional)
  • Floral patterned paper of choice
  • White cardstock for stamping images
  • Coloring medium of choice. I used both Prismacolor pencils and Copic markers
  • Scissors
  • Black cardstock
  • Alphabet dies
  • Press and Seal or Transfer tape
  • Liquid glue
  • Distress ink pad: Black Soot
  • Distress ink blender brush/pad
  • Water dropper
  • Collage Medium (I used Tim Holtz Distress Collage Medium)
  • Sentiment stickers (I used Tim Holtz - Small Talk stickers)
Instructions:
  • Prepare the art journal pages by covering the coils with Press and Seal and the margins with washi tape. Add wax paper under the pages. 

  • Paint on a layer of gesso and let it completely dry.

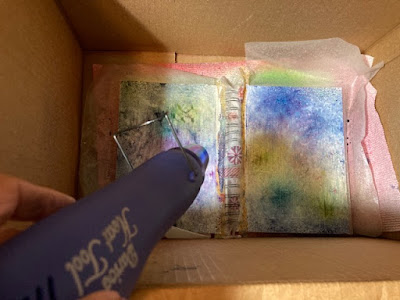
  • Place the journal into a box so the over spray is contained in the box. 
  • Spray the Distress Ink onto the pages, but don't overlap too much. Spray water over the ink so the ink will spread. Gently use a paper towel to mop up puddles.  Use a heat gun to quick dry or air dry.


  • Using the Background Grunge stamps, randomly stamp images using a stamp block or without. The entire image of the stamp does not have to stamp to create the background. Select a variety of stamps from the set to use. 


  • Tear patterned paper corners and adhere using collage medium.
  • Stamp and color the butterfly, sunflower (stamp partial or cut flowers in half since they will be placed on edge of journal page), and dragonfly stamps then fussy cut. Use any colors you like, but here's what I used:
    • Butterfly (Copic markers): Y17, B02, RV02
    • Dragonfly (Copic markers): YG11, BV00, BV01
    • Sunflower (Copic markers): Y17, Y35, Y13, E33
  • Stamp and color the Girl with Basket of Flowers. Use any colors you like. Here are my Prismacolor pencil colors:
    • Skin: 116, 018, 019, 020
    • Cheeks: 082
    • Hair: 117, 114, 010
    • Blue: 042, 043
    • Tree & Basket: 114, 116
    • Green for leaves and flowers: 110, 061
    • Pink flowers: 080, 082
    • Grass: 057, 110, 061
    • Sky: 101
    • Walkway: 065
  • Stamp and color the Dragonfly Lady. Use any colors you like. Here are my Copic colors:
    • Hair: E39, YR27, YR24, Y32
    • Skin: E04, E11, E21, E00, E000
    • Cheeks: R20
    • Lips: R21
    • Dragonflies: YG11, BV00, BV01
    • Stars: Y24, Y11, Y15
    • Blue background: B00, B000
    • Bubbles: Y00, B000, BV000; plus Castle Arts colored pencil #35 lavender light.
  • Using the Distress Ink in Black Soot, ink the edges of each image. Set aside.
  • Using alphabet dies and black cardstock, cut out the words "nature's art."
  • Using a self-healing mat or surface with grid lines, add a line of removable adhesive onto the mat. Line up the die cuts onto the mat and place a piece of transfer tape or Press and Seal on top to pick up all the letters at once. Use a spatula to help lift the die cuts off the mat.


  • Add liquid glue to the die cuts the place them onto your journal pages.

  • Carefully peel off the transfer tape or Press and Seal.
  • Using the end of the water spray pump, add a few big drops of water onto the journal pages for some texture (optional - this was a last minute, spur of the moment idea).

  • Adhere all the images onto the journal pages using collage medium. Add the sentiment stickers.
  • Lastly, apply a light coat of collage medium all over the pages.
The art journal page is complete! This was a really fun project to do. Give it a try!


Thank you for stopping by and have a very creative week! 

Be sure to follow us at:


Thursday, April 15, 2021

Scrappy Boy Stamps April New Release: Pretty Little Things

How cute are these new release stamps from Scrappy Boy Stamps! These stamps were inspired by the Christmas ballet, The Nutcracker, but they can be used for any occasion, not just Christmas. This stamp set is called Pretty Little Things and there are coordinating outline dies for those who don't like to fussy cut. There is a bundle available too! There are one Christmas sentiment and four non-Christmas sentiments with this stamp set. All ten of the stamps can be used for Christmas or non-Christmas projects! Today I am sharing a birthday card I made with the ballerina, music box, teddy bear, and rocking horse, but I'll be making Christmas cards this month too.


To make this A2 size card, I first stamped the ballerina, music box, teddy bear, and rocking horse then cut it out using the coordinated outline dies. I then colored all the images using Copic markers. 


Copic Markers Used:
Hair: E59, E25, E33, E31
Skin: E04, E11, E21, E00, E000
Cheeks: R20, R30
Dress: BG49, BG13, BG34, BG10, RV55, RV63, RV52, RV00
Pink: RV55, RV63, RV52, RV00
Gold: E25, Y38, Y21
Bear: E35, E33, E31
Horse Hair: E25, Y38, Y21
Horse: E35, E33, E31
Horse Rocker & Sadddle: BG49, BG13, BG10
Shelf: E47, E44, E43, E42

I then used a wacky outline die to cut out the A2 card front. I hand drew the shelf on the bottom of the card and colored it with Copic markers. Then I ink blended the center of the card with Distress Oxide ink in Spun Sugar. 


I stamped the sentiment and cut it out using a set of banner dies from Stamp Anniething. I adhered the sentiment and all the images onto the card front. Next I prepared a A2 card base using a light brown Kraft cardstock. I cut a mat in a darker Kraft cardstock and adhered all the layers together with liquid glue. I added a few sparkles with a white gel pen and the card was finished.


These stamps are so adorable and versatile. I can't wait to make Christmas cards with this set. Keep an eye out for it soon!  

Thank you for visiting and have a very creative week!


Tuesday, April 13, 2021

Rachelle Anne Miller Creative Studios: Bear's Wagon Ride

When was the last time you sent a card to your bestie just because she is an awesome friend? I know for me, I don't send them enough! I made this card with the perfect digital stamp from Rachelle Anne Miller called Bear's Wagon Ride. This stamp can be used for many different occasions, such a birthday, welcome baby, friendship, hello, and more!

Don't forget to enter our monthly challenge to win some digital stamps! 


I just love digital stamps. You can make them any size you want. I decided to make mine big enough for an A6 size (4-1/2"x6-1/4") card. This size makes it easier to color and to ink a background. First I printed the stamp and colored it with Copic markers. Colors are listed below.


Copic markers used:
Bear fur: E33, E53, E51, E50
Blue: B97, B95, B93, B91
Green: YG17, YG13, YG11
Yellow-orange: YR15, YR14, YR12, YR01
Red: RV34, RV11, RV00


After coloring the stamp, I printed another stamp using masking paper so that I could mask off the stamp to do some ink blending for the background. I used Distress Oxide Ink in Mowed Lawn for the grass. I used the Cloud Builder Stencil from Stamp Anniething and Tumbled Glass Distress Oxide Ink for the sky.

I matted the card front using light blue cardstock from my stash. Then I added a plaid mat underneath it. The plaid paper is from Stamp Anniething. I created the sentiment in MS-Word, printed, then trimmed it to size and adhered it to the card to complete the card.


This is such a fun stamp to color and the card is very easy to make. Thank you for stopping by and have a creative and colorful week!