Monday, June 28, 2021

Scrappy Boy Stamps: Climb Every Mountain Slimline Card

When Scrappy Boy Stamps (Sean) came out with three AMAZING stamp sets inspired by The Sound of Music in May, I knew I had to make a slimline card with the entire family. I had the stamps colored, but I waited for the outline dies to arrive so that I didn't have to fussy cut nine stamps! 

There are three sets: 1) Climb Every Mountain; 2) Can't Stop Singing; and 3) Fill My Heart. You can buy each set individually or all three sets in a bundle. Currently, if you buy the stamp bundle, you get $5 off! Coordinating outline dies are also available for those that hate to fussy cut and also get $5 off on the bundle! This link will take you to the Scrappy Boy Stamps store and you can check out all the other stamps that are available. 


The first thing I did was stamped all the images and colored them with Copic markers. Then I used the coordinating outline die to cut them out. Since the children are all wearing the same outfit, it was easy to color them. Skin colors are all the same, but I used two different hair color combinations. I also stamped the sentiment, trimmed it with my paper trimmer, and added a black cardstock mat.


Copic Markers Used

Children
Skin: E04, E11, E21, E00, E000
Clothes: W8, W6, W4, W2, Blender
Hair:  Child 1 (youngest), 4, 6, 7 - E39, YR24, YR23, YR20
Hair: Child 2, 3, 5 - E29, E37, E35, E34, E32

Father
Skin: E04, E11, E21, E00, E000
Hair: E49, E47, E44, E43
Suit: B39, B37, B34
Tie & Shoes: T7, T5, T2
White: T3, T1, Blender

Governess (Maria)
Skin: E04, E11, E21, E00, E000
Hair: E29, E37, E35, E34, E31
Dress & Shoes: E18, E15, E13, E11
Guitar: Y13, E55, E53, E51

To ensure that the entire family fit on this slimline card, I cut the card base at 8"W x 4"H. This size card fits into a standard size 10 envelope. I matted the card front with black cardstock.

I used watercolor paper for the card front and used Distress Oxides to create the sky, mountains, and grass. First, I stamped the mountains (comes in the stamp set) several times so it covers the width of the card. I masked off the snow caps, sky, and grass areas and used Distress Oxide in Faded Jeans to color the mountains. 

Next, I masked the mountains, then used the Cloud Stencil Builder from Stamp Anniething and Distress Oxide in Stormy Sky to create the clouds. 

Next, I masked the mountains and clouds and used Distress Oxides in Mowed Lawn and Lucky Clover to create the grass. I sprinkled some water, and blotted with a clean paper towel to create the white spots to add some texture. To finish, I used a Spectrum Noir Sparkle pen to add some glitter to the mountain tops. 


Next I arranged all the stamps onto the card front, staggering them so they would all fit. The stamps in the back are adhered using liquid glue and the ones in the front are adhered using double-sided foam tape. I also used foam tape for the sentiment. To finish, I adhered all the card front to the black cardstock mat then onto the card front. 


This is such a fabulous set of stamps. There are many more stamps in this set I have yet to use. A peek above shows the nun and poinsettia stamps that I will use in a future project. 

Thank you for stopping by today. Have a creative week! 

Friday, June 25, 2021

Stamp Anniething New Grab and Go Box: Level Up

Stamp Anniething has done it again! Another ridiculously amazing Grab and Go Box called Level Up, inspired by Nintendo's Super Mario Brothers! When my son was little, it was so fun playing Mario Brothers Cart with him. I was never good at any of the other Mario Brothers games, but driving I could do!

With this Grab and Go Box, you get six character stamps and a bunch of accessories stamps, all with coordinating outline dies. Plus, everything you need to make a bunch of cards: Patterned paper pad, card bases and envelopes, a brick stencil, a set of builder dies to make your scenes, shaker bits, charms, ribbon, glue, and double sided adhesive tape. Jam packed with so many goodies! I am sharing 5 of the 6 character stamps I used. The 6th stamp,which is Toadette, is being saved for a future project. 

Project #1: My first project is a slimline card using the new Interactive Slide Mechanism Die. Pull the tab and Mario joins Princess Peach! I also used the Brick Stencil, patterned paper from the paper pad, and many of the accessories stamps for this card.
Copic markers used:
Mario
Skin: E04, E11, E21, E00, E000
Cheeks: R20
Tongue: R22, R20
Hair: E49, E44, E42
Eyes: B97, BG02
Yellow: Y38, Y15
White: W5, W3, W1, W00
Blue: B06, B04, B02, B01
Red: R29, R35, R32, R21

Princess Peach
Skin: E04, E11, E21, E00, E000
Cheeks: R20
Lips: RV17, RV13
Eyes: B97, BG02
Earrings: B06, B04, B01
Light Pink: RV34, RV52, RV10, RV00
Dark Pink: RV17, RV14, RV13, T2 
Crown: Yellow: Y38, Y15, Y11;Red: R29, R32, R21;Blue: B06, B02
Gloves: T5, T3, T0, 0


Project #2: My favorite character is still and will always be Yoshi. This is an A6 size shaker card. I used patterned paper from the paper pad, the Brick Stencil, shaker bits, and many of the accessories stamps for this card.


Copic markers used for Yoshi
Skin: E25, E35, E33, E31
Hair: T9, T5, T3
Eyes: E15, E11
Tongue: R22, R20
Green: YG09, YG06, YG03
Red: R29, R32, R21
Brown: E99, E97, E95
White: W5, W3, W1, W00

Project 3: The character on this slimline card is inspired by Bowser, the arch-enemy of Mario. I incorporated many of the accessories stamps in this card.

Copic markers used:
Skin: E25, E35, E33, E31
Cheeks: R32, R20
Hair: T9, T5, T3
Eyes: E25, E34
Green: G28, G17, G05, G03
Bowser mask: Hair & Eyebrows - E08, R24, YR18, YR02
Horns & Snout: E55, E53, E51, E50
Shirt: E33, E31, E50
Shoes: E33, E31, E50

Project #4: The character on this card is Princess Rosalina. I used the Brick stencil and cut out a castle for the background. I also used a few of the accessories stamps.

Copic markers used:
Hair: E13, E34, E11, YR20
Skin: E04, E11, E21, E00, E000
Cheeks: R20
Tongue: R22, R20
Eyes: B97, BG02
Blue (Dress): BG05, BG02, BG01, BG000, B01, B0000, Blender
Yellow/Gold: E25, Y38, Y21
Silver: T3, T2, T0
Red: R35
Blue: BG05


If you want this new Level Up Grab and Go Box, get it today at Stamp Anniething  before they are sold out! Thank you stopping by and have a creative week!


Wednesday, June 23, 2021

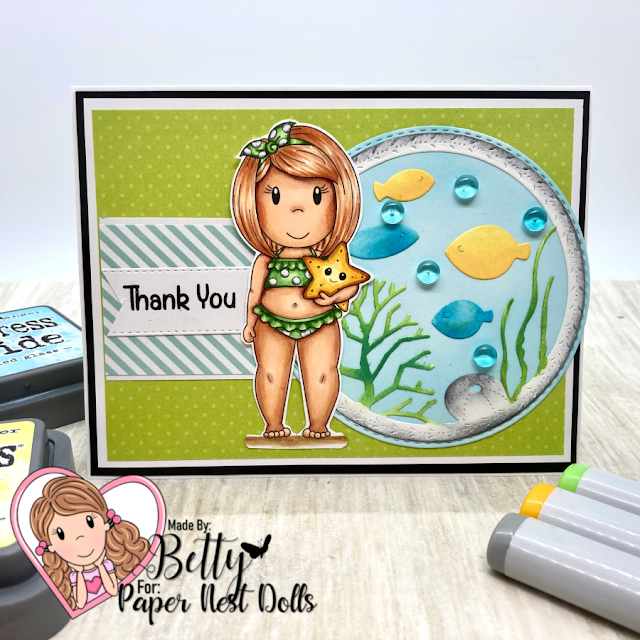
Paper Nest Dolls: Emma with Starfish - Thank You Card

Happy Summer! Today I am sharing my A2 size card with the cute stamp from Paper Nest Dolls called Emma with Starfish. I just love how cute she is and I wanted to add an underwater fish scene to go with her. I needed a Thank You card for a friend, but you can use any sentiment for this card. 

Emma with Starfish comes in red rubber and in digital formats.


I used the digital stamp. I printed it and colored this stamp with Copic markers. 


Copic markers used
Skin: E04, E11, E21, E00, E000
Hair: E97, E13, E11, E53, E50
Starfish: YR27, Y17, Y15, Y11
Green: YG17, YG13, YG11
White (Polka Dots): C5, C3, C00
Ground: E35, E33, E31


For the underwater fish scene, I used a die from Memory Box called Underwater Scene. I cut everything out of white cardstock and used Distress Oxides and Distress Inks to color them. 

Distress Oxides used: Tumbled Glass, Mermaid Lagoon, Wild Honey, Mowed Lawn, and Lucky Clover

Distress Ink used: Hickory Smoke


Thank you for visiting! Have a creative week!


Monday, June 21, 2021

Stamp Anniething: Masking and Swapping Heads!

Happy Summer Everyone! Today is the first day of summer here in the USA and in my part of the country, we have been going through a heat wave all week. I think the highest it got was 111 degrees. Yesterday was 100, and today we get back down to about 90. So it's another great day to stay indoors and make some cards! I made this A6 card with two different stamps where I swapped heads. I used the head of Mei Yin - Our Friendship is a Gift and the body of Eloise - Arigato


Supply list:
Happy Birthday sentiment from Stacey - Sign Board

There are several ways you can do the head swapping. The way I did it was I stamped each image, scanned it into my computer, and used my Silhouette Studio software to swap the heads. I call it digital masking! The reason I did it this way was because I needed to make the body of Eloise a little bit bigger to fit the head of Mei Yin so it was a bit better in proportion. However, it would have also been fine without increasing the size. I think it was just my OCD!

We do have a head-swapping guru on our Stamp Anniething Design Team, Timothy Thomas. He can show you another way to swap heads without using a computer and actually doing the art of masking. Join the Stamp Anniething Facebook Group and watch his video. Here is the link to the video: Timothy's Video

After I printed the head-swapped stamp, I colored it using Copic markers. I used a #5 white Gelly Roll pen and drew flowers on her kimono to match the flowers on the washi paper that's on the shoji screens. I fussy cut her out, leaving a thin white border.


Copic markers used:
Skin: E04, E11, E21, E00, E000
Cheeks: R20
Tongue: R22, R20
Hair: T9, B37, T5, B32
Purple: BV29, V28, V25, V22
Green: YG09, YG06, YG03

For the background, I used the new Asian Living Stencil Builders. I used all the stencils in the set except for the pagoda, which I will save for a future card. I used Distress Inks and Distress Oxide inks to stencil. I first started with the fence, then I stenciled the two shoji screens. Next, I cut out washi paper to fit, stenciled the lines on them, trimmed, and placed it over the shoji screens on the card. 

I then masked the screens and stenciled the bamboo leaves around them. Next, I masked off the screens and fence and inked in the ground. I used a blender brush and inked the sky, concentrating on the edges of the card, leaving a small halo effect around the image to make it pop. To finish the card, I stamped the sentiment and cut it with one of the banner dies and adhered it to the card. 


Thank you for stopping by and hope you give this head swapping technique a try. You can do this with many stamps. Have a creative week! 


Friday, June 18, 2021

Blank Page Muse Art Rubber Stamps: Birthday Balloons Card

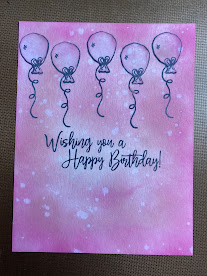
Blank Page Muse is known for their huge variety of red rubber stamps and now they are also adding photopolymer stamps for those who love clear stamps! Using one of their new clear stamps called Special Day Set Clear Sentiments Birthday Stamp Set designed by Pam Bray, I've made this beautiful birthday card that can be used for any age. This stamp set comes with stamps and sentiments to also make non-birthday cards. 


I wanted to have some fun playing with the balloons and making a fun distressed oxide inked background. Using some Arteza glitter pens, I was able to add some patterns to each balloon. 

Supplies:
  • Blank Page Muse: Special Day Set Clear Sentiments Birthday Stamp Set designed by Pam Bray
  • A2 top folding card base - white cardstock
  • Black cardstock for mat 5-7/8"W x 4-1/8"H
  • Watercolor paper for card front 5-1/4"W x 4"H
  • Masking tape/paper
  • Scrap cardstock, any color, 4”W x 2”H
  • Solvent black ink pad - I use Staz-On
  • Distress Oxide Ink - Victorian Velvet and Picked Raspberry
  • Blender brush
  • Watercolor pens & water brush OR any watercolors of choice
  • Glitter gel pens
  • Washi tape of choice to match your colors
Instructions:
  • Using the solvent black ink pad, stamp five balloons onto the watercolor paper. Then stamp the sentiment.

  • Place masking tape/paper over the scrap cardstock and stamp 5 balloons. Cut out the balloons and place the masks over the stamped balloons.

  • To ink blend the background, use a blender brush and start with the Distress Oxide Ink in Victorian Velvet. Then add the Picked Raspberry, leaving the area where the sentiment a little lighter than the rest of the card. Make sure the edges are the darkest areas. 


  • Using the tube from the water spray bottle, splatter water all over the oxide ink. Wait 15 seconds, then use a clean paper towel to dab off the excess water.
  • Remove masking from the balloons
  • Using watercolor pens or any watercolors, paint the balloons five different colors of choice. Let dry.


  • Using glitter gel pens, add designs onto the balloons, such as zig zig, squiggly, and straight lines. Use different colors to make them colorful. Also, use the glitter pen to color the balloon ribbons. 

  • To finish the card, add decorative patterned washi tape. Wrap the washi tape ends to the back of the card.

Such a fun card to make! It’s fun using different colors and decorating balloons. Thank you for stopping by. Have a creative week! 


Thursday, June 17, 2021

LGBTQIA+ Instagram Hop: You're a Superhero - Never Hide Your Pride

I am so excited to participate in my very first Instagram Hop! June is Pride month and the hop is all about celebrating Pride month and our LGBTQIA+ crafty friends and allies. Pride originated from the early morning of June 28th, 1969, when LGBT community members rioted following a police raid on the Stonewall Inn, a gay bar in Greenwich Village. The first parade was on the first anniversary of this riot. It's important to celebrate Pride today because there are still many rights and privileges not afforded to the LGBTQIA community. I celebrate LGBTQIA+ culture and support LGBTQIA+ rights.

I am sharing this card I made using three Stamp Anniething digital stamps: 1) Elle #Love Wins, 2) Justin #Love Wins, and 3) Siv #Love Wins. You can purchase these stamps and all proceeds will be donated to True Colors United. Their mission is: "True Colors United implements innovative solutions to youth homelessness that focus on the unique experiences of LGBTQ young people."


There are over 130 crafters participating in this hop. In order to make it easy for fans to support the crafters, we are divided into groups. The hop started on Saturday, June 12, at 7:00 AM PT/9:00 AM CT/11:00 AM ET and extends through June 17. June 16, Wednesday is my day for showcasing my card. 

Please support my fellow crafters by participating in the hop. We have prize give-aways!!

For a chance to win one of our many prizes please:
1. Leave a comment.
2. Tag your friends in separate comments for extra entries.
3. It would be great if you would give me a follow.
4. Follow our kind sponsors below.

Here is the list of prizes you can win! Please follow them on Instagram!
@jennifermcguireink $100 to SSS
@sassyandcrafty.co $100
@ginakdesigns 3 X $50
@christybeanscrafts 2 X $50 to store of choice
@bossyjosciecraftygoods $50
@cactuscollaborative $50 to SSS
@creativityactivist $50 to store of choice
@czdesign $50 to SSS
@doodlebugdesign $50 (US only)
@maker.forte $50
@mftstamps $50
@_studiokato_ $50 to Pinkfresh Studio
@honeybeestamps 2 X $25
@cardnouveau €25 (EU only)
@crafty_meraki $25
@erinleecreative $25
@heroarts $25
@inkon3 $25
@janesdoodles $25
@timeforteadesigns £25
@lucyabrams Jewels Fruit Salad package
@tim_holtz Box of stash from the studio (US only)
@jloucksdesigns Stampin Up Prize Pack


Thank you for the support and keep on hopping!!

Monday, June 14, 2021

Conie Fong Art & Design: Sophie and Puppy

It's been a long time since I've had a puppy. My last dog lived to be over 18 years old and passed away in 2019. I've decided to not get another dog for now as I am retired and have plans to do some traveling. This cute digital stamp from Conie Fong, called Sophie and Puppy, reminds me of my daughter when she was about 5 when she got her first puppy. This is the cutest stamp for any occasion. Just add your sentiment of choice. 


For this A2 card, I first printed the stamp and colored it with Copic markers. I then fussy cut her out.


Copic markers used:
Hair: E29, E25, E13
Skin: E04, E11, E21, E00, E000
Aqua: BG09, BG57, BG45, BG11
Orange: YR18, YR68, YR01
Yellow: YR24, Y17
White: C5, C3, C1, 0
Dog: E55, E53, E50, C3, C1


For the background, I used dies from Gina Marie Designs and patterned paper from Photoplay.  The hearts are cut from a die from Cuttlebug.


Thank you for stopping by and have a creative week! 


Friday, June 11, 2021

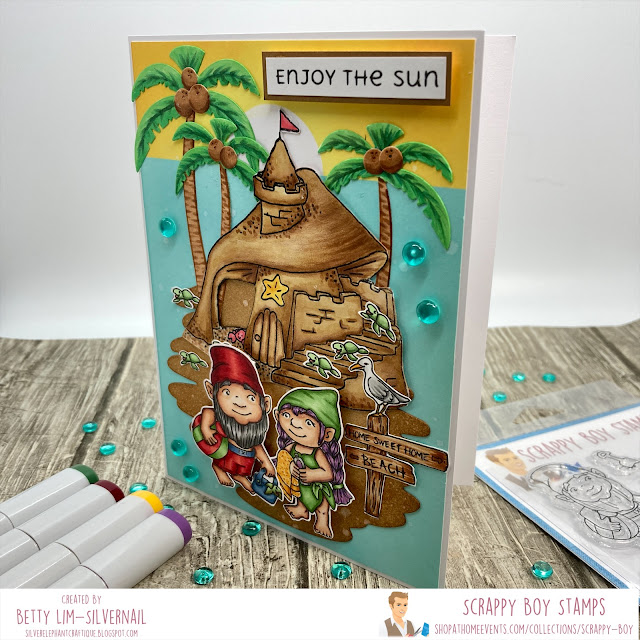
Scrappy Boy Stamps: Enjoy the Sun

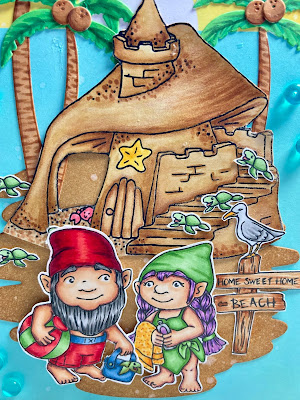
Scrappy Boy Stamps' June release, called Summer with my Gnomies, has the cutest summer gnome set with many stamps to create different beach and outdoor scenes. I love that this set can be used for any occasion by just changing the sentiment or you can keep it generic and use it as a note card.


To make this A6 size card, I first stamped the images and colored them with Copic markers. I fussy cut them since the dies were not available yet. They are available now in the store. I used the Palm Tree dies from Stamp Anniething to create the palm trees and used Copic markers to color them.


Copic markers used:
Male gnome
Hair: T7, T5, T3, T0
Skin: E04, E11, E21, E00, E000
Red: R59, R29, R35, R24, R22
Blue: B97, B95, B93

Female gnome
Hair: V17, V15, V13
Skin: E04, E11, E21, E00, E000
Green: YG17, YG13, YG11
Yellow: YR27, Y38, Y35, Y32

Mushroom Sand Castle: Distress inks Vintage Photo & Black Soot; plus Copics E35, E34, E33, E31
Pier: E39, E35, E51
Seagull: T3, T1, T0, Y38
Palm Trees: E37, E35, E34, G28, G17, G05, G14

To make the background, I masked off the sun area with masking tape and used a blender brush to apply the Distress inks in Salvage Patina and Tumbled Glass to make the water. I then removed the masking tape and inked the sky with Distress inks Squeezed Lemonade and Wild Honey . You can use the same piece of masking tape to mask the water so you don't apply the yellow ink on it.


I cut out the sand using the Squiggly Mat die from Stamp Anniething and inked it with Distress ink in Vintage Photo.

I glued all the stamps down with liquid glue except for the sentiment and the two gnomes. I used foam squares to pop up these stamps.


This is such a fun set of stamps to color. I love all the stamps and sentiments. You can make lots of cards with this set.  

Thank you for stopping by and have a creative week! 

Monday, June 7, 2021

Paper Nest Dolls: Koala Hugs!

Paper Nest Dolls doesn't just have doll stamps, but they also have animal stamps, such as elephants and koalas. For this card, I used the adorable digital stamp called Koala with Butterfly. You can get this stamp as part of a five piece set called Koalas in red rubber or individually in digital format. I used the digital format so that I can make the image the size I want. This stamp can be used for any occasion just by changing the sentiment.


To make this 6x6 card, I first printed this stamp and colored it using Copic markers. I used nesting dies to cut out the colored stamp and the patterned paper. I used coordinating patterned paper to use as a mat for the card base. I used a "hugs" die to use as the sentiment.  


Copic Markers Used

Gray: W8, W6, W5, W3, W2, W00
Green: YG67, YG63, YG25
Brown: E59, E57, E55
Red: R56, R29
Orange: YR09, YR04, YR02

This is such an adorable and fun stamp to color. It's an easy, clean and simple card that you can make in no time! I hope you give this a try! 


Thank you for visiting and have a very creative week! 


Friday, June 4, 2021

Stamp Anniething: Sneak Peek Day 3 - Sliding By to Say Hi!

Welcome to Day 3 and the final day of Stamp Anniething's Sneak Peeks! In keeping with this month's theme, "Playground," today's card features the stamp called "Trio of Kids - Sliding By to Say Hi!" This is a large stamp, perfect for slimline cards, but they will also fit on an A2 size card. So fun to color and if you are into masking, you can mask off any of the kids for a one or two kid card or even add more kids to the slide.


Stamp Anniething supplies used for this card:
To make this card, I first stamped the image then colored it with Copic markers. I then cut it out using the coordinating outline die.


Copic markers used:
Girl
Skin: E04, E11, E21, E00, E000
Cheeks: R20
Tongue: R22, R20
Hair: E57, E35, E53, E50
Pink: RV66, RV55, RV02
Green: YG09, YG06, YG03
Shoes: T3, T1, T0

Boy #1
Skin: E25, E35, E33, E31
Cheeks: R21, R20
Tongue: R22, R20
Hair: T9, T7, T5, T3, T1
Aqua: BG18, BG13, BG11
Red: R29

Boy #2
Skin: E70, E11, E00, E50
Cheeks: R20
Tongue: R22, R20
Hair: E18, E08, YR18, YR14
Blue: B97, B95, B93
Shoe: T3, T1, T0

Slide: Y17, Y13, Y15, Y11 

After coloring the slide, I applied embossed it with clear embossing powder to make it look shiny like plastic. 


I cut the Rectangles Slim Line die out of cardstock from Photoplay and used a sheet of patterned paper from the Party Time Paper Pack to put behind the rectangles die cut. I cut out all the word dies using pink cardstock from Photoplay and the coordinating outline with white cardstock. I stamped the sentiment on white cardstock then cut it out using a paper trimmer, along with a pink cardstock mat. I adhered everything with liquid glue. To finish the card, I adhered a few Jelly Dots. 

I hope you love this month's new releases as much as I do! I had so much fun coloring and creating all the projects this month. All products are now available in the store. Thanks for stopping by and have a creative week!


Thursday, June 3, 2021

Stamp Anniething: Sneak Peek Day 2 - You Raise Me Up When I am Down

Welcome to Day 2 of Stamp Anniething's Sneak Peeks where the theme this month is "Playground!" Today's card features the stamp called "Rebecca & Justin - You Raise Me Up." It's the cutest stamp with Rebecca and Justin riding on a seesaw/teeter totter. The teeter totter can move up and down! This makes for a very fun card or you can put it on a scrapbook page, treat box, gift bag, and more.
***Links to all the new release products will be available on Friday, June 4.

Stamp Anniething supplies used for this card:
To make this card, I first stamped Rebecca and Justin on white cardstock, colored it with Copic markers, then used the coordinating outline dies to cut them out. I then used an embossing ink pen and clear embossing powder on the teeter totter to make it look shiny like metal.


Copic markers used:
Rebecca
Skin: E70. E11, E53, E50
Cheeks: R20, R30
Tongue: R22, R20
Hair: E49, E47, E43, E42
Shirt: B18, BG13, BG23, BG11
Shoes and Shorts: R56, R29, R35, R22

Justin
Skin: E04, E11, E21, E00, E000
Cheeks: R20, R30
Tongue: R22, R20
Blue: B99, B97, B95, B93
Red: R56, R29, R35, R22, R21

Teeter Totter: Y17, Y35, Y13

To make the background, I used the Octagon Diamond Stencil and embossed a 6"x 6" piece of kraft cardstock with the Aztec embossing powder. I used the Squiggle Mat die to cut out the backdrop and made it look like sand by coloring it with Distress Ink in Vintage Photo. I used Gina Marie dies to cut out the sun, clouds, and fence. I inked the edges using Distress inks in Squeezed Lemonade and Wild Honey (sun) and Tumbled Glass (clouds). I stamped and cut the sentiment using the Banner dies. I adhered everything down with liquid glue, except for Rebecca and Justin, where I used double sided foam tape. To finish the card, I added a few Jelly Dots in Champagne. 

Thank you for stopping by and please come back tomorrow to see what we have for Sneak Peek Day 3! You are going to love it! Have a creative day!


Wednesday, June 2, 2021

Stamp Anniething: Sneak Peek Day 1 - Fun & Cute Treat Boxes

It's sneak peek week at Stamp Anniething! Today I am sharing a sneak peek of several items that will be released this Friday. This month's theme is "playground" and this set of stamps, dies, and stencil is so fun to play with! I am using the new Treat Box die that is easy to put together and decorate and can be used for any occasion. I made two treat boxes using the adorable stamp called "Michelle - You Bring Me Joy." One I colored with Copic markers and the other one with Spectrum Noir markers.


Left: Copics    Right: Spectrum Noir


***Links to all the new release products will be available on Friday, June 4.

Stamp Anniething supplies used for this card:

The Treat Box die comes with all the dies to make this treat box, including the front and side panels that you can use to decorate your box. For one of the boxes, I cut out patterned paper from the Party Time paper pack. The other box, I used the Octagon Diamond Stencil and embossed it with the Aztec embossing powder. 

You Bring Me Joy Treat Box details:

For this card, I stamped Michelle on white cardstock and colored it with Copic markers. I drew the horse bridle with a Copic Multi-liner. I used a white gel pen to add highlights to her eyes.I then used the coordinating outline die to cut her out.


Copic markers used:
Hair: 100, W8, W6, W4
Skin: RV34, E11, E21, E00, E000
Cheeks: R20
Tongue: R22, R20
Green: YG17, YG25, YG11
Blue: B97, B95, B93
Pink: RV17, RV14, RV13
Purple: V17, V15, V12

I cut out the base Treat Box using pink cardstock from my stash. Then I cut out the decorated panels using patterned paper from the Party Time Paper Pack. I used the circle frame die from Shaker Basics Set 1 and cut a circle using blue glitter paper. I cut out the word "joy" using the pink cardstock and the outline die using pink diagonal striped cardstock from Photo Play. I used a heart die from Cricut to cut a couple of hearts. I stamped and cut out the sentiment using one of the Banner Dies. After adhering all the pieces to the treat box, I added a couple of heart shaped and one round shaped jelly dots. You can fill the box with your favorite candies. I filled mine with starlight mints.

Happy Birthday Treat Box details:

For this card, I stamped Michelle on white cardstock and colored her with Spectrum Noir Tri-Blends and Illustrators. I drew the horse bridle with a Copic Multi-liner. I used a white gel pen to add highlights to her eyes. I then used the coordinating outline die to cut her out.


Spectrum Noir markers used:
Hair: Bold Brown Blend (Tri-blend)
Skin: Fair Skin Blend (Tri-blend)
Shirt: Green Turquoise Blend (Tri-blend)
Shorts & Horse (Blue): True Blue Blend (Tri-blend) and TB5 (Illustrator)
Silver: BGR4, BGR3, BGR1 (Illustrator)

I cut out the treat box base using black cardstock. I used the Octagon Diamond Stencil and embossed a 6"x6" piece of white cardstock with the Aztec embossing powder. Then I used the treat box die to cut out the pieces to decorate the box. I stamped and cut out the sentiment using one of the Banner Dies. I adhered all the pieces on the box with liquid glue. I put candy in a cellophane bag, tied it with a ribbon and placed it into the treat box. 

Thank you for visiting today and please come back tomorrow for Day 2 of Sneak Peeks! Have a creative day!