Sunday, February 27, 2022

Scrappy Boy Stamps: We're a Super Team

I hope you enjoyed this month's new release of Scrappy Boy Stamps superheroes stamps. I just love how fun and easy it is to make bright and beautiful cards with these stamps and papers. If you need to build your stash of cards, it's best to get the bundle to make it easier to make your cards. 


Today's fun-fold peek-a-boo card features a girl superhero from the You're My Hero set on the front of the card and a boy superhero from the Super Team set on the inside. I got this fun-fold idea from Creative Treehouse and you can watch their video on YouTube for the template. The only thing I did differently was I used a different punch on the inside since I did not have the one she had.

I first colored the stamps, colored them with Copic markers, then cut them out with the coordinating dies. I also stamped the sentiment "We're a Super Team" and added a black cardstock mat. 


Copic Markers Used:
Girl Superhero:
Skin: E04, E11, E21, E00, E000
Cheeks: R21
Mouth: R22
Hair: E18, E08, YR18, YR14
Gold: E23, Y38, Y17
Blue: B28, B24, B21
Brown (rope): E39, E35, E31

Boy Superhero:
Skin: E04, E11, E21, E00, E000
Cheek: R21
Mouth: R22
Hair: T9, T7, T5, T3
Blue: B99, B97, B95, B93
Red: R39, R37, R35, R32
Yellow: YR23, Y17, Y15

I used papers from the Superheroes paper pack for this card. The card base is black cardstock. I adhered all the pieces together with liquid glue, except for the girl superhero where I used double-sided adhesive foam tape.


Thank you for stopping by! I hope you have a very creative day! 

Scrappy Boy Stamps: Have a Super Birthday

I never have enough masculine birthday cards in my stash when I need them, so I was so elated when Scrappy Boy Stamps released the superheroes stamp sets (Super Team and You're My Hero), coordinated dies, stencils (6x6 Halftone Dot and Slimline Comic Builder Stencil Set), and papers (Superheroes 6x6 and 4x9)! It take very little time to make this slimline card using the beautiful patterned papers and cute stamps. 


I first stamped the image, the Splat! sentiment, and the Boom! sentiment, and colored them with Copic markers. I then cut them out using the coordinating outline dies. 

Copic Markers Used:
Hair: E49, E47, E35, E31
Skin: E13, E11, E21, E00, E000
Cheeks: R20
Mouth: R22
Red: R39, R29, R24, R22
Blue: B39, B37, B34
Yellow: YR23, Y35


I used the largest of the Wonky Stitched Slimline Dies to cut out the patterned papers for the card front. These nesting dies will debut at the Stamp and Scrapbook Expo in Pleasanton, California on March 4, 2022. I used the largest one on the back and a medium one to cut out the city scene. For the city scene, I matted the papers with black and white cardstock. I adhered all the layers with liquid glue. I used double-sided foam tape to adhere the superhero and the two large sentiments. 


To finish the card, I stamped the Have a Super Birthday sentiment added a black mat and adhered it to the card with liquid glue. 

Thank you for visiting today! Have a creative day! 


Saturday, February 26, 2022

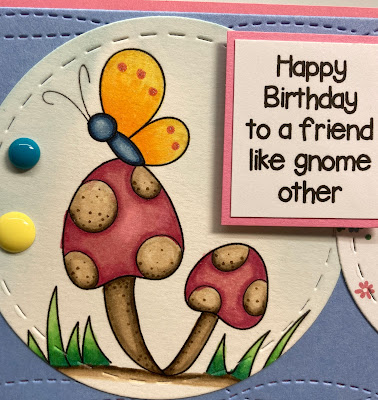
Paper Nest Dolls: Happy Birthday to a Friend Like Gnome Other

Hello Friends! Today I'm sharing a slimline card featuring stamps from Paper Nest Dolls called the Gnome Set. This set includes 4 gnomes, a gnome house, and 5 stamps to build a scene. Such a fun set for making some fun projects. I made this slimline birthday card using two of the gnomes and the mushroom-butterfly stamp.


First I printed the digital stamps 3" tall. I colored them with Copic markers then fussy cut the gnomes and used a 3" stitched circle die to cut the mushroom-butterfly.


Copic markers used:
Girl Gnome:
Skin: E04, E11, E21, E00, E000
Hair: E39, YR24, YR23, YR20
Blue: B97, B95, B93, B91
Pink: RV34, RV32, RV00
Green: G16, G14, YG11
Yellow: Y38, Y17, Y15
Brown: E44, E43, E42, E41


Boy Gnome:
Skin: E04, E11, E21, E00, E000
Hair: T9, T5, T3
Yellow: Y38, Y17, Y15, Y13
Blue: B97, B95, B93, B91
Green: G16, G14, YG11
Silver: C5, C3, C1
Brown: E44, E43, E42, E41


Mushrooms:
Brown: E44, E43, E42, E41
Pink: RV34, RV32, RV00
Green: G16, G14, YG11
Yellow: Y38, Y17, Y15, Y13
Blue: B97, B95, B93, B91

I used a 2-1/2" stitched circle die to cut the patterned paper. The paper is from Photoplay. I used an 8" x 3-1/8" wacky slimline stitched die to cut the card front and mounted it onto pink cardstock with an 1/8" border then mounted this onto a slimline card base of white cardstock. 

I created the sentiment on my computer using MS-Publisher, printed, and trimmed it then added a pink mat. I adhered the circles using liquid glue then adhered the two gnomes using double-sided adhesive foam tape. 


Thank you for stopping by today! These cute stamps are fun and easy to color. Perfect cards, scrapbooks, gift tags, treat boxes, and more! Hope you give it a try. 

Have a wonderful day! 


Friday, February 25, 2022

Stamp Anniething: Family is Everything!

Stamp Anniething has done it again! They have released an amazing stamp set (bundle) called Family is Everything! which was inspired by my favorite family from Columbia. A total of six adorable character stamps, the magic door, some flowers, mice, a fabulous paper pack designed by Annie of Stamp Anniething, a stencil, and sentiments in both English and Spanish! 


This was a pre-order bundle and is currently sold out, but if you’d like to be notified when more are in stock, use the email feature.


This was a pre-order bundle, so for the design team, we were given the digital stamps and papers only; therefore I don't have any cards made with the stencil. The stencil will be used in a future card! Listed below are the markers and colors I used to make each card. 

Card 1: You Are Amazing
Copic Markers Used:
Skin: E17, E13, E11, E21, E00
Cheeks: R20
Mouth: R22, R20
Hair: T9, T7, T5, T3
Pink: RV66, RV55, RV52
Gold: E23, Y38, YR21
Black: T7, T5, T3
Door: E18, E19, E15, E13, E11
Side panels: YR23, Y19, Y15

Additional products used: 
Quilted Elegance Stencil
Chipboard (for the floor)
Jelly dots

Card 2: Nothing is Stronger than Family
Spectrum Noir Illustrators Used:
Skin: EB4, EB1, RB2, RB1, FS8
Cheeks and Tongue: PP4, PP2
Hair: Black, EB7, EB4, EB2
Purple: LV3, LV2, LV1
Pink: PP6, PP5, PP4
White: IG6, IG2, Blender

Additional products used:
Shaker Basics Set 1 (circle die)
Annie's Alphabet

Card 3: Happy Birthday (Girl with Glasses)
Copic Markers Used:
Skin: E15, E13, E11, E21
Tongue: R22, R20
Cheeks: RV11
Hair: E49, E47, E44, E43
Glasses: YG09, YG06, YG03
Skirt: B05, B04, B01, B00 (Layer 1); B16, B14, B12 (Layer 2): B26, B24, B23, B21 (Layer 3)
White: C5, C3, C00
Gray: C7, C5, C3

Additional products used:
Card mat dies
Jelly dots

Card 4: I Think You Are Perfect (Man)
Copic Markers Used:
Skin: E09, E15, E97, E02, E01
Cheeks: R22
Tongue: R22, R20
Hair: E49, E47, E44, E43, E41
Green: G99, G94, G82, G40
Brown: E59, E57, E55
Mice: E44, E43, E41

Additional products used:
Card mat dies
Geo Triangles Stencil
Shaker Basics Set 1 (Circle die)


Card 5: I Think You Are Perfect (Girl)
Skin: E15, E13, E11, E21
Cheeks: RV11
Tongue: R22, R20
Hair: E29, E27, E25, E23, E21
Purple: V15, V12, V01
Black: C7, C5, C3

Additional products used:
Card mat dies
Jelly dots

Card 6: Happy Birthday (Girl with hair bow)
Spectrum Noir Markers Used:
Skin: EB7, EB4, EB2, EB1, TN3
Cheeks: PP5
Tongue: PP4, PP2
Hair: Black, IG9, IG6, BG4, BG2
Red: DR5, DR3, DR1
Yellow/Gold: GY3, GY2, LY1

Additional products used:
Card mat dies
Banner die
Jelly dots

Thank you for stopping by! Hope you enjoyed this new release. So fun to make cards and other projects with this bundle. Have a creative day! 
Monday, February 21, 2022

Stamp Anniething: I Love the 80's

Today is my design team day at Stamp Anniething and I get to use a prior release stamp for my project. One of my favorite stamp sets is the Back to the 80's Grab and Go BoxA Grab and Go Box comes with all the things you need to make cards.  Please check out my prior blog post on this Grab and Go Box. I love the music from the 80's. Some of my favorite musicians and bands are Michael Jackson, Prince, Madonna, Hall and Oates, Duran Duran, Bruce Springsteen, Van Halen...I can go on forever! Many albums on cassette tapes and vinyl. Oh...the good times! 


Today's A2 card features a stamp that was inspired by the 80's movie, The Breakfast Club. After stamping this image, I added an 80's design to her dress using a Copic marker friendly pen. I then colored the image using Copic markers.


Copic markers used:
Girl:
Skin: E13, E11, E21, E00, E000
Cheeks: R20
Tongue: R22, R20
Hair: E49, E47, E44, E43, E41
Blue-green: BG49, BG45, BG12, BG11
Pink: RV14
Yellow: Y17
Blue-green: BG49
White: T5, T3, T1

I love the 80's sentiment: RV17, RV14, RV13


Next, I cut out all the pieces of the cassette tape using the Cassette Tape Builder Die. I used patterned paper to create a label for the cassette (this does not come with the builder die). I then stamped the sentiment and trimmed it to fit the cassette tape. 

I used the designer paper pack from the Grab and Go box to mat my card.  I added a strip in the middle and matted it with black cardstock. 

All pieces are adhered with the glue tube, except for the girl, where she is popped up using the foam squares. 


Thank you for stopping by and hope you enjoyed this Back to the 80's card! Have a wonderful day! 


Saturday, February 19, 2022

Scrappy Boy Stamps: You're My Superhero

I am so loving these superheroes stamps, stencils, and papers from Scrappy Boy Stamps! So fun and easy to make cards, scrapbook pages, treat boxes, and more with this entire set of coordinated products! I couldn't resist making a shaker card using the adorable cyborg superhero from the You're My Hero set and the masked superhero from the Super Team set; the Halftone Dot Stencil; and the Superheroes patterned paper. 


I first stamped the images and colored them with Copic markers. I then cut it out with the coordinating outline die.

Copic Markers Used:
Cyborg Superhero:
Skin: E37, E35, E33, E31
Cheeks: RV34
Mouth: R22
Gray: T5, T3, T2, T1
Blue: B06, B04, B02, B01
Red: R37, R35, R32


Masked Superhero:
Skin: E37, E35, E33, E31
Cheeks: RV34
Mouth: R22
Hair: E49, E47, E44, E43
Blue: B06, B04, B02, B01
Red: R39, R37, R35, R32
Orange: YR18, YR14


To make the shaker, I used the two of the nesting A2 Stitched Scalloped Edge Dies to create the frames for the shaker. I used the Superheroes paper for the backing. These nesting dies will debut at the Stamp and Scrapbook Expo in Pleasanton, California on March 4, 2022.

I used the Halftone Dot stencil and Crafters Workshop Stencil Butter to create the beautiful shiny card front.  Again, I used the nesting A2 Stitched Scalloped Edge Dies to cut out the card front and then used a larger one to cut out a black cardstock mat. I used the Stitched Scalloped Edge Die that I used to create the shake to cut the hole for the shaker so that I can inlay the shaker to make the card front flat. I used several layers of double-sided adhesive foam tape behind the card front to build up the card. 


I stamped the sentiment "You're My Superhero" on black cardstock using Versamark Watermark stamp pad then heat embossed it using white embossing powder. I used a scalloped oval punch from Stampin' Up to cut it out. I adhered the superheroes and sentiments using double-sided adhesive foam tape and the card was finished. 


Thank you for visiting today and I hope you love these superheroes stamp set as much as I do! Have a creative day! 


Conie Fong Art & Design: Tricycle Gnome Happy Birthday Card

It's beginning to feel like Spring here in Northern California with daytime temperatures reaching 70! Now I'm in the mood to use Spring colors for my cards, just like today's card using the adorable digital stamp called Tricycle Gnome by Conie Fong Art & Design. This stamp set comes in PNG (transparent background) and JPG (white background) formats that include 4 gnomes holding various balloons, 2 balloons, and 5 sentiments! I used the gnome holding one round balloon to make this A2 birthday card for a friend. 


I first printed this digital stamp and the Happy Birthday sentiment and colored the stamp with Copic markers, then fussy cut it out. 

Copic Markers Used:
Skin: E11, E21, E00
Cheeks: R20
Beard: T5, T3, T1
Purple: BV13, BV11, BV000
Green: YG07, YG05, YG11
Blue: B24, B23, B21
Orange: YR16, YR15, YR21
Brown: E37, E35, E33, E31
Gray/Silver: C5, C3, C1


I used a stitched circle die to cut a large circle. I masked the bottom where the grass is with washi tape and ink blended the top using a cloud stencil and Distress Oxide ink in Tumbled Glass. I then masked the top and the area where the sidewalk are and ink blended in the grass using Distress Oxide in Mowed Lawn. I then colored the sidewalk using Copic markers W2 and W0. I adhered the Tricycle Gnome making sure the the wheels were on the sidewalk. 


I layered the card with purple cardstock and patterned paper from Stamp Anniething. I adhered the circle onto the card with double-sided adhesive foam tape. I trimmed and matted the sentiment and adhered it to the card with double-sided adhesive foam tape. To finish the card, I added a few enamel dots from Gina Marie Designs. 


A cute stamp to color and a fun card to make! I hope you give this one a try! Thank you for stopping by and have a creative day! 


Wednesday, February 16, 2022

Scrappy Boy Stamps Sneak Peek: Superheroes!

We all have our favorite superheroes. Why is that we love them? By definition, a superhero is typically a character that possesses superhuman or supernatural powers and is dedicated to fighting evil. Children can learn the importance of teamwork and respect each other's different abilities and opinions. Some of my favorites are Batman, Superman, and Wonder Woman so I was so happy to see Scrappy Boy Stamps come out with two superheroes stamp sets (Super Team and You're My Hero), coordinating outline dies, two stencils (6x6 Halftone Dot and Slimline Comic Builder Stencil Set), and paper packs (Superheroes 6x6 and 4x9). This new release will be available in the new Scrappy Boy Stamps web store on Friday, February 18, 2022. 


I used stamps from both stamp sets to make this slimline card. These two stamps sets each have four superhero images and tons of sentiments that you can mix and match to make that personalized card! 

For this card, I first stamped all the images, colored them with Copic markers, then cut them out using the coordinated outline dies.

Copic Markers Used:
Superhero #1:
Skin: E13, E11, E21, E00, E000
Cheeks: R21, R20
Mouth: R22
Hair: E37, E35, E33, E31
Orange: YR18, YR16, YR14
Yellow: YR23, YR21, YR20

Superhero #2:
Skin: E13, E11, E21, E00, E000
Cheeks: R21, R20
Mouth: R22
Yellow: YR23, Y17, Y15
Red: R39, R37, R35, R32
Orange: YR18, YR16, YR14

Superhero #3
Skin: E37, E35, E33, E31
Cheeks: R21, R20
Mouth: R22
Gray: C5. C3, C1
Black: C9, C7, C5, C3
Blue: B39, B37, B34


To create the background, I used the Slimline Comic Builder Stencil and traced the lines onto the different patterned papers then used my paper trimmer to cut the papers. I then pieced them together and adhered them to black cardstock. To create a nice clean border, I used the largest of the Wonky Stitched Slimline Dies. These nesting dies will debut at the Stamp and Scrapbook Expo in Pleasanton, California on March 4, 2022. 


I then ink blended cardstock using Distress Oxide Inks in Carved Pumpkin and Lucky Clover on white cardstock using two of the speech balloons from the Slimline Comic Builder Stencil then stamped one with the sentiment Zonk! and the other Boom! I then fussy cut them out leaving a white border. I adhered these sentiments to the card with liquid glue.

I stamped the sentiment "Even Superheroes Have Bad Days" on white cardstock then matted it with black cardstock. I adhered it to the card using double-sided foam tape, along with the three superheroes. 


As mentioned above, this new release will be available in the new Scrappy Boy Stamps web store on Friday, February 18.  Thank you for stopping by! Have a creative day! 


Friday, February 11, 2022

Conie Fong Art & Design: You Are So Special

I never have enough cards in my stash that just tells the person how special she is to me. I thought this was the perfect stamp for a You Are So Special card. This beautiful digital stamp is from Conie Fong Art & Design and it's called Feeling Fabulous. It's one of those stamps that you can use for any occasion by just changing the sentiment.


For this top-folding A2 size card, I printed the digital stamp at 3 inches tall and colored it with Copic markers. I also printed this sentiment that is from the Tricycle Gnome and Sentiment Bundle.


Copic markers used:
Hair: E18, E08, YR18, YR14
Skin: E13, E11, E21, E00, E000
Cheeks: R20
Lips: R22, R20
Eyes: B02, B00
Blue-green: BG13, BG11, BG10
Orange: R14, R02, R12


The patterned papers are from Echo Park and Photo Play. The postage stamp die is from Gina Marie Designs and the butterfly die is from Crafters Companion. 


This is a fast, fun, and easy card to make so I hope you give it a try! Thank you for visiting today and have a wonderful and creative day!


Wednesday, February 9, 2022

Paper Nest Dolls: Love Potion Amara | Happy Valentine's Day

It's not too late to make a few Valentine's cards! I made this card using a digital stamp called Love Potion Amara from the Love Potion stamp set from Paper Nest Dolls. So cute and simple to print and color! Add this to digital printable papers and you can make this card in no time! 


I first printed the image at 3-3/4" tall and colored it with Copic markers. I then used an oval stitched die to cut it out. I used Distress Ink in Black Soot to ink the edges.


Copic Markers Used:
Skin: E13, E11, E21, E00, E000
Cheeks: R20
Hair: E39, YR24, YR23, YR20
White: C5, C3, C1, 0
Blue Green: BG13, BG11, BG10
Pink: RV14, RV13, RV11
Blue (glass): B01, BG000
Goggles (glass): B00

I used free digital pattered paper that I found on Freepik. It was Designed by macrovector / Freepik. I imported the image to Microsoft Publisher and added the Happy Valentine's Day sentiment. I printed it 6" x 6" then trimmed it down to 5.5" x 5.5" I added a black cardstock mat behind it, leaving an 1/8" border. Then I placed it on the 6" x 6" card base. 


I added a strip of black cardstock at the bottom of the card where I used an older Martha Stewart border punch to create the edge. I adhered Love Potion Amara onto the card using double-sided adhesive foam tape. To finish the card, I added a few enamel dots. 


Thank you for stopping by. I hope you give this a try! Have a wonderful and creative day. 


Sunday, February 6, 2022

Scrappy Boy Stamps: Future Family - You're Out of This World | Happy Birthday

I am sharing a card using the Future Family stamp set from Scrappy Boy Stamps. I had a family member request a birthday card using the adorable images from this set and to make sure I included "the boss." This set was released in August 2021 and is one of my favorites from Scrappy Boy Stamps! 


I first colored all the images with Copic markers, then I cut it out using the coordinated outline dies. I also stamped the sentiments at this time.


Copic markers used:

Father
Skin: E13, E11, E21, E00, E000
Hair: E18, E08, R24, R22
White (Shirt): W5, W3, W1, W00
Turquoise (Pants): BG07, BG05, BG01

Mother
Skin: E15, E13, E11, E21, E01, E000
Hair: E18, E08, YR18, YR14
Red: RV66, RV55, RV52
Purple: V95, V93, V91
White: W3, W1, W0

Robot
Aqua: BG06, BG04, BG01, BG000
Blue: BG24, BG23, BG21
Black: T9, T7, T5, T3
White: T5, T3, T0, 0
Red: R29, R22

The Boss
Skin: E13, E11, E21, E00, E000
Turquoise: BG07, BG05, BG01
Green: G09, G05, G02
Black: T7, T5, T3

I created the galaxy background by ink blending the following Distress Inks on watercolor paper: Squeezed Lemonade, Worn Lipstick, Seedless Preserves, Peacock Feathers, Blueprint Sketch, Chipped Sapphire, and Black Soot. I then used water to splatter some "stars." Then I used a white gel pen to create more darker stars. I masked off the top and bottom of the paper since I only wanted the galaxy in center of my card. 


I used a die from Gina Marie Designs and cut out some geometric shapes from glitter cardstock I got from Jo-Anns. I used the same glitter paper to mat the card and the sentiment. 

I adhered all the images using double-sided adhesive foam tape. To finish the card, I added a few rhinestones I had in my stash.


Such a fun and cute card to make. I hope you give it a try! Thank you for stopping by and have a creative day! 

Friday, February 4, 2022

Stamp Anniething Sneak Peek Day 3: Kevin - You're My Pot of Gold

Welcome to Day 3 of Stamp Anniething's sneak peeks where the theme is Spring Surprise! Today's card features the handsome Kevin - You're My Pot of Gold stamp, it's coordinating die, Lucky word die, and Woven Dots stencil. What a perfect set for St. Patrick's Day, birthday, graduation and more! 


Additional products used:

For this A6 card, I first stamped the image and colored it with Copic Markers. I used a white gel pen to add some shine to the coins. Then I cut it out using the coordinated outline die. 


Copic Markers Used:
Skin: E13, E11, E21, E00, E000
Cheeks: R21
Tongue: R22, R20
Hair: E57, E55, E53, E51
Gold: E23, Y38, YR21
Green: G28, G16, G14, YG03
Gray: C7, C5, C3, C1

I then created the stenciled background using the new Woven Dots Stencil and The Crafter's Workshop Lime Green Stencil Butter. You all know how I love my stencil butter!! I let this completely dry for a couple of hours. 


I cut out an A6 sized card front out of gold colored paper then used papers from the Luck of the Irish paper pad to create a mat about 1/8" smaller on each edge. 
I used the Stamp Anniething large scalloped card mat die and then the smaller rectangular die to cut out a white frame out of white cardstock. I trimmed the stenciled piece to fit behind this frame. I also cut out a gold strip and the four leaf clover paper to add to the front of the stenciled piece. I adhered all these layers down with Stamp Anniething glue.


Next, I die cut the Lucky word die. The outline part of the word die is cut using gold colored paper and the word lucky is cut out of the matching paper used earlier for the card mat. I adhered this to the card using double-sided adhesive foam tape.

Lastly, I stamped the sentiment trimmed it with a paper trimmer then matted it with gold paper. I adhered it to the card using double-sided adhesive foam tape.


Thank you for stopping by today! All products are now available in the Stamp Anniething store.  Have a wonderful and creative day!